Snow Sports Merit Badge — Complete Digital Resource Guide
https://merit-badge.university/merit-badges/snow-sports/guide/
Introduction & Overview
Snow-covered slopes, frosted trails, silent forests — snow sports put you in some of the most beautiful places on Earth. Whether you love the rush of flying downhill on skis, the quiet rhythm of cross-country touring, the freedom of a snowboard, or the simple pleasure of strapping on snowshoes and hiking where no trail exists, this badge gives you the skills and knowledge to enjoy winter safely.
The Snow Sports merit badge covers four different activities. You only need to master one of them in depth — but along the way every Scout will learn the safety codes, first aid, and outdoor ethics that apply to all snow sports.
Then and Now
Then
People have been traveling on skis for thousands of years. Rock carvings in Norway dating back more than 5,000 years show hunters on skis pursuing reindeer. In medieval Scandinavia, skis were tools of survival — the fastest way to move through deep winter snow for hunting, war, and communication.
Snowshoeing has an equally ancient history in North America. Indigenous peoples across the continent developed many different snowshoe designs — each suited to their local terrain and snow — long before European contact.
Competitive skiing began in the mid-1800s in mining camps in California and the Norwegian mountains. By the early 1900s, Alpine skiing had become a sport, and by 1936 it was an Olympic event. Snowboarding grew out of the surf and skateboard culture of the 1960s and 1970s, reaching the Winter Olympics in 1998.
Now
Today, more than ten million Americans ski or snowboard each season. Cross-country skiing and snowshoeing have surged in popularity as more people discover how accessible and affordable they are — all you need is snow and a pair of legs.
Modern equipment has transformed the sports. Shaped skis make turning easier. Snowboard technology advances every year. Avalanche beacons, airbag packs, and better forecasting have made backcountry travel safer. And universal trail-marking systems and mountain safety codes mean that everyone — from beginner to expert — can share the mountain respectfully.
Get Ready! This guide walks you through every requirement step by step. Safety comes first — Requirements 1 through 6 lay the foundation that every snow sport participant needs before heading to the mountain. Then Requirement 7 is yours to choose.
Kinds of Snow Sports
Snow sports cover a wide range of activities. Here is a quick look at what this badge includes:
Downhill (Alpine) Skiing — Option A
Alpine skiing is what most people picture when they think of skiing: riding a chairlift to the top of a mountain and skiing down groomed trails or through powder. Modern shaped skis carve turns with much less effort than the straight planks of a generation ago.
Cross-Country (Nordic) Skiing — Option B
Nordic skiing uses skis with a free heel — your heel lifts off the ski with each stride, which is what makes propulsion possible. Classic Nordic skiing glides along groomed tracks. Skate skiing looks like ice skating on skis. Touring takes you off marked trails into the backcountry.
Snowboarding — Option C
Snowboarding straps both feet to a single board and uses edge angles to carve turns and control speed. Terrain parks, halfpipes, and open groomed runs are all part of the snowboarding world.
Snowshoeing — Option D
Snowshoeing is the most accessible snow sport of all: strap a pair of snowshoes to any boot or hiking shoe and you can walk across deep snow that would swallow your feet otherwise. No lifts, no lessons, no groomed runs required.
Ready to start? Requirements 1 and 2 cover the safety and first aid knowledge every snow sport participant needs — no matter which option you choose.
Req 1 — Hazards & First Aid Topics
Requirements 1a and 1b together build your safety foundation for all snow sports. Before you ever clip into a binding or strap on a snowshoe, you need to know what can go wrong on the mountain and how to handle it. Read through both sections carefully — your counselor will ask you to explain these topics in your own words.
Requirement 1a
Snow sports are exciting, but the mountain environment creates real hazards that can hurt or kill unprepared participants. Being a prepared Scout means thinking through each hazard before you head out.
Common Hazards and How to Handle Them
Collisions with other skiers or objects Collisions are the most common cause of serious injury on ski slopes. Trees, lift towers, rocks, and other skiers can all be in your path.
- Anticipate: Stay alert and look ahead at all times. Know your stopping distance.
- Prevent: Ski at a speed you can control. Follow the Your Responsibility Code (see Req 6a).
- Respond: If a collision happens, stop, check for injuries, and call for ski patrol.
Avalanche Avalanches are sudden slides of snow down a slope. They are most dangerous in the backcountry but can occur anywhere on steep terrain after new snowfall or during warming.
- Anticipate: Check the avalanche forecast before backcountry travel. Learn the warning signs: cracking snow, “whumpfing” sounds, recent avalanche debris.
- Prevent: Avoid steep slopes (40–60 degrees) after heavy snow or during warming. Travel one person at a time in avalanche terrain. Carry beacon, probe, and shovel.
- Respond: If caught, try to swim toward the surface. If buried, create an air pocket before the snow settles. Rescuers should use beacons to locate victims within minutes.
Getting lost or disoriented Poor visibility (whiteout), unfamiliar terrain, or straying off marked runs can leave you lost on the mountain.
- Anticipate: Study the trail map before you ski. Tell someone your plan.
- Prevent: Stay on marked trails. Stop and take a bearing if unsure.
- Respond: Stay put, stay visible, and use your whistle or phone to signal for help.
Weather changes Mountain weather can shift rapidly. Wind, dropping temperatures, and sudden snowstorms are serious threats.
- Anticipate: Check the weather forecast before heading out. Know what changing clouds and wind direction mean.
- Prevent: Dress in layers and bring extra gear. Know where warming huts and lodges are.
- Respond: Head inside at the first sign of severe weather.
Equipment failure Binding malfunctions, broken poles, or improperly fitted boots can cause falls or prevent you from stopping.
- Anticipate: Inspect equipment before every outing.
- Prevent: Have bindings set by a certified technician. Use properly fitting boots.
- Respond: Stop immediately if equipment fails. Do not continue on damaged gear.
Official Resources
🎬 Video: How to Ski Safely (video) — https://youtu.be/AKxY8Xm-Gg0?si=EK3y5wxrfgJTmAk9
Requirement 1b
Cold temperatures, altitude, sun reflection off snow, and high-speed falls create a specific set of medical risks on the mountain. Know these conditions so you can recognize and respond to them.
Cold-Weather Illnesses
Hypothermia — The body’s core temperature drops dangerously low. Signs include uncontrollable shivering, confusion, slurred speech, and stumbling. A person with hypothermia may stop shivering as the condition worsens — this is a dangerous sign, not improvement.
- Prevention: Dress in moisture-wicking base layers, insulating mid-layers, and a waterproof shell. Stay dry and take regular warming breaks.
- First aid: Move the person out of the wind and cold. Remove wet clothing. Warm gradually using blankets and body heat. Do not rub the skin or give alcohol. Call for emergency help for moderate or severe cases.
Frostbite — Skin and underlying tissue freeze, most often on exposed skin: nose, ears, cheeks, fingers, and toes. Superficial frostbite appears red and feels numb and waxy. Deep frostbite turns white or grayish and the tissue feels hard.
- Prevention: Cover all skin in cold or windy conditions. Use moisture-wicking gloves and warm boots. Wiggle your toes and fingers regularly to maintain circulation.
- First aid: Move indoors. Do not rub frostbitten tissue. Rewarm in warm (not hot) water if refreezing is not possible. Seek medical help for deep frostbite.
Trauma and Injury
Shock — A life-threatening state where the body cannot maintain adequate blood flow. Signs include pale/cold/clammy skin, rapid weak pulse, confusion, and nausea. Shock can follow any serious injury.
- First aid: Have the person lie down and elevate their legs (unless a head, neck, or spine injury is suspected). Keep them warm. Call for emergency help immediately.
Concussion — A brain injury caused by a blow to the head, common in falls and collisions. Signs include headache, dizziness, confusion, memory loss, nausea, and sensitivity to light.
- Prevention: Always wear a properly fitting helmet.
- First aid: Stop activity immediately. Do not return to skiing that day. Seek medical evaluation. A person showing concussion symptoms should never be left alone.
Fractures — Broken bones from falls or collisions. Common sites in skiing and snowboarding are the wrist, forearm, leg, and collarbone. Signs: severe pain, swelling, bruising, obvious deformity, inability to bear weight.
- First aid: Stabilize the injury — do not try to straighten a fracture. Apply a splint (see below). Keep the person warm and comfortable. Call ski patrol.
Sprains and Strains — Sprains are stretched or torn ligaments (common at the ankle and knee, especially ACL in skiing). Strains are stretched or torn muscles or tendons.
- Prevention: Stay in good physical condition. Warm up before activity. Do not ski when fatigued.
- First aid: Use RICE — Rest, Ice, Compression, Elevation. Seek medical evaluation if the person cannot bear weight.
Bruises — Soft tissue injuries with bleeding under the skin. Apply ice and monitor for signs of more serious injury.
Dehydration — Cold, dry air and physical exertion cause faster water loss than most people expect. Signs include headache, dark urine, fatigue, and dizziness.
- Prevention: Drink water consistently throughout the day, even if you are not thirsty. Avoid excessive caffeine.
- First aid: Rest and drink water or an electrolyte beverage.
Sunburn — UV radiation is more intense at altitude and reflects off snow, burning exposed skin even on cloudy days.
- Prevention: Apply SPF 30+ sunscreen to all exposed skin, including lips and under the chin where snow reflects. Reapply every two hours and after sweating.
How to Apply a Splint
A splint immobilizes a fracture to prevent further injury during transport.
Principles:
- Splint the injury in the position you find it — do not try to straighten or realign.
- The splint must extend beyond the joint above AND below the injury site.
- Pad the splint so it does not press directly on the injury.
- Check circulation (pulse), sensation (feeling), and movement in the limb before and after splinting.
Improvised splints can be made from ski poles, tent poles, padded boards, rolled newspapers, or even layers of clothing bound around the limb. Secure with bandanas, ski straps, or triangular bandages — tight enough to hold but not so tight they cut off circulation.
Official Resources
🎬 Video: Treating Frostbite and Hypothermia (video) — https://youtu.be/tHiav9zYJT0?si=VC-plNy5tA2XSZ1I
🎬 Video: How to Splint a Broken Bone (video) — https://youtu.be/jo2zi_JB9_4?si=nVI-3TY16Ma1BL1p
Now that you can explain snow sport hazards and first aid, the next requirement asks you to go one step further — why every participant must be ready to help, and how to call for help when you need it.
Req 2 — Rendering & Reporting Aid
Requirements 2a and 2b move from theory to action. You now know what injuries can happen — these requirements ask you to explain why you must be ready to help and how to get the right people involved when a serious accident occurs.
Requirement 2a
Ski patrol and emergency services may be minutes away or farther. On a backcountry trail or a remote run, they may be much farther. In a medical emergency, minutes matter.
Here are the key reasons every participant must be ready to help:
You may be the first person on scene. A solo skier who falls out of sight, a boarder who hits a tree, or a snowshoer who twists an ankle on a backcountry trail may have no one nearby but you. The actions you take in the first few minutes can prevent a minor injury from becoming life-threatening.
Cold and altitude make waiting dangerous. Lying still in the snow causes rapid heat loss. An injured person can develop hypothermia quickly. Covering them with a jacket or extra layers while you wait for ski patrol could be the most important thing you do.
Bystanders often hesitate. Research on emergency response consistently shows that people in groups assume someone else will act. Knowing that you are responsible for helping — and knowing what to do — breaks through that hesitation.
You signed up for it. The Scout Oath and Law commit you to helping other people at all times. Snow sports are no different from any other setting where someone might need your help.
Requirement 2b
Ski patrol is the professional first-response team at most ski resorts. They carry first aid supplies, sleds (tobogans), and communications equipment. Your job is to alert them accurately and quickly.
Steps to Report an Accident
Stay calm and assess safety. Make sure you and the injured person are not in danger of being hit by other skiers. Mark the scene uphill with crossed skis or poles if you have them.
Do not move a seriously injured person unless they are in immediate danger. A fall hard enough to cause a loss of consciousness or spine injury requires ski patrol — not a well-meaning bystander.
Send someone to get help — or go yourself. At most resorts, ski patrol can be reached by:
- Flagging down a resort employee or lift operator (fastest at many resorts)
- Calling the resort’s ski patrol phone number (post it in your phone before you ski)
- Dialing 911 in a true emergency — dispatchers can contact mountain rescue teams
Tell them exactly:
- What happened — the nature of the injury (fall, collision, suspected fracture, unconscious, etc.)
- Where you are — trail name, run number, lift tower number, or GPS coordinates if in the backcountry
- How many people are injured
- What first aid has already been given
Stay with the injured person (or leave a responsible person with them) until ski patrol arrives.
Follow patrol instructions. Once patrol arrives, step back and let them work. Answer their questions clearly.
Official Resources
🎬 Video: How to Report an Accident to the Ski Patrol (video) — https://youtu.be/Zl0ZyNoox8M?si=xgYuHNUn5izc4HA7
You know how to respond in an emergency. Next, learn how to navigate the mountain safely using the international trail-marking system.
Req 3 — Trail Marking System
Every ski resort in North America uses the same trail-marking system, and most resorts worldwide use a similar one. Knowing these symbols before you get on the mountain is not just helpful — it is a safety requirement. Choosing a trail that is beyond your skill level puts you and others at risk.
The North American Trail Difficulty System
The international system used in North America assigns a shape and color to each level of difficulty. You will see these symbols on trail signs, trail maps, and slope markers.
| Symbol | Color | Difficulty | What to Expect |
|---|---|---|---|
| Circle | Green | Easiest | Wide, gently sloping runs; ideal for beginners learning basic control |
| Square | Blue | More Difficult | Moderate pitch; requires ability to make turns and control speed |
| Diamond | Black | Most Difficult | Steep terrain; requires confident parallel turns and strong speed control |
| Double Diamond | Black | Expert Only | Extreme steepness, moguls, cliffs, or narrow chutes; for experts only |
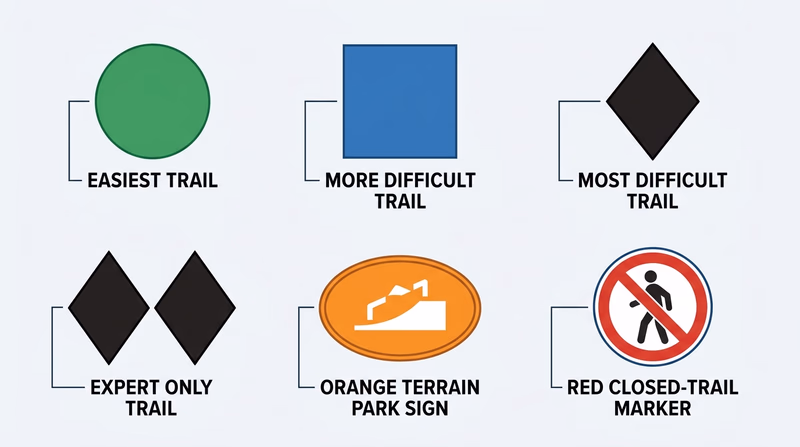
Additional Markers You Will See
Orange rectangle or “Terrain Park” signs — Marks areas with jumps, rails, boxes, and other freestyle features. Terrain parks require additional skills and come with their own SMART Style code (see Req 6b).
Closed signs — A large orange or red “CLOSED” X across a trail entrance means the run is officially closed. Do not enter. Closed runs may hide cliff drops, thin snowcover over rocks, or avalanche hazard.
Boundary signs — Ropes and signs mark the boundary between the ski area and unpatrolled backcountry terrain. Going out of bounds means leaving the coverage of ski patrol and taking full responsibility for your safety.
Mileage and distance markers — Some trails post distance signs, especially at cross-country centers where routes are measured.
Why the System Matters
The difficulty ratings are calibrated by each resort to reflect conditions on that particular mountain. A blue square at a small midwestern ski area may be significantly different from a blue square at a large Rocky Mountain resort. Always review the trail map when arriving at a new mountain and ask resort staff or your counselor about conditions.
Reading the Trail Map
Before you ski, spend five minutes with the trail map:
- Find your starting point — Where is the lodge? Where does the chairlift drop you?
- Identify easy runs (green circles) from the top of each lift.
- Find landmarks — lodge buildings, patrol stations, first aid huts.
- Note closed areas and boundaries — Do not head toward them.
- Plan a meeting spot — If your group gets separated, agree on where to regroup.
Official Resources
🎬 Video: International Trail Marking System (video) — https://youtu.be/N_f6xMFVVHc
You can now read any North American ski trail map. Next, get your body ready for the physical demands of snow sports.
Req 4 — Fitness for Snow Sports
Getting fit for snow sports is not just about performance — it is about injury prevention. Tired muscles make mistakes. Strong, flexible, well-conditioned muscles absorb impacts, hold proper body position, and respond quickly when something unexpected happens on the slope or trail.
Why Fitness Matters on Snow
Strength keeps you in control. Ski and snowboard turns require powerful leg and core muscles to maintain position through each turn. Fatigue is the leading contributor to afternoon ski injuries — most slope accidents happen in the final two hours of a ski day when legs are worn out.
Endurance lets you stay active all day and still ski safely at the end of the day. Cardiovascular fitness reduces the feeling of altitude (at higher elevation, the air has less oxygen), and aerobic conditioning delays the onset of muscle fatigue.
Flexibility protects your joints. Flexible hamstrings, hip flexors, and calves allow you to respond to unexpected terrain without pulling a muscle. Stretching also helps prevent the knee injuries (especially ACL tears) that are among the most common serious injuries in Alpine skiing.
Exercises for Each Option
Option A — Alpine Skiing
| Exercise | What It Trains |
|---|---|
| Wall sit (hold 30–60 seconds) | Quad endurance — same muscles used to hold a ski stance |
| Squats and jump squats | Leg power for turn initiation |
| Lateral lunges | Hip and groin flexibility; lateral movement |
| Plank and side plank | Core stability for upper-lower body separation |
| Single-leg balance on a wobble board | Balance and ankle stability |
| Cardiovascular: cycling, running, or hiking | Aerobic endurance |
Option B — Cross-Country (Nordic) Skiing
| Exercise | What It Trains |
|---|---|
| Lunges with torso rotation | Weight transfer and core rotation |
| Push-ups and rows | Upper body and arm push for pole work |
| Skater squats | Lateral push power for skate skiing |
| Hip flexor stretches | Stride length and forward lean posture |
| Cardiovascular: running, cycling, or rollerski | Aerobic base — critical for touring |
Option C — Snowboarding
| Exercise | What It Trains |
|---|---|
| Squats and single-leg squats | Leg strength for edge control |
| Balance board or skateboarding | Board feel and dynamic balance |
| Core rotation exercises (Russian twists) | Upper-lower body separation in turns |
| Hip flexor and hamstring stretches | Injury prevention on hard landings |
| Cardiovascular: skateboarding, surfing, hiking | Sport-specific conditioning |
Option D — Snowshoeing
| Exercise | What It Trains |
|---|---|
| Hiking with a pack | Weight-bearing endurance |
| Step-ups and stair climbing | Uphill movement muscles |
| Calf raises | Ankle stability and push-off |
| Hip abductor exercises | Lateral stability for snowshoe gait |
| Cardiovascular: walking, jogging, hiking | Aerobic base for long tours |
Official Resources
🎬 Video: Training to Prevent Snow Sports Injuries (video) — https://youtu.be/a8sf5k3fH9I
Your body is ready. Now make sure your gear is too.
Req 5 — Clothing & Equipment
For this requirement you need to show up dressed and geared for your chosen snow sport, then explain to your counselor why each layer and piece of equipment you are wearing keeps you safe and warm. This is a “show and tell” — come ready to present.
The Layering System
Snow sports clothing is built around three layers that work together. Wearing a single thick jacket is not as effective as three thin layers, because layers trap warm air and can be adjusted as you heat up or cool down.
Layer 1 — Base Layer (Next to Your Skin)
Purpose: Pull moisture away from your skin (wicking). Wet skin loses heat up to 25 times faster than dry skin.
What to wear: Synthetic fabrics (polyester, nylon) or wool. Avoid cotton — it absorbs moisture and stays wet.
Look for: Snug fit, labeled “moisture-wicking” or “merino wool.”
Layer 2 — Mid Layer (Insulation)
Purpose: Trap warm air close to your body to retain heat.
What to wear: Fleece jacket, insulated vest, or a down or synthetic puffy jacket.
Look for: Weight appropriate to the temperature. Lighter mid-layers for active sports; heavier for colder or less active use.
Layer 3 — Shell (Outer Layer)
Purpose: Block wind, snow, and rain while allowing some moisture to escape (breathability).
What to wear: A waterproof-breathable ski or snowboard jacket and pants (look for Gore-Tex or similar). Seam-sealed is best.
Look for: Adjustable hood, powder skirt (inside the jacket to keep snow out), and underarm zips for ventilation.
Essential Accessories
Helmet — Required for all skiing and snowboarding. A properly fitting helmet must sit level on your head with the front edge just above your eyebrows. Shake your head — it should not shift. Replace any helmet after a significant impact, even if there is no visible damage.
Goggles — Protect your eyes from UV radiation, wind, and blowing snow. Different lens tints are optimized for different light conditions: darker lenses for bright sun, lighter or amber/rose lenses for flat light and cloudy days.
Gloves or mittens — Mittens are generally warmer because fingers share heat. Gloves offer more dexterity. Either should be waterproof. Carry a hand warmer for extreme cold days.
Boots — Properly fitted ski boots should feel snug (not painful) with your heel locked down. Snowboard boots should feel comfortable when flexed forward. Boots that are too large cause poor control; boots that are too small cause pain and cold feet.
Neck gaiter or balaclava — Covers exposed neck, chin, and face. More effective than a scarf, which can snag on equipment.
Sunscreen and lip balm (SPF 30+) — UV radiation is stronger at altitude and doubles when it reflects off snow. Apply before you go out, not after.
Equipment Overview by Option
Alpine skiing: Skis, poles, alpine ski boots, release bindings (properly set by a technician).
Cross-country skiing: Nordic skis appropriate to your style (classic or skate), poles (slightly longer than for alpine), low-cut Nordic boots, bindings.
Snowboarding: Snowboard, step-in or strap bindings, snowboard boots, leash.
Snowshoeing: Snowshoes (sized for your weight and terrain), trekking poles (optional but helpful), waterproof hiking boots or pac boots.
Official Resources
🎬 Video: How to Dress for Snow Sports (video) — https://youtu.be/mjJNpR3nepM
You are dressed for the mountain. Now learn the safety codes that govern everyone’s behavior on the slope.
Req 6 — Responsibility, SMART Style & Avalanche
Requirement 6 covers the three safety codes that every snow sport participant — beginner or expert, skier or snowshoer — must understand and follow. Know them cold before you head to the mountain.
Requirement 6a
The Your Responsibility Code is the foundational code of conduct at ski areas across North America. It sets the rules of the mountain — the same way traffic laws set the rules of the road. Every skier, snowboarder, and snowshoer is expected to know it and follow it.
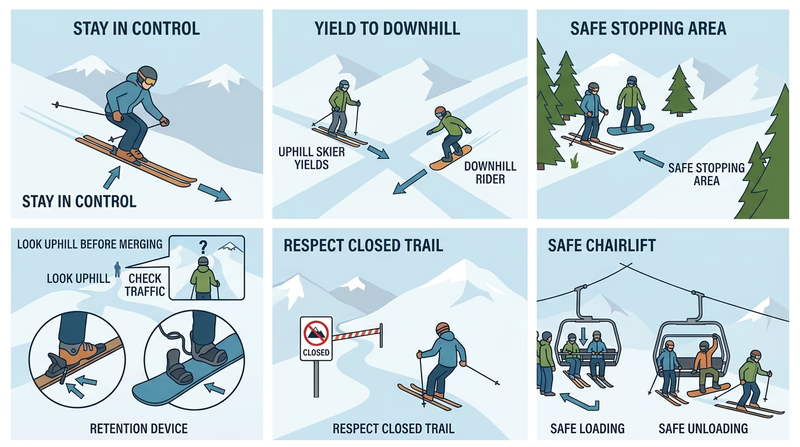
The Seven Elements
1. Always stay in control and be able to stop or avoid other people or objects. You are responsible for where you go and how fast you travel. If you cannot stop before hitting someone or something, you are going too fast for your ability or the current conditions.
2. Remember that people ahead of you (or below you) have the right of way. It is your responsibility to avoid them. The person downhill from you has no idea you are coming. They cannot dodge you. You must watch for them and route around them — always.
3. Do not stop in any place where you obstruct a trail or are not visible from above. Stopping at the bottom of a blind rise, in a narrow chute, or right below a terrain feature puts you in the path of someone who cannot see you. Always stop where others can see you from above.
4. Whenever starting downhill or merging into a trail, look uphill and yield to others. Entering a slope is like pulling onto a highway — you yield to traffic already on the road. Look uphill before you push off.
5. Use safety devices to help prevent runaway equipment. Ski brakes, leashes, and retention straps keep your skis and snowboard from flying downhill when you fall. A runaway ski can travel at high speed and seriously injure someone.
6. Observe all posted signs and warnings. Keep off closed trails and out of closed areas. Closed signs exist because an area is dangerous — avalanche risk, thin snowcover, drops, or cliff edges. Ignoring closure signs puts you and rescue workers in danger.
7. Know how to load, ride, and unload safely prior to using any lift. Chairlift accidents happen during loading and unloading. Watch what others do, ask for help your first time, and know where the stop buttons are.
Why Every Person Must Follow This Code
Snow sport areas concentrate many people of varying skill levels on the same terrain. Without a shared set of rules, collisions and injuries multiply. Following the Code is not just courteous — it is how you protect yourself and every other person on the mountain.
Official Resources
🎬 Video: Your Responsibility Code (video) — https://youtu.be/euGO92z4MnM
Requirement 6b
SMART Style is the safety program specifically developed for terrain parks, halfpipes, and freestyle features. Standard Your Responsibility Code rules apply everywhere on the mountain, but terrain parks add additional risks — people launching into the air, features that can cause head and neck injuries, and traffic coming from multiple directions. SMART Style addresses those specific risks.
The SMART Style Points
Look before you leap. Before you hit any jump, rail, or feature, scope it from the side first. Walk up to the feature and look at the landing zone. Is it clear? Are there other riders in the air or landing? Is the snow in good shape? Never hit a feature blind. If the feature is new to you, watch others ride it first.
Easy style it. Start with features that match your current skill level. Do not attempt the largest jump or the most difficult feature first. Snow parks are built with progression in mind — start small, build confidence, and work your way up gradually as your skills improve.
Respect gets respect. Wait your turn. Terrain parks have a one-at-a-time rule: one person uses a feature at a time. Clear the landing zone quickly after your run so the next rider can go. Do not cut in line. Look out for other park users — including beginners who may not know where to stand.
Why SMART Style Matters
Terrain parks and halfpipes are the most injury-dense locations at any ski resort. Head and spine injuries from bad landings or collisions are serious and sometimes permanent. SMART Style exists to reduce these risks by establishing predictable, respectful behavior for everyone using freestyle terrain.
Official Resources
🎬 Video: SMART Style Safety Program (video) — https://youtu.be/4Y7lCN7SKiY
Requirement 6c
Avalanches kill more than 25 people in the United States each year, and the vast majority are triggered by the victims themselves or their companions. Most avalanche deaths happen in the backcountry — areas outside ski resort boundaries — but avalanche awareness applies wherever you travel in mountainous winter terrain.
When Avalanches Happen
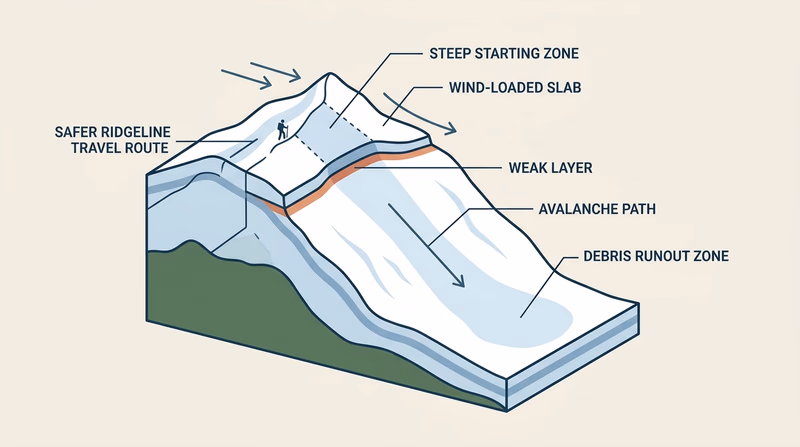
Avalanches are most likely when:
- Slopes are steep — Most fatal avalanches run on slopes between 30 and 45 degrees. Slopes in the 38–42 degree range are particularly dangerous.
- New snow has fallen recently — Heavy snowfall in the 24–72 hours before loading creates unstable layers.
- Layers within the snowpack are unstable — Weak layers (faceted snow, buried surface hoar) can collapse under additional load, triggering a slide on the slab above.
- You hear warning signs — Cracking sounds in the snow as you travel, a “whumpf” sound (the sound of a weak layer collapsing), or visible avalanche debris nearby all indicate dangerous conditions. Take these seriously and retreat.
Before You Go
- Check the avalanche forecast at avalanche.org or your regional avalanche center. The forecast rates danger from 1 (Low) to 5 (Extreme). Above a rating of 3 (Considerable), backcountry travel requires heightened caution or should be avoided.
- Carry beacon, probe, and shovel if traveling in avalanche terrain. These three tools — and the training to use them — are the minimum standard for backcountry travel. A beacon (transceiver) emits a signal that companions can use to locate you if buried. A probe confirms exact burial location. A shovel is required to dig you out.
- Travel with partners and tell someone your route and expected return time.
In Avalanche Terrain
- Travel one person at a time through exposed terrain while others watch from a safe spot.
- Stay on ridgelines when possible to avoid being caught in a slide path.
- Avoid the runout zone below steep slopes after heavy snowfall.
If Caught in an Avalanche
- Try to escape to the side of the slide if possible.
- Discard poles and fight to stay on the surface with a swimming motion.
- Just before the snow stops moving, cover your face with your arms and try to create an air pocket in front of your mouth and nose. Once snow settles, it sets like concrete — you will not be able to move.
- Stay calm to conserve air. Wait for rescuers to find you by beacon signal.
Individual Responsibility
Every backcountry traveler is responsible for:
- Checking the forecast before every trip.
- Carrying and knowing how to use beacon, probe, and shovel.
- Making conservative decisions when conditions are uncertain.
- Never traveling in avalanche terrain without a trained partner.
Even at ski resorts, avalanche control work (ski patrol triggering controlled slides) keeps in-bounds terrain safer — but closed signs must be respected. Ski area boundaries exist partly to keep you away from avalanche paths that have not been controlled.
Official Resources
🎬 Video: How to Reduce Avalanche Risk (video) — https://youtu.be/_f-vEc5LTFM
You have covered all of the safety codes and precautions. Now it is time to choose your snow sport and start the skills requirements.
Req 7 — Pick Your Snow Sport
You have completed the safety, first aid, fitness, and equipment requirements that every snow sport participant needs. Now it is time to go deep on one specific discipline. Choose the option that best fits your access, interests, and skill level.
Your Options
Req 7a — Downhill (Alpine) Skiing: Demonstrate ski maintenance (waxing, bindings, DIN), the American Teaching System, lift riding, and a full progression of skills from beginner wedge maneuvers through christies and a controlled run on intermediate terrain.
Req 7b — Cross-Country (Nordic) Skiing: Select and maintain Nordic equipment, understand trail rules and ski styles, plan a one-day tour, navigate with map and compass, and complete a 4-mile tour demonstrating propulsion technique and steep-terrain skills.
Req 7c — Snowboarding: Know fall technique and injury prevention, select and maintain snowboard equipment, ride lifts, wax your board, and complete a skills progression through an ollie, nose-end grab, wheelie, and a controlled run on intermediate terrain.
Req 7d — Snowshoeing: Name snowshoe parts, select the right size, understand types and terrain, care for your equipment, plan a day hike, navigate with map and compass, and complete a 2-mile hike demonstrating uphill, downhill, and traversing technique.
How to Choose
Choose Alpine Skiing (7a) if you have access to a ski resort with chairlifts and groomed runs, and you want to develop the most widely recognized ski skills.
Choose Nordic Skiing (7b) if you are interested in backcountry travel, have access to cross-country trails, or want a snow sport that combines fitness with navigation. Note: 7b has 11 sub-requirements and you must complete 10 of them.
Choose Snowboarding (7c) if you already skateboard or surf, prefer a single-board feel, or are drawn to freestyle terrain. Note: 7c also has 11 sub-requirements with a minimum of 10 required.
Choose Snowshoeing (7d) if you want the most accessible option — snowshoeing requires no special technique to start and can be done anywhere there is snow. It is also ideal if ski resort access is limited.
Req 7a — Downhill (Alpine) Skiing
You have chosen Alpine (downhill) skiing. Work through all ten requirements below in order. The first few are knowledge and demonstration requirements you can prepare for at home or at the ski shop; the rest are on-snow skills you will demonstrate with your counselor.
What You’ll Complete
- Req 7a1 — Wax, Bindings & DIN: Show how to wax skis, maintain release bindings, and explain the DIN standard.
- Req 7a2 — American Teaching System: Explain the ATS and a basic snowskiing progression.
- Req 7a3 — Types of Alpine Skis: Discuss different ski types and demonstrate two safe ways to carry skis and poles.
- Req 7a4 — Riding a Lift: Demonstrate one lift type and explain two others.
- Req 7a5 — Beginning Maneuvers: On a gentle slope, demonstrate straight run, gliding wedge, wedge stop, sidestep, and herringbone.
- Req 7a6 — Linked Wedge Turns: On slightly steeper terrain, show linked wedge turns.
- Req 7a7 — Christies: On a moderate slope, demonstrate five to ten christies.
- Req 7a8 — Controlled Run: Make a controlled run down an intermediate slope.
- Req 7a9 — Varied Conditions: Ski in varied conditions — different pitch and snow types — while maintaining balance and turning ability.
- Req 7a10 — Major Ski Organizations: Name the major U.S. ski organizations and explain their functions.
Before You Head to the Slope
Requirements 7a1, 7a2, 7a3, and 7a10 can be researched and discussed before you get on snow. Use the official resources on each page to prepare your explanations. The on-snow requirements (7a4 through 7a9) progress from the gentlest terrain to intermediate — do not rush ahead.
Req 7a1 — Wax, Bindings & DIN
Before your first run, you need to know how to care for your equipment. Well-maintained skis slide faster and turn better. Properly set bindings protect your knees and legs when you fall. This is a show-and-tell requirement — bring your skis (or access to a pair) and demonstrate these tasks.
Waxing Alpine Skis
Alpine skis are waxed on the base — the smooth plastic surface that contacts the snow. Wax reduces friction, protects the base material, and can be tuned to different snow temperatures.
Hot Wax (Most Thorough Method)
- Clean the base — Use a plastic scraper to remove old wax and any dirt.
- Choose your wax — Wax is sold by temperature range. Check the package for the appropriate snow temperature. Cold, hard snow needs a harder (lower-temperature) wax; wet spring snow needs a softer wax.
- Melt and apply — Hold a wax iron set to the correct temperature (check wax packaging) and touch the wax bar to the iron above the ski base. Let the melted wax drip along the length of the base.
- Spread the wax — Run the iron slowly along the ski, spreading the wax in a thin, even layer. Keep the iron moving — never let it sit still (this can damage the base).
- Let it cool — Allow the wax to harden fully (10–15 minutes).
- Scrape — Use a plastic ski scraper to remove the excess wax. Scrape from tip to tail. The goal is a very thin, even layer; excess wax slows you down.
- Brush — Use a nylon or horsehair brush to polish the base and open the structure. This step dramatically improves glide.
Rub-On Wax (Quick Method)
For a quick wax, rub-on or paste wax can be applied by hand and polished with a cork. It is less durable than hot wax but fine for a day of casual skiing.
Ski Maintenance Beyond Wax
Edge sharpening — The metal edges on each side of the ski allow you to carve into hard snow and ice. Dull edges slide sideways instead of gripping. A simple file or edge tool held at 90° to the base sharpens the edge. Ask your counselor or a ski shop tech to demonstrate proper edge angle maintenance.
Base repairs — Small gouges in the base can be filled with P-Tex (base repair candles). Melt the P-Tex into the gouge, let it cool, then scrape flush. Deep gouges or core shots (damage reaching the wood/foam core) require professional repair.
Storage — At the end of the season, apply a thick coat of wax and do not scrape it. The wax layer protects the base from oxidizing. Store skis in a cool, dry place.
Release Bindings: Use and Maintenance
Release bindings serve two critical functions: they hold your boot securely during normal skiing, and they release your boot when a fall generates forces that could injure you.
Using your bindings:
- Step in at the toe first, then press the heel down firmly until you hear a click.
- Check that the boot is fully engaged before skiing.
- To release, press the heel bail lever with your pole or a boot.
- Regularly test the release: step in, simulate a rotational fall, and confirm the binding releases cleanly.
Maintaining your bindings:
- Keep pivot points and moving parts clean and lightly lubricated.
- Inspect for cracks, corrosion, or bent parts before each season.
- Have bindings tested and certified by a qualified technician every year — or whenever you switch to new boots. Only a certified technician should adjust the release setting.
The DIN Standard
DIN stands for Deutsches Institut für Normung (German Institute for Standardization), the organization that established the international standard for ski binding release settings.
A DIN number on your binding represents the force required to release your boot. It is not simply “how tight” the binding is — it is a calibrated setting based on your height, weight, boot sole length, skier type (beginner through advanced), and age.
- Lower DIN settings release more easily — appropriate for children, lighter skiers, beginners, or anyone who prefers quicker release.
- Higher DIN settings require more force to release — appropriate for heavier, more aggressive, or advanced skiers who generate greater forces in turns.
Why it matters to you: Setting your own DIN without a certified technician is dangerous. A DIN that is too low causes “prerelease” — the binding releases during normal skiing when it should not, causing falls. A DIN that is too high prevents release during a real fall, putting your knee and leg at risk.
Official Resources
🎬 Video: How to Wax Skis (video) — https://youtu.be/1Xt1gZfZ2Rw
🎬 Video: How to Test Ski Bindings (video) — https://youtu.be/Ix27SNEsRYM
🎬 Video: Ski Binding DIN Settings (video) — https://youtu.be/DkNAXgc2-rk?si=p-0U6YH1kIngZ47t
Your skis are waxed and your bindings are set. Next, learn the teaching system that organizes the entire ski learning progression.
Req 7a2 — American Teaching System
The American Teaching System (ATS) is the national framework used by ski instructors in the United States to teach skiing at every level. It was developed by the Professional Ski Instructors of America (PSIA) to give students a consistent, learner-centered experience at any U.S. ski school.
What the American Teaching System Is
Rather than teaching a fixed sequence of moves, the ATS starts with the learner — where they are right now — and builds skills in stages. Instructors guide students through progressions that develop three core skill areas simultaneously:
Edging — Tilting the ski on its edge to grip the snow and control direction. Beginners use flat skis; advanced skiers make precise edge adjustments on every turn.
Rotary (turning) — Steering and rotating the skis to control the direction of travel. This ranges from simple leg steering in a wedge to refined hip and leg rotation in parallel skiing.
Pressure control — Managing where and how much force is applied to the ski, which affects turn quality and the ability to handle varied terrain.
All three skills are present at every level — but their refinement defines the progression.
A Basic Skiing Progression
The ATS organizes skiing into skill levels that provide a roadmap from first day on snow through expert terrain:
Getting started (beginner) First-time skiers learn to walk on flat snow, glide, and stop. The herringbone and sidestep help with uphill movement. Falls are expected and part of learning.
Gliding wedge and wedge stop The student forms a wedge shape (tips together, tails apart) to glide and stop on gentle terrain. This is the first tool for controlling speed and direction.
Wedge turns Steering within the wedge to change direction left and right. The student begins to link turns rhythmically.
Wedge christies One ski begins to match the other near the end of the turn, moving from a full wedge toward parallel. Speed control improves.
Basic parallel turns Both skis are kept roughly parallel throughout the turn. The student can comfortably ski easy blue terrain.
Intermediate and advanced parallel Dynamic edge use, carving, moguls, varied snow, and steeper terrain. These levels develop all three core skills to a high degree.
Official Resources
American Teaching System Skill Levels (PDF) Official BSA resource showing the PSIA skill level descriptions used in the American Teaching System. Link: American Teaching System Skill Levels (PDF) — https://filestore.scouting.org/filestore/Merit_Badge_ReqandRes/Requirement%20Resources/Snow%20Sports/american_teaching_system_levels.pdfReq 7a3 — Types of Alpine Skis
Modern Alpine skis are designed for specific terrain and skiing styles. Knowing the differences helps you choose the right equipment and talk knowledgeably with your counselor about what you are using.
Types of Alpine Skis
All-Mountain Skis The most versatile category. All-mountain skis handle a variety of terrain — groomed runs, light powder, and mixed conditions — without specializing in any single one. Most rental skis fall into this category. If you only own one pair, this is typically the best choice.
Carving Skis Shorter, with an exaggerated hourglass shape (wide tip and tail, narrow waist). The deep sidecut makes the ski arc tightly on hardpack and groomed snow. Excellent for fast, precise turns on groomers; not suited for deep powder or bumpy terrain.
Powder Skis (Fat Skis) Extra-wide through the middle to provide flotation in deep, ungroomed snow. The wide surface area keeps you on top of powder. On groomed runs they feel sluggish compared to narrower skis.
Mogul Skis Narrower and shorter with a softer flex to absorb the constant impacts of a mogul field. Designed for quick direction changes and agility.
Park and Pipe Skis (Twin Tips) Symmetrical — both tips are turned up — so you can ski forward or backward and land jumps in either direction. Built for terrain parks, halfpipes, and freestyle skiing.
Touring Skis (Alpine Touring / AT Skis) Lightweight skis for backcountry travel. Paired with AT bindings that allow the heel to lift for climbing uphill and lock down for downhill descents.
Ski Length and Width
Length: Shorter skis are easier to turn and more forgiving for beginners. Longer skis are more stable at higher speeds. Beginner skis are often around chin-height; advanced skis may reach nose height or taller.
Waist width: Measured in millimeters at the narrowest point under your boot. Under 80mm works best on groomed runs; 90mm and wider is better in powder.
How to Carry Skis and Poles
Method 1 — Shoulder carry Clamp both skis together, bases facing outward. Rest them on one shoulder with tips pointing forward and slightly up. Grip the bindings to steady the skis. Keep tips elevated so you do not accidentally hit someone ahead of you.
Method 2 — Under-arm carry Hold both skis together, bases inward, clamped horizontally under one arm. Keep tips pointing forward. Watch your tips and tails — they extend farther than you think and can knock into people nearby.
Carrying poles: Hold both poles in your free hand, tips pointing down. Before entering a lift line or the lodge, loop both pole straps over one wrist to free your hands.
Official Resources
🎬 Video: Types of Alpine Skis (video) — https://youtu.be/PXR5vRgIlJE
🎬 Video: How to Carry Skis (video) — https://youtu.be/GLu49jDy51k
Req 7a4 — Riding a Lift
Lifts are how you get to the top of the mountain. The most common types are chairlifts, gondolas, and surface lifts. You need to demonstrate one type and explain two others — your counselor will confirm which you demonstrate based on what is available at your ski area.
Chairlift
Chairlifts carry skiers suspended on a moving cable, with open seats swinging on the line. They are the most common lift type at North American ski resorts.
Loading:
- Wait in the designated loading area and watch the chair ahead of you.
- When the attendant signals, shuffle into position and look over your shoulder for the approaching chair.
- Sit down smoothly as the chair reaches you; do not jump onto it.
- Lower the safety bar after all riders are seated.
- Keep ski tips up and pointing forward so they do not catch on any obstacle.
Riding: Stay seated with skis dangling or resting on the footrest (if present). Keep the safety bar lowered. Hold on but do not lean forward or rock.
Unloading:
- Raise the safety bar when you near the top.
- Slide forward to the edge of the seat as you approach the unloading ramp.
- Place your ski tips on the ramp as the chair arrives and stand up smoothly.
- Ski forward and to the side quickly to clear the unloading area for the next riders.
Gondola
Gondolas are enclosed cabins on a cable — think of a glass box that rides the same type of line as a chairlift but is weather-protected.
Loading: Remove skis and carry them to the designated rack inside or outside the cabin. Step in, sit down, and allow the doors to close.
Riding: Sit inside the enclosed cabin. Enjoy the view — gondolas often cover long distances and significant vertical elevation.
Unloading: Retrieve your skis when the cabin reaches the top, step out, and move clear of the exit.
Surface Lifts (T-Bar and Rope Tow)
Surface lifts pull skiers up the mountain while they remain on the snow surface.
T-Bar: A horizontal bar attached to a cable pulls two skiers at once. Let the bar press against the back of your thighs — do not sit on it. Keep your skis in the tracks and lean back slightly. At the top, let the bar go and ski off to the side.
Rope Tow: Grab the rope with both gloved hands and grip firmly. Keep your weight centered and let the rope do the work. Release smoothly at the top.
Official Resources
🎬 Video: Ski Lifts and How to Ride Them (video) — https://youtu.be/4xkGmEC-vPk
Req 7a5 — Beginning Maneuvers
These five maneuvers are the building blocks of skiing. Practice each one until it feels comfortable before moving to the next. Your counselor will observe you demonstrating all five on a gentle (green circle) slope.
The Five Beginning Maneuvers
Straight Run
Ski directly downhill with both skis parallel, about hip-width apart, and your weight evenly balanced. Bend your knees slightly and keep your hands forward. Do not lean back — it puts you out of control. The straight run builds your comfort with speed and the feeling of gliding on snow.
Gliding Wedge (Snowplow)
Push your ski tails apart so the tips come closer together, forming a V-shape (or wedge). The inside edges of both skis press lightly into the snow. The wider the wedge, the more friction and the slower you go. A gliding wedge creates gentle speed control without stopping. Keep your weight even on both feet and your knees bent.
Wedge Stop
From a gliding wedge, widen your wedge more aggressively and increase edge angle (press your knees inward slightly). The increased edge contact with the snow creates enough friction to bring you to a full stop. Practice stopping under control — not by crashing into a pile of snow at the bottom.
Sidestep
Standing perpendicular to the slope (skis across the fall line, not pointing downhill), step sideways up the hill one step at a time. Each step edges your uphill ski into the snow for grip. This is how you move uphill on skis when there is no lift and you need to reposition. Keep your poles planted uphill for balance.
Herringbone
Face uphill and angle your ski tips outward (heels together, tips apart — the opposite of the wedge). Press the inside edges into the snow firmly with each step to grip. Walk uphill in this pattern, alternating feet. The inside edges prevent you from sliding back. This is for climbing short, gentle inclines.
Official Resources
🎬 Video: Beginner's Guide - The Gear (video) — https://youtu.be/LaF1tT1l7c0?si=A4krxuBaIP1wPGgx
🎬 Video: Beginner's Guide - Basic Moves (video) — https://youtu.be/l6AG5WLUaNo?si=Cy7fDWXKwAFsQp9B
🎬 Video: Beginner's Guide - Getting Around (video) — https://youtu.be/zAQVuC1Q4mw?si=ofT18Us8eaEUr9_w
Req 7a6 — Linked Wedge Turns
Linked wedge turns move you from braking to actual turning. Instead of just wedging to slow down and stop, you steer the wedge left and right in a continuous, rhythmic S-pattern. This is a major milestone — controlling your speed by turning, not just stopping.
How Linked Wedge Turns Work
Start in a gliding wedge — tips closer together, tails apart, weight even, knees slightly bent.
To turn right: Shift slightly more weight onto your left ski and look toward your right. The wedge will steer you that way. Small weight shifts do most of the work — you do not need to lean hard.
To turn left: Shift weight onto your right ski and look left.
Link the turns: As you complete one turn, immediately begin the weight shift to start the next. Do not let the skis run straight between turns — the continuous arc is what makes them “linked.”
What Your Counselor Is Looking For
- A consistent wedge shape maintained through the turn (not just at the start)
- Smooth direction changes — turns connected without a flat, runaway section between them
- Speed managed by turn shape, not by stopping
- Body position: weight centered, hands forward, knees bent
Official Resources
🎬 Video: How to Do Linked Wedge Turns (video) — https://youtu.be/1BdMf9rmubQ
🎬 Video: The Wedge Turn (video) — https://youtu.be/9bEH6JCq83U?si=5ru69RVAgDgQfAif
Req 7a7 — Christies
A christie (also spelled “christy” or “Christie”) is a turn where both skis are brought parallel to each other during the finish of the turn. It is the bridge between wedge skiing and full parallel skiing, and demonstrating christies on a moderate (blue square) slope shows your counselor that your skills are progressing.
What a Christie Is
In a wedge christie, you begin the turn with a wedge (like the turns you have been doing), but partway through the turn you bring the downhill ski parallel to the uphill ski, finishing in a matched, parallel position. The two skis are parallel — “christied together” — at the completion of the turn.
As your skill develops, the wedge at the start gets smaller and smaller until it effectively disappears, and you are skiing in full parallel.
How to Execute a Christie
- Start from a gliding wedge, moving across the slope (traverse).
- Initiate the turn by steering with the uphill ski, just as you would in a wedge turn.
- As the turn progresses, bring the downhill (inside) ski parallel to the turning ski. This happens naturally as you shift weight to the outside ski.
- Finish the turn with both skis parallel, edges set into the hill.
- Transition to the next turn by beginning the next wedge initiation.
What Your Counselor Is Looking For
- Five to ten consecutive christies without stopping
- Both skis finishing each turn in a parallel position
- Control of speed and direction throughout
- Smooth transitions between turns on a blue-square (moderate) slope
Official Resources
🎬 Video: How to Do Christies (video) — https://youtu.be/x5q0yV14sas
Req 7a8 — Controlled Run
A controlled run means skiing an intermediate slope from top to bottom while managing your speed, choosing your line, and staying in full control throughout. This is not a race — it is a demonstration that you can ski sustained terrain confidently and safely.
What “Controlled” Means
Speed management — You choose how fast you go by shaping your turns. You maintain a consistent, manageable pace — not as fast as possible, not stopping every few turns.
Line selection — You look ahead and choose where to ski, reading terrain and other skiers. Planning ahead — not reacting at the last second.
Balance — Weight centered over your skis. Not leaning back (the “backseat”), not crouching too far forward.
Turns when needed — Christies or parallel turns control speed and navigation. The wedge can still appear but is not your only tool.
Safe stopping — You stop smoothly at the bottom or when directed, not by crashing or snow-plowing into a pile.
Setting Yourself Up for Success
- Warm up first on easier terrain to find your rhythm before the controlled run.
- Set your pace in the first few turns. A calm, rhythmic start carries through the whole run.
- Think ahead. Scan three turns downhill at all times. Pick your targets, then execute.
- Stay relaxed. Tense muscles make skiing harder. Breathe, bend your knees, keep your hands forward.
- If speed builds, make a wide turn across the slope to bleed off speed before you commit to the next turn.
Official Resources
🎬 Video: Making a Controlled Run (video) — https://youtu.be/CMgId4iSlcE
Req 7a9 — Varied Conditions
A mountain is never one single kind of terrain or snow. This requirement asks you to show that your technique holds up when conditions change — not just on the perfect groomer, but when the slope steepens or the snow surface changes underfoot.
Types of Snow Conditions You May Encounter
Groomed (packed powder) — The easiest surface. Machine-groomed corduroy provides consistent, predictable grip. This is where most beginners build confidence.
Powder — Fresh, untracked snow. Deep powder requires you to keep weight balanced over both skis (not just the downhill ski) to stay on the surface. It feels very different from groomed runs — softer, slower, and more forgiving for falls but harder to turn in.
Ice or hard pack — Compacted snow with little or no give. Edges must be sharp and pressure applied confidently. Turns are shorter and more precise. Most beginners find icy conditions challenging; expect more sliding and less grip.
Variable or “crud” — Partially skied-out, uneven snow that varies in hardness and depth from turn to turn. Requires relaxed legs that can absorb unexpected bumps and flex independently.
Moguls (bumps) — Large mounds of snow formed by repeated turns in the same spots. Moguls require short, quick turns and active absorption — bending and extending your legs to keep contact with the snow.
Steep terrain — Steeper pitch amplifies any imbalance. Keep weight forward (over the front of the boot), make shorter, more frequent turns, and avoid the temptation to lean back.
What Your Counselor Is Looking For
- Adapt your technique to each condition rather than skiing every surface the same way.
- Maintain balance — weight centered, not leaning back especially on steeper or harder snow.
- Continue turning — do not lock up or stop making turns when conditions change.
- Manage speed — adjust turn shape and frequency to the terrain.
Official Resources
🎬 Video: Skiing in Variable Snow Conditions (video) — https://youtu.be/DQv53VSxykY?si=wBlVELSoFcvQ973i
Req 7a10 — Major Ski Organizations
The world of skiing in the United States is supported by several key organizations. Each one has a different focus — from teaching and instruction to competition to safety on the slopes. Know who they are and what they do.
Major U.S. Ski Organizations
Professional Ski Instructors of America (PSIA)
Function: PSIA is the national organization for alpine ski and snowboard instructors. It establishes the American Teaching System (ATS), certifies instructors, and provides ongoing education for ski school professionals throughout the country.
When you take a lesson at any accredited ski resort in the United States, there is a good chance your instructor was trained and certified under PSIA standards.
American Association of Snowboard Instructors (AASI)
Function: AASI is the snowboard division of PSIA. It sets teaching standards, certifies snowboard instructors, and develops curriculum for snowboard instruction. PSIA and AASI share an organization but maintain separate certification tracks.
U.S. Ski & Snowboard
Function: U.S. Ski & Snowboard is the national governing body for competitive skiing and snowboarding in the United States. It selects and trains the U.S. Olympic and national teams in Alpine, Nordic, freestyle, ski jumping, and snowboarding. If you watch Americans compete in the Winter Olympics, they are representing U.S. Ski & Snowboard.
National Ski Patrol (NSP)
Function: The NSP trains and organizes ski patrollers — the first responders at ski areas across the country. Ski patrol members respond to accidents and injuries, maintain mountain safety, perform avalanche control, and provide emergency medical care. NSP members may be volunteers or paid professionals, many trained as Emergency Medical Technicians (EMTs) or Outdoor Emergency Care (OEC) technicians.
National Ski Areas Association (NSAA)
Function: The NSAA is the trade association for ski resort operators in the United States. It represents the ski industry’s business interests, promotes the Your Responsibility Code, and publishes safety and environmental standards for ski areas.
Official Resources
🎬 Video: Professional Ski Instructors of America (PSIA) (video) — https://youtu.be/Z_Jh5pfseU8
🎬 Video: U.S. Ski & Snowboard (video) — https://youtu.be/MHJlZBwiUx4
🎬 Video: National Ski Patrol (video) — https://youtu.be/bmqLYSj4u0Q?si=6X5-kAiIuDy3Tgdg
You have completed all ten requirements for Option A — Downhill (Alpine) Skiing. If you chose another option, continue to that section. Otherwise, head to Extended Learning.
Req 7b — Cross-Country (Nordic) Skiing
You have chosen cross-country (Nordic) skiing. This option covers equipment, trail rules, waxing, navigation, skiing technique, and a 4-mile tour. There are 11 sub-requirements and you must complete at least 10 of them.
Work through the requirements below in order — the knowledge requirements (7b1 through 7b7) can be prepared before you hit the trails; the skills requirements (7b8 through 7b11) are demonstrated on snow.
What You’ll Complete
- Req 7b1 — Equipment Selection: Select, use, and maintain cross-country ski equipment for safety and comfort.
- Req 7b2 — Trail Rules: Explain the reasons for common Nordic trail rules — no walking on tracks, one-way direction, no pets, no snowmobile trails.
- Req 7b3 — Types of Nordic Skis: Discuss classic, skating, touring, and telemark skis.
- Req 7b4 — Waxing for Touring: Explain the basic principles of waxing for cross-country touring.
- Req 7b5 — Skiing Styles Compared: Discuss the differences between cross-country, backcountry/ski touring, ski mountaineering, and downhill/telemark skiing.
- Req 7b6 — One-Day Tour Gear: List the items you would take on a one-day ski tour.
- Req 7b7 — Map & Compass: Demonstrate the proper use of a topographic map and compass.
- Req 7b8 — Speed & Direction Control: On a gentle packed slope, demonstrate straight run, traverse, side slip, step turn, wedge stop, and wedge turn.
- Req 7b9 — Propulsion Technique: On a cross-country trail, demonstrate weight transfer, pole timing, rhythm, flow, and glide.
- Req 7b10 — 4-Mile Tour: Complete a 4-mile tour demonstrating ability to handle varied snow conditions.
- Req 7b11 — Steep Hills & Difficult Conditions: Demonstrate traverses, kick turns uphill and downhill, sidesteps, and pole drag.
Req 7b1 — Equipment Selection
Cross-country skiing gear is built around one defining feature: a free heel. Unlike Alpine ski boots that are locked at both toe and heel, Nordic boots attach only at the toe, allowing your heel to lift with each stride. This is what makes propulsion possible.
Selecting Skis
Length: Classic Nordic skis are typically 15–25 cm longer than the skier is tall, scaled to body weight. Heavier skiers need longer skis for more contact and grip; lighter skiers use shorter skis.
Style match: Skis are not interchangeable across styles. Classic skis have a kick zone under the foot (either waxable or with a textured grip base). Skate skis are shorter and stiffer with no kick zone. Touring and backcountry skis are wider for off-track travel. See Req 7b3 for details on types.
Camber: Nordic skis have an arch (camber) in the middle. When you stand on both skis, the grip zone should barely touch the snow. When you kick forward on one ski, the arch flattens and presses the grip zone into the snow to push. Proper camber match to your weight is critical for grip and glide.
Selecting Poles
Nordic poles should reach from the ground to roughly your armpit for classic skiing, or to your chin/shoulder for skate skiing (skate requires slightly longer poles for the wider push angle).
Material: Aluminum poles are durable and affordable. Carbon fiber poles are lighter and used by more serious skiers.
Baskets: Winter cross-country baskets are small, round discs near the tip. Large powder baskets are used in deeper snow conditions.
Selecting Boots
Boots must match your binding system. Three common Nordic binding systems (NNN, SNS, NNN-BC) are not interchangeable — always buy boot and binding as a matched pair or verify compatibility.
Cross-country boots should feel comfortable with a normal walking sock. They are much softer and more flexible than Alpine boots. The sole should flex easily when you bend it with your hands.
Maintenance
- Wax regularly — see Req 7b4 for waxing principles.
- Dry equipment after use — snow and moisture degrade bases and rust metal edges over time. Wipe down and store in a cool, dry place.
- Inspect bindings and cable connections before each use. Loose or cracked bindings cause unexpected release on the trail.
- Check boot soles for cracking or separation, especially in cold temperatures. Old boots can fail in freezing conditions.
Official Resources
🎬 Video: How to Choose Cross-Country Skis (video) — https://youtu.be/vqKaNOw6Feg?si=wVLxSaHGNEfQXGAq
Req 7b2 — Trail Rules
Nordic trail rules exist to protect the trail surface, ensure everyone’s safety, and keep the experience enjoyable. Each rule has a clear, practical reason behind it.
The Rules and Why They Exist
No Walking on Ski Trails
Hiking boots and shoes punch through the groomed snow surface and destroy the carefully prepared tracks and corduroy. Ski resorts and Nordic centers spend significant effort and equipment grooming trails. A single person walking through a track compresses and deforms the snow in a way that takes hours of grooming to repair — and in subfreezing temperatures, footprints can freeze solid and become tripping hazards for skiers. Even snowshoes can damage groomed tracks and should stay off Nordic trails unless the trail is specifically designated for both.
One-Way Ski Direction
Most Nordic trails are designed and groomed for one-way travel in a specific direction. Two-way traffic creates head-on collision risk and also makes trail grooming inefficient. Skiers moving at speed on a narrow trail need to know what is ahead of them — not also what might be coming from behind. If you need to turn back before completing a loop, look for a designated turnaround point rather than reversing direction on the trail.
No Pets
Dogs on Nordic trails create multiple hazards:
- Off-leash dogs run into other skiers and disrupt technique.
- Dog paw prints and waste damage and contaminate the groomed snow surface.
- Leashes stretched across the trail can trip other skiers.
- Even well-behaved dogs on short leashes create unpredictable hazards in the confined space of a groomed track.
Some Nordic centers have designated dog-friendly loops or times — check with the facility.
No Skiing on Snowmobile Trails
Snowmobile trails are packed but not groomed for skiing. More importantly, snowmobile traffic is dangerous for skiers: machines move fast, are loud, and may not be able to stop quickly. Snowmobile exhaust also pollutes the snow. Ski on trails designated for skiing; snowmobiles and skiers need separate terrain for safety.
Req 7b3 — Types of Nordic Skis
Nordic skiing covers several distinct disciplines, and each uses equipment designed for that specific style of movement and terrain.
Classic Skis
Classic skiing uses a diagonal stride — one ski pushes back as the other glides forward, like walking or running. Classic skis have a kick zone under the foot (the middle third of the ski). When you kick down, this zone grips the snow and propels you forward. When you glide, the ski rides on its tip and tail sections.
- Waxable classic skis have a smooth base in the kick zone that you apply grip wax to, matched to snow temperature.
- Waxless (no-wax) classic skis have a patterned fish-scale texture in the kick zone that grips mechanically — no wax required. More convenient; slightly less efficient.
- Width: Relatively narrow for groomed track skiing.
- Boot/binding: Low-cut, flexible boot; NNN or SNS binding is common.
Skate Skis
Skate skiing uses a side-to-side motion similar to ice skating — you push off the inside edge of one ski and glide on the other, alternating sides. Skate skis are shorter and stiffer than classic skis and have no kick zone.
- Requires a groomed, packed trail surface (cannot be used in deep snow).
- Much faster than classic skiing on groomed trails.
- Higher cardio demand — skate skiing is extremely aerobic.
- Boot/binding: Stiffer boot with more ankle support than classic; usually NNN skate binding.
Touring Skis (Backcountry / Off-Track)
Touring skis are wider and more durable than groomed-trail skis. They are designed for travel in untracked snow, forest trails, and backcountry routes where there is no grooming.
- Width: Significantly wider (50–75mm at waist) for flotation in soft or deep snow.
- Metal edges: Many touring skis have metal edges for control on steep icy terrain.
- Bindings: 75mm three-pin or NNN-BC (backcountry) bindings are common; some use touring bindings designed for heavier use.
- Boots: Sturdier, more supportive boots than groomed-trail options.
Telemark Skis
Telemark skiing uses a free-heel binding similar to Nordic gear but the technique is used for alpine-style descents on downhill slopes and backcountry terrain. The telemark turn is characterized by a dropped knee — the back leg bends deeply as you carve the turn.
- Telemark skis are closer in width and stiffness to Alpine skis than to groomed-trail Nordic skis.
- They are used in lift-accessed ski resorts (with the lift but no heel lock on the descent) and in backcountry touring.
- The combination of Nordic climbing efficiency (free heel going up) and Alpine-style descending ability makes telemark popular with backcountry adventurers.
Official Resources
🎬 Video: Types of Cross Country Skis (video) — https://youtu.be/oXIp-lJJH4E?si=yNMZNIMyDHQjO_uC
Req 7b4 — Waxing for Touring
Nordic waxing is a science and an art. The right wax transforms a cross-country ski from a plank that slides backward into a tool that grips going uphill and glides efficiently on flat and downhill terrain. Understanding the basic principles — even if you use no-wax skis — makes you a more knowledgeable Nordic skier.
Two Types of Wax
Glide wax is applied to the tip and tail of the ski (the glide zones). Its job is to minimize friction and maximize slide. Glide wax is temperature-specific: cold snow requires harder (colder-temperature) wax; wet, warm snow needs softer wax. The wrong glide wax causes slow, sticky movement or excessive sliding.
Kick wax (grip wax) is applied to the kick zone (the middle third of a waxable ski). Its job is the opposite: maximum grip when you push down and minimal drag when you glide. Kick wax must match the snow temperature and snow crystal type very precisely. The wrong kick wax means either slipping (no grip when you push) or clumping (snow sticks and you drag a ball of ice under your foot).
The Temperature Principle
Snow crystal structure changes with temperature:
- Cold, dry snow (well below freezing) has sharp, hard crystals. It requires harder grip wax — these wax types come in small metal tins and are typically labeled “green” for the coldest conditions, then “blue” and “violet” for progressively warmer snow.
- Wet snow (near 0°C / 32°F) has rounded, soft crystals. It requires klister, a sticky paste-like wax that grips wet snow. Klister is messy to apply and clean up but essential for spring conditions.
- New snow vs. old snow: New snow has sharper crystals and needs harder wax. Old, settled snow has rounded crystals and may need softer wax even at the same temperature.
Application
- Clean the ski base first — remove old wax residue with a plastic scraper.
- Apply glide wax to tip and tail sections using a hot wax iron, then scrape and brush.
- Apply kick wax in thin layers to the kick zone. Rub it in with a cork tool to smooth and press it into the base. Apply two to three layers.
- Test it on a short section of trail. Adjust if you are slipping (need more or softer wax) or if snow is balling up under the foot (too much or too soft a wax — scrape some off or apply harder wax over it).
No-Wax Skis
Many recreational skiers use no-wax (waxless) skis with a textured fish-scale base in the kick zone. These require no kick wax — the mechanical texture provides grip. You still apply glide wax to the tip and tail glide zones for best performance, but the kick zone handles itself. No-wax skis are ideal for touring in variable conditions where matching wax to rapidly changing snow is impractical.
Official Resources
🎬 Video: How to Wax Cross-Country Skis (video) — https://www.youtube.com/shorts/hFl9r0JapvI
Req 7b5 — Skiing Styles Compared
Nordic skiing encompasses a wide range of disciplines that differ in terrain, equipment, technique, and objective. Here is a comparison of the four styles this requirement asks about.
Cross-Country Skiing (Track / Trail)
Terrain: Groomed Nordic trails at a ski center or resort, usually in a flat to gently rolling forested setting.
Equipment: Lightweight classic or skate skis, light boots, Nordic bindings (NNN, SNS).
Technique: Diagonal stride (classic) or skating motion (skate technique). Focus is on efficient propulsion on the flat and gentle uphill.
Objective: Fitness, recreation, or racing on prepared trails. No need for navigation skills beyond the trail system.
Risk level: Low — groomed trails are marked, patrolled, and free of major hazards.
Backcountry / Ski Touring
Terrain: Ungroomed natural terrain — forests, meadows, open mountains, snowfields. No lifts, no groomed tracks.
Equipment: Wider touring skis with metal edges, supportive boots, NNN-BC or three-pin bindings, skins (grip pads that attach to ski bases for climbing), avalanche safety gear.
Technique: A mix of striding, poling, kick turns, and traverses. Skins allow climbing steep uphill terrain; skins are removed for descents.
Objective: Wilderness travel, remote hut access, adventure, photography, or multi-day expeditions.
Risk level: Higher — avalanche terrain, navigation requirements, weather, and self-rescue are all real factors.
Ski Mountaineering
Terrain: High-altitude mountain terrain, often involving glaciers, steep couloirs (narrow gullies), exposed ridges, and significant vertical gain/loss.
Equipment: Lightweight alpine touring (AT) or randonée gear — very stiff skis, AT bindings with locked heel for descents, crampons and ice axes may be needed.
Technique: Combines ski touring efficiency with technical mountaineering. Steep descents require strong Alpine skiing skill. Route finding, rope travel on glaciers, and crevasse rescue may be required.
Objective: Summit ascents, peak bagging, and extreme mountain descents.
Risk level: Very high — requires advanced mountaineering skills, avalanche training, and mountain rescue knowledge.
Downhill / Telemark Skiing
Terrain: Alpine ski resort slopes (groomed and ungroomed), accessed by lifts or by skinning uphill.
Equipment: Telemark skis (wider and stiffer than Nordic, narrower than full Alpine), free-heel telemark bindings, stiff telemark boots.
Technique: The distinctive telemark turn involves dropping the rear knee toward the snow while carving with both skis. The free heel (never locked on descent) is what defines telemark. On the ascent, the free heel allows efficient Nordic-style uphill travel.
Objective: Combining the efficiency of Nordic (free heel going up) with the thrill of Alpine descents. A traditional backcountry and resort discipline.
Risk level: Comparable to Alpine skiing at resorts; higher if used in backcountry settings.
Quick Comparison
| Style | Terrain | Equipment | Primary Goal |
|---|---|---|---|
| Cross-country | Groomed trails | Light Nordic gear | Fitness and recreation |
| Backcountry touring | Ungroomed wilderness | Wide skis, skins | Wilderness travel |
| Ski mountaineering | High-altitude peaks | AT or randonée | Summit and extreme descent |
| Downhill/Telemark | Alpine slopes | Telemark gear | Free-heel downhill skiing |
Official Resources
🎬 Video: Styles of Cross-Country Skiing (video) — https://youtu.be/a2C77sfBMHo
🎬 Video: What is Telemark Skiing? (video) — https://youtu.be/-B1UnHDByoY
Req 7b6 — One-Day Tour Gear
A one-day ski tour takes you away from groomed trails and lodge facilities into terrain where you are self-sufficient. Planning what you carry matters — the right gear can mean the difference between a great day and a dangerous situation.
Your Gear List for a One-Day Ski Tour
Navigation
- Topographic map of your route (waterproof or in a protective sleeve)
- Compass — GPS units can fail in cold; always carry a map-and-compass backup
- Trail map of the area if applicable
Safety and Emergency
- First aid kit — blister care, bandages, moleskin, pain reliever, emergency mylar blanket
- Whistle — for signaling
- Fire starter — waterproof matches or lighter, plus a fire-starting material in a sealed bag
- Emergency bivouac sack or extra insulating layer — in case you must spend unexpected time outside
Clothing (Ten Essentials principle: dress in layers)
- Moisture-wicking base layer
- Insulating mid-layer (fleece or down)
- Waterproof shell jacket and pants
- Extra dry gloves or mittens
- Warm hat and neck gaiter
- Gaiters — keep snow out of boot tops in deep or loose snow
- Spare socks
Food and Water
- Water — minimum 1–2 liters; water bottles (not bladders, which freeze in cold) or insulated container
- High-calorie food — energy bars, trail mix, chocolate, nuts, or a thermos of warm soup for cold days
- Extra food for unexpected delays
Equipment
- Skis, poles, boots (your primary gear)
- Ski wax kit or no-wax skis with backup grip wax for changing conditions
- Ski repair kit — pole basket repair parts, binding screws, cable or buckle repair, duct tape
- Headlamp or flashlight with extra batteries — tours can run long
Sun Protection
- Sunscreen (SPF 30+) and lip balm with SPF
- Goggles or sunglasses — snow reflects UV strongly even on overcast days
One-Day Ski Tour Checklist
Review before every outing- Navigation: map, compass (and trail map if applicable).
- Safety: first aid kit, whistle, fire starter, emergency layer.
- Clothing: layered system, extra gloves, hat, gaiters, spare socks.
- Food and water: minimum 1.5 L water, high-calorie snacks, extra emergency food.
- Equipment: skis/boots/poles, wax kit, repair kit, headlamp with batteries.
- Sun: sunscreen, lip balm, goggles or sunglasses.
- Communication: fully charged phone (cold drains batteries — keep in an inside pocket), tell someone your route and expected return time.
Official Resources
🎬 Video: Gear Checklist for a Day Tour (video) — https://youtu.be/3rHuEqZgUMc
Req 7b7 — Map & Compass
A GPS is useful, but in cold temperatures batteries drain fast and electronics can fail. Knowing how to navigate with a map and compass is an essential skill for any backcountry or cross-country ski tour.
Reading a Topographic Map
A topographic (topo) map shows terrain in three dimensions through contour lines — lines connecting all points at the same elevation.
Key map-reading skills:
- Contour lines close together = steep terrain. Lines far apart = gentle terrain.
- Contour interval: each map states its contour interval (e.g., “20-foot contour interval”). Every line represents a rise or fall of that amount.
- V-shapes pointing uphill = valleys or drainages. V-shapes pointing downhill = ridges.
- Closed circles = hilltops or peaks. The innermost circle is the summit.
- Index contours are every fifth line and are marked with their elevation.
- Map scale (e.g., 1:24,000) tells you the real-world distance represented per inch or centimeter on the paper.
For ski touring: Read the topo before you leave. Identify steep sections (avalanche risk), flat travel zones, stream crossings, and your intended route’s high and low points.
Using a Compass
A baseplate compass (like a Silva or Suunto) has three essential parts:
- Magnetic needle — always points to magnetic north.
- Rotating bezel (azimuth ring) — marked in degrees from 0 to 360.
- Baseplate with direction-of-travel arrow — points where you want to go.
Taking a bearing from a map:
- Place the compass on the map, aligning the baseplate edge with your start point and your destination.
- Rotate the bezel until the north lines on the bezel align with the north lines on the map.
- Read the bearing at the direction-of-travel arrow (e.g., 285°).
- Adjust for declination — the difference between magnetic north and true north. Your topo map will state the declination for your area.
Following a bearing in the field:
- Hold the compass level.
- Rotate your whole body until the magnetic needle aligns with the north arrow on the bezel (“red in the shed” or “putting Fred in the shed” are common memory tricks).
- Walk in the direction the direction-of-travel arrow points.
- Sight on a landmark in that direction, travel to it, and repeat.
Dead reckoning in a whiteout: If visibility drops to near zero (whiteout), you can navigate by bearing and pace counting. Know your pace count per 100 meters to estimate distance traveled.
Official Resources
🎬 Video: How to Read a Topographic Map (video) — https://youtu.be/CoVcRxza8nI
🎬 Video: How to Use a Compass (video) — https://youtu.be/0cF0ovA3FtY?si=HJAgHgcZCmPOcuC3
🎬 Video: How to Use a Topographic Map and Compass (video) — https://youtu.be/P1LL2FXK6o0?si=rb4_VuRCb-uql1gU
Req 7b8 — Speed & Direction Control
Cross-country skiing is not just about flat terrain and forward motion. Ski tours frequently involve descents — and on Nordic gear, with a free heel and lighter boots, controlling speed downhill requires specific techniques. Practice all six maneuvers on a gentle, packed slope.
The Six Maneuvers
Straight Run
Ski directly downhill with skis parallel, hip-width apart, knees slightly bent, and weight centered. Arms forward with poles tucked back, not dragging. The straight run gives you a feel for speed and how your Nordic skis behave on descent — they are less responsive to edging than Alpine skis.
Traverse
Ski across the slope at an angle — not straight downhill, but cutting across the hill. Keep your skis parallel, with slight edge pressure into the hill on the uphill edges. The traverse controls speed by not pointing directly downhill. It is your go-to direction for moving across steep terrain safely.
Side Slip
From a stopped position or slow traverse, release your edges by letting your skis flatten and allow yourself to slide sideways down the slope (still facing across the hill). Control the slip speed by re-engaging your edges. This skill is used for descending terrain that is too steep to traverse comfortably or when you need to lose elevation carefully.
Step Turn
While moving, lift one ski and angle it in the direction you want to turn, then bring the other ski alongside it. Repeat — step the lead ski, bring the other alongside. This is used for directional changes at slow speeds and on flat or gentle terrain. Think of it as walking a turn rather than skidding one.
Wedge Stop
Push your tails apart to form a V-shape (tips together, tails apart), pressing the inside edges into the snow. The more aggressively you wedge, the more friction — bringing you to a stop. Works on packed and groomed surfaces; less effective in deep or loose snow.
Wedge Turn
From a gliding wedge, shift weight to the outside ski of the desired turn direction. The wedge steers you that way. Turn left: weight to right ski. Turn right: weight to left ski. The technique is the same as in Alpine skiing but Nordic equipment is more flexible, so your body position needs to stay more upright and centered.
Official Resources
🎬 Video: How to Control Speed and Direction (video) — https://youtu.be/kmw9LxutG_8
Req 7b9 — Propulsion Technique
Efficient Nordic skiing is all about technique. Unlike Alpine skiing where gravity does most of the work on descent, cross-country touring requires you to generate forward momentum on flat and uphill terrain. Good technique means you can cover distance without exhausting yourself.
The Elements of Effective Propulsion
Weight Transfer (Ski to Ski)
The fundamental movement in classic Nordic skiing is transferring your full body weight from one ski to the other with each stride. A common beginner mistake is keeping weight equally distributed on both skis at all times — this prevents the kick zone from loading and pushing properly.
Think of it like walking: when you step forward on your right leg, your full weight is briefly on that leg before shifting to the left. Nordic skiing works the same way. Commit your weight to each ski in turn. The more completely you transfer weight, the more efficient each push becomes.
Pole Timing
In diagonal stride (classic technique), your poles push in alternating rhythm with your legs — opposite arm and leg move together, exactly like natural walking motion.
- Right ski kicks back → Left arm/pole plants and pushes
- Left ski kicks back → Right arm/pole plants and pushes
The pole plants at the moment of the kick, adding upper body power to the stride. Late pole planting (after the kick) wastes energy. Early planting (before the kick) disrupts rhythm.
Rhythm
Good Nordic skiing has a steady, flowing rhythm — not a choppy, hesitant sequence of movements. Rhythm develops with practice and relaxation. Tense, jerky movements waste energy. A relaxed upper body and smooth arm swing naturally creates a better lower-body kick.
Flow
Flow is the overall feeling of smooth, connected movement from stride to stride. Skiers with flow look effortless because each element transitions smoothly into the next without obvious breaks or resets.
Glide
After the kick, let the gliding ski actually glide — do not rush immediately into the next kick. The glide phase is where the work of the kick is rewarded with forward motion. Beginners often cut the glide phase short by shuffling too quickly. Extend through the glide: weight fully on the front ski, rear leg extended behind, body moving over the lead ski.
What Your Counselor Is Looking For
- Clear weight shift from one ski to the other (not shuffling flat on both skis)
- Pole timing that matches the diagonal stride (opposite arm and leg)
- Consistent rhythm maintained over at least a short trail section
- A visible glide phase after each kick — not just a shuffle
Official Resources
🎬 Video: Basic Moves on Cross-Country Skis (video) — https://youtu.be/ctrIUq9kCJI?si=QoPaYBG0365ZvZF1
Req 7b10 — 4-Mile Tour
The 4-mile tour is the capstone of the Nordic option. It brings together all your skills — technique, fitness, equipment, and judgment — and asks you to demonstrate them over a sustained distance in real-world conditions.
What “Coping With Varied Snow Conditions” Means
A 4-mile tour rarely happens on a single type of snow. You may encounter:
- Groomed classic track — smooth and forgiving
- Packed powder — firm but grippy; efficient travel
- Breakable crust — a hard surface layer that breaks through with each step; tiring and unpredictable
- Heavy wet snow — slushy, slow, and tiring; grip wax issues common in spring
- Icy sections — requires confident edging and reduced speed
- Variable (mixed) — patches of all of the above, sometimes within a single stride
“Coping” means you adjust your technique and pace to each condition without stopping every 50 feet. A slow, steady pace on difficult snow is better than racing through easy sections and exhausting yourself before you reach the harder terrain.
Preparing for the Tour
- Know your route. Study the map before you leave. Note elevation changes — steep climbs and descents add significantly to effort.
- Check the wax forecast. Snow temperature changes during the day (especially in spring). Start with a wax appropriate for the morning temperature and bring a small kit to adjust.
- Dress to move. Cross-country skiing generates a lot of body heat. You will overheat in the same layers that kept you warm at the trailhead. Dress slightly cooler than you think you need and use your layering system as you warm up.
- Fuel before and during. Four miles of Nordic skiing can burn 400–700 calories depending on terrain and effort. Carry food and water, and stop to eat before you feel hungry.
- Tell someone your plan. Route, expected return time, and contact information for your meeting point.
During the Tour
- Pace yourself. Start at a pace you can maintain for the full distance. You should be able to hold a conversation for the first mile.
- Take care of your feet. If you feel a hot spot developing (early blister), stop and address it. A small piece of moleskin now prevents a large problem two miles from the trailhead.
- Observe and adapt. If you hit icy terrain, widen your stance and shorten your stride. If snow is heavy and wet, concentrate on lifting your ski more with each step rather than sliding through slushy resistance.
Official Resources
🎬 Video: Skiing on Varied Conditions (video) — https://youtu.be/nCqNLC8PzNM?si=_vD2U1nIhE-khHVQ
Req 7b11 — Steep Hills & Difficult Conditions
Nordic skis are designed for forward motion on moderate terrain, but ski tours frequently involve steep sections. These techniques allow you to navigate challenging slopes safely when your normal forward stride would send you sliding out of control.
Traverse
Moving across a steep slope at an angle (rather than straight up or straight down) allows you to gain or lose elevation gradually.
- Uphill traverse: Angle your skis across the fall line and sidestep slightly, or use a shuffling diagonal stride. Edge your uphill ski into the hill for grip.
- Downhill traverse: Keep your weight over the downhill ski, edge both skis into the hill, and let gravity pull you diagonally down and across rather than straight down.
Kick Turn (Uphill and Downhill)
A kick turn is how you reverse direction on steep terrain where there is not enough room to ski a wide arc.
Basic kick turn:
- Stop in a stable, balanced position.
- Lift one ski and swing the tip far forward, then rotate the ski 180° so it points in the opposite direction and place it on the snow.
- Shift your weight onto the turned ski.
- Bring the other ski around to match.
Uphill kick turn: Used at the end of an uphill traverse to reverse direction and continue climbing on the other side.
Downhill kick turn: Used at the end of a downhill traverse. The same technique, but you must be on stable ground since your center of gravity is shifting while facing partially downhill.
Sidestep
Plant both poles above you on the uphill side and step sideways up the hill one step at a time, keeping skis perpendicular to the fall line. Edge the uphill ski firmly into the snow for grip with each step. Used for ascending steep terrain when traversing is not possible or efficient.
For descending, reverse the process: sidestep down by stepping the downhill ski out, then bringing the other alongside, while keeping poles planted for support.
Pole Drag
On a descent that is too steep to control purely with edging, trail both poles behind you dragging the tips in the snow. This creates friction and reduces speed. Do not rely on pole drag as your only speed control — it is a supplement to edging and technique, not a substitute.
How to pole drag:
- Hold poles normally but allow both tips to trail behind you on the snow surface.
- Increase or decrease drag by applying more or less downward pressure.
- Combine with a traverse or wedge to manage speed on very steep terrain.
Putting It Together
Steep hill techniques are often combined in sequence:
- Traverse across the slope to reduce effective steepness.
- Kick turn at the edge to reverse direction.
- Continue the traverse on the new line.
- Sidestep up or down short steep pitches where traversing is not possible.
- Use pole drag for speed control on unavoidable steep descents.
Official Resources
🎬 Video: Dealing With Hills (video) — https://youtu.be/MWskz4ZnPl4?si=pyET65PzEaPCW94o
You have completed all the requirements for Option B — Cross-Country (Nordic) Skiing. If you chose another option, continue to that section. Otherwise, head to Extended Learning.
Req 7c — Snowboarding
You have chosen snowboarding. Like the Nordic option, this section has 11 sub-requirements of which you must complete at least 10.
Snowboarding has a different feel from skiing — your feet are both fixed to a single board, which means your whole body rotates together on turns. That takes some getting used to, but once you find your edge, snowboarding is fluid and rewarding.
What You’ll Complete
- Req 7c1 — Forward-Fall Injuries: Discuss the specific injuries caused by snowboarding forward falls and how to reduce the risk.
- Req 7c2 — Equipment Selection: Select the correct snowboard, boots, and gear for safety and comfort.
- Req 7c3 — Bindings & Leashes: Use and maintain bindings; explain different binding types and why leashes matter.
- Req 7c4 — Types of Snowboards: Discuss the four types of snowboards and demonstrate how to carry a snowboard safely.
- Req 7c5 — Riding a Lift: Demonstrate one lift type and explain two others on a snowboard.
- Req 7c6 — Waxing a Snowboard: Demonstrate the basic principles of waxing a snowboard base.
- Req 7c7 — Beginning & Intermediate Maneuvers: On gentle terrain, demonstrate sideslipping and basic speed/direction control. On slightly steeper terrain, show traversing.
- Req 7c8 — Ollie, Nose-End Grab & Wheelie: Demonstrate three freestyle techniques on a moderate slope.
- Req 7c9 — Controlled Run: Make a full controlled run down an intermediate slope.
- Req 7c10 — Varied Conditions: Ride in varied terrain and snow — changes in pitch, snow type, and moguls.
- Req 7c11 — Major Snowboarding Organizations: Name the major U.S. snowboarding organizations and explain their functions.
Req 7c1 — Forward-Fall Injuries
Snowboarding has a specific injury pattern different from skiing. Because both feet are attached to one board, falls tend to go in one of two predictable directions: forward (onto your hands, wrists, and face) or backward (onto your tailbone, hips, and head). Forward falls are the most common and create distinct injury risks worth understanding before you ever click into a board.
Why Forward Falls Are Different in Snowboarding
When a skier loses balance and falls forward, their feet can separate from the skis and they often tumble and roll. A snowboarder’s feet are locked to the board — when you fall forward, the board comes with you, and your arms instinctively reach out to catch the impact. That’s where most of the damage happens.
Common Forward-Fall Injuries
Wrist fractures and sprains The most common snowboarding injury, caused by extending the arms to catch a fall. The force of the impact is transmitted through the palms and wrists, stressing the small wrist bones and the radius (the larger forearm bone near the wrist). The scaphoid fracture — a small wrist bone — is particularly common and can be slow to diagnose.
How to reduce risk: Wear wrist guards designed for snowboarding. They do not prevent all injuries, but they significantly reduce fracture risk by distributing force along the forearm. Wrist guards are one of the most evidence-supported pieces of protective gear in all of skiing and snowboarding.
Shoulder injuries When you fall onto an outstretched arm, the force can travel up the arm to the shoulder, causing AC joint separations (where the collarbone meets the shoulder blade) or dislocations.
How to reduce risk: Learn the technique for falling safely (below). Wrist guards help by keeping your wrists from collapsing in ways that transmit force upward.
Facial injuries A board edge or hard snow contact with the face can cause cuts, broken noses, and eye injuries.
How to reduce risk: Wear a helmet with a fitted visor or chin guard on aggressive terrain. Goggles protect your eyes from edge contact.
Concussion Forward falls can involve head contact with the snow if your momentum carries you over your outstretched arms.
How to reduce risk: Wear a properly fitted helmet every time you ride.
How to Fall Safely Forward
You cannot always prevent a fall, but you can train a safer falling response:
- Tuck your chin toward your chest to avoid face contact with the snow.
- Bend your elbows and try to land on your forearms and palms rather than straight, locked-out arms. This distributes force more broadly.
- Roll with the momentum rather than slamming to a stop — a rolling fall reduces peak impact force.
- Wear wrist guards — especially as a beginner, when falls are most frequent.
Official Resources
🎬 Video: How to Fall on a Snowboard (video) — https://youtu.be/pAuRz-QP5tM
Req 7c2 — Equipment Selection
Choosing the right snowboard setup for your size, ability, and riding style makes learning safer and faster. The main components are the board, bindings, and boots — and they need to work together.
Selecting a Snowboard
Length: A basic starting point is a board that reaches between your chin and nose when stood upright on the ground. Heavier or more aggressive riders can go longer; lighter, more casual riders can go shorter. Shorter boards are easier to turn and better for beginners and terrain parks. Longer boards are faster and more stable at speed.
Width: Your boots should not overhang the board edge by more than a small amount (1–2 cm maximum). Too much overhang causes boot drag in turns. If you have wide feet or large boot sizes (US men’s 11+), you may need a “wide” board.
Flex: Boards are rated from soft (more forgiving, better for beginners and freestyle) to stiff (more responsive, better for high-speed carving). Beginners should start with a medium-soft flex.
See Req 7c4 for descriptions of the four board types.
Selecting Boots
Snowboard boots should feel snug but not painfully tight. A proper fit:
- Heel should be firmly held down; there should be no heel lift when you flex forward.
- Toes should barely touch the end of the liner when the boot is unlaced, but not crammed.
- No pressure points that cause numbness after 10 minutes.
Lacing systems:
- Traditional laces — most control but slow to put on.
- BOA system — dial-tightened wire system; fast and convenient.
- Speed laces / quick-pull — one-pull lacing; fast and simple.
Boots must match the binding system you are using. Most modern boots are compatible with most bindings, but confirm before purchasing.
Selecting Bindings
Bindings transfer your movements to the board. There are two main types for beginner and recreational riders:
- Strap bindings (most common): Two straps secure your foot — one over the toe and one at the ankle. Very adjustable; used at all levels.
- Step-in / rear-entry bindings: Faster to get in and out of but less adjustable and less common in high-performance applications.
Fit Check
Before each session:
- Boot laced or buckled firmly — no excess movement.
- Bindings adjusted to boot size — straps should hold the boot snugly without creating pressure points.
- Leash (if required) properly attached — see Req 7c3.
- Helmet fitted properly — see Req 5 for general fitting principles.
Official Resources
🎬 Video: Selecting Snowboard Equipment (video) — https://youtu.be/lF2lf5RGCOw?si=IonNRzzALWYLVIlx
Req 7c3 — Bindings & Leashes
Bindings connect your boots to your board. Properly adjusted bindings give you full control over your board. Improperly adjusted or maintained bindings are a safety hazard.
Using Strap Bindings (Most Common)
Putting on strap bindings:
- Sit or stand with the board flat on the snow.
- Insert your front foot boot into the binding, aligning the heel cup firmly against the back of the binding.
- Buckle the ankle strap first, then the toe strap. Pull each strap snug but not so tight that circulation is cut off.
- Check that the heel is held firmly — no wobble.
- Repeat for the rear binding.
Adjusting strap bindings:
- Binding stance position: The binding is mounted at a specific angle (e.g., front foot +15°, rear foot 0° or -6°). Your stance angle is set when you mount the board; you adjust straps daily.
- Highback angle: The rigid plastic back of the binding can be angled forward for more responsive heel-side turns. Most beginners set it neutral.
- Strap length: Straps are sized at purchase; adjust the ratchet so two fingers fit under the strap at full tension.
Binding Methods Compared
| Type | How It Works | Pros | Cons |
|---|---|---|---|
| Strap bindings | Two adjustable straps over toe and ankle | Universal fit, most adjustable | Slower to strap in |
| Rear-entry bindings | Highback drops down, you step in and pull highback up | Very fast to enter and exit | Less adjustable |
| Step-on bindings | Boot clips directly into binding without straps | Fastest of all; clean feel | Requires specific compatible boots |
Maintaining Bindings
- Inspect before each use: Check straps for cracking, fraying, or broken ratchets. Check highback for cracks. Check all screws that attach the binding to the board — cold temperatures can cause screws to loosen.
- Tighten loose screws with a screwdriver or board tool. Loose bindings are dangerous.
- Replace worn straps — a snapped strap mid-run leaves you with no control over that end of the board.
- End-of-season storage: Remove bindings from the board for storage if possible. Keep them dry and away from prolonged UV exposure, which degrades plastic.
The Need for Leashes
A leash is a strap or cord that attaches your board to your boot or leg. It is required at many ski areas whenever you remove a boot from a binding — for example, while riding a chairlift with one foot unstrapped or when stopped on the hill.
Why leashes matter: A snowboard without a rider attached is a runaway sled. On a slope, a free board accelerates quickly and can reach speeds capable of seriously injuring another person. This is why Your Responsibility Code requires safety devices to prevent runaway equipment — and a snowboard leash is that device.
How to attach: Loop the leash around your front ankle or boot before clicking into your bindings. Confirm the leash is secure before heading onto a slope or chairlift.
Official Resources
🎬 Video: How to Adjust Bindings (video) — https://youtu.be/1NQ-G0qn4UA
Req 7c4 — Types of Snowboards
Different snowboards are designed for different terrain and riding styles. Knowing the four main types helps you understand why boards are shaped differently and how to choose the right tool for your riding.
The Four Types of Snowboards
All-Mountain Boards
The most versatile type. All-mountain boards handle groomed runs, powder, and light freestyle work without specializing in any one area. If you rent a board or buy one first board, it is almost certainly all-mountain. Medium flex — responsive but forgiving.
Freestyle / Park Boards
Designed for terrain parks, halfpipes, and tricks. Key features:
- Twin tip shape: Symmetrical — nose and tail are the same size and shape so the rider can go switch (riding fakie, with the non-dominant foot forward) just as easily as regular.
- Soft to medium flex: More forgiving on landings; easier to butter and press.
- Shorter length: Easier to spin and maneuver.
Freeride / Powder Boards
Designed for ungroomed, off-piste snow — powder, trees, and backcountry terrain. Key features:
- Directional shape: Longer, wider nose than tail. The nose floats on top of powder while the tail sinks slightly, keeping the rider on the surface.
- Stiff flex: More responsive and stable at higher speeds.
- Setback stance: Bindings are mounted farther toward the tail, which shifts weight back for better float in deep snow.
Alpine / Carving Boards
Narrow and very stiff. Designed exclusively for high-speed carving on groomed runs, often ridden with hard shell boots (similar to ski boots) and plate bindings.
- Narrow waist: Allows for quick, precise edge-to-edge transitions.
- Directional shape: Optimized for forward motion and carved turns.
- Not suitable for powder, tricks, or casual riding. Most common in racing contexts.
How to Carry a Snowboard Safely
Under-arm carry: Tuck the board under one arm with the base facing away from your body. Hold the board roughly at the center for balance. Keep the nose pointing forward and slightly up to avoid tripping on it. This is the most common and practical carry method for short distances.
By-hand carry: Grip one edge of the board with one hand near the middle. The board hangs vertically at your side. Keep clear of others — the board’s length extends well below and above your grip point.
Safety notes:
- In crowded areas (lift lines, lodge entrances), carry the board vertically or tuck it under your arm.
- Never drag a board by its leash — this is hard on the board and the leash.
- Watch your edges — metal edges can cut through soft materials and scratch surfaces.
Official Resources
🎬 Video: Types of Snowboards (video) — https://youtu.be/I9t_ez_utno
Req 7c5 — Riding a Lift
Riding a chairlift on a snowboard is different from skiing because you need to ride with your rear foot unstrapped — snowboard bindings do not allow you to skate or walk normally with both feet locked in. You skate to the lift with your front foot strapped in and your rear foot free.
Chairlift (Most Common — Demonstrate This One)
Before the chairlift:
- Strap in your front foot. Leave your rear foot free for skating and lift riding.
- Skate toward the lift line using your free rear foot to push like a scooter.
- Position yourself in the loading area and look over your shoulder for the approaching chair.
Loading:
- As the chair arrives, sit down smoothly. Your board extends out in front of you.
- Place your free rear foot on the board’s stomp pad (a grip pad between the bindings) for stability.
- Lower the safety bar once all riders are seated.
- Tip the board’s nose up slightly if the chair has a footrest.
Riding: Keep your board flat or slightly nose-up. Do not swing the board around. Rest your free foot on the stomp pad.
Unloading:
- Raise the safety bar approaching the top.
- As the chair reaches the ramp, place your board on the surface and stand.
- Skate forward on your front foot, using your rear foot for balance, and clear the unloading area quickly.
- Stop to one side and strap in your rear binding before heading to the run.
Gondola
An enclosed cabin on a cable — weather-protected and common at larger resorts. Remove your board and carry it vertically into the cabin. The board usually goes in a rack at the end of the cabin. Ride seated inside and retrieve the board at the top.
Magic Carpet / Conveyor Lift
A moving flat belt used on beginner slopes. Step onto the belt with your front foot strapped in, rear foot on the stomp pad. Ride up standing, keeping your weight over your front foot. Step off at the top and skate clear.
Official Resources
🎬 Video: Ski Lifts and How to Ride Them (video) — https://youtu.be/4xkGmEC-vPk
Req 7c6 — Waxing a Snowboard
Waxing a snowboard is similar to waxing Alpine skis. The goal is to protect the base and reduce friction for better glide. A properly waxed board is faster, smoother, and has a longer-lasting base.
Why Wax?
The base of a snowboard is made from sintered or extruded polyethylene. An unwaxed or dry base looks dull or white and glides poorly because it has lost its moisture content. Wax penetrates the base material and restores glide. Waxing also:
- Protects the base from oxidation and damage
- Fills microscopic scratches with lubricant
- Reduces base friction so you move faster with less effort
Basic Hot Wax Method
- Secure the board — use a vise or lay the board base-up on a stable surface.
- Scrape the old wax — use a plastic scraper to remove old wax and any accumulated dirt from tip to tail.
- Select your wax — all-temperature wax is fine for general use; temperature-specific wax provides better performance.
- Melt the wax — hold a wax iron (set to the appropriate temperature for your wax — check the packaging) and press the wax bar against the iron above the base, dripping melted wax in a zigzag pattern along the board.
- Spread the wax — run the iron along the full length of the board slowly and evenly. Keep the iron moving; never let it sit still (this can burn the base).
- Let it cool completely — at least 15–30 minutes.
- Scrape — use your plastic scraper at a 45-degree angle and scrape from nose to tail, removing all the excess wax. You are leaving a very thin layer — excess wax actually slows you down.
- Brush — use a nylon or horsehair brush to polish the base and open the structure of the base material. This step significantly improves glide.
Quick Rub-On Wax
For convenience before a riding session, rub-on or paste wax can be applied directly to the base and buffed with a clean cloth. Less durable than hot wax but requires no iron or scraper.
Official Resources
🎬 Video: How to Wax a Snowboard (video) — https://youtu.be/YGG5_xjeB2Y
Req 7c7 — Beginning & Intermediate Maneuvers
Requirement 7c7 has two parts: basic maneuvers on a gentle slope (7c7a), then traversing on slightly steeper terrain (7c7b). Master the gentle slope skills before moving to steeper ground.
Requirement 7c7a
Snowboarding on a gentle slope introduces you to the fundamental sensations of edge control: the board grips when you apply pressure to an edge, and slides when you flatten it.
Sideslipping
Sideslipping is the most basic control technique. Standing sideways to the slope with your board across the hill (heel-side or toe-side edge engaged), release edge pressure slightly and let the board slide sideways down the slope. Re-engage the edge to slow and stop. Practice on both:
- Heel-side: Facing downhill, digging in your heels
- Toe-side: Facing uphill, digging in your toes
Sideslipping teaches you the feel of edge engagement and gives you a way to descend terrain that is too steep to ride otherwise.
Speed and Direction Control
On a gentle slope with both feet strapped in:
- Flat board (straight run): Let the board run flat to build speed and feel the glide.
- Heel-side edge: Flex your ankles and knees back to engage the heel edge — this slows you down and turns you toward your heel side (toe side of the hill).
- Toe-side edge: Flex your ankles forward to engage the toe edge — turns you toward your toe side.
- Falling leaf: Sideslip slightly forward (down the fall line) by shifting weight to the nose, then shift back to the tail to slide slightly backward — like a leaf falling. Good for introducing directional movement without full turns.
Official Resources
🎬 Video: Beginning Snowboard Maneuvers (video) — https://youtu.be/9YGruvaETK4
🎬 Video: How to Make Your Board Go Straight (video) — https://youtu.be/UoPxRNsLrZ8
Requirement 7c7b
A traverse is riding across the slope at an angle — not straight downhill. It is one of the most useful tools for managing speed on steeper terrain.
Heel-Side Traverse
Face downhill with your heel-side edge pressed into the hill. Shift weight slightly toward the nose of the board to move across the slope. The board tracks diagonally across the hill, neither going straight down nor stopping.
Toe-Side Traverse
Face uphill with your toe-side edge pressing into the hill. Shift weight toward the nose to move across the slope in the other direction.
Combining both traverse directions with heel-side and toe-side turns between them is the building block of linked turns — the next step in snowboard progression.
Official Resources
🎬 Video: Maneuvering Hills & Traversing the Slope (video) — https://youtu.be/eIcLMojBopA
Req 7c8 — Ollie, Nose-End Grab & Wheelie
These three maneuvers introduce basic freestyle technique on a moderate (blue square) slope. They are foundational moves — once you understand how the board flexes and responds to weight shifts, more advanced tricks build on the same principles.
Ollie
An ollie is the most basic snowboard jump — getting air off flat ground using only your own body movement, with no kicker or jump feature needed.
How to ollie:
- Build a small amount of speed on the moderate slope.
- Press your weight onto the tail — load it like a spring by bending your rear knee.
- Spring off the tail — push down hard and snap upward, straightening your rear leg.
- Simultaneously pull your front foot up toward your chest, bringing the nose up.
- Level out the board at the peak.
- Land with both feet at the same time, knees bent to absorb the impact.
The ollie is named after its skateboarding equivalent (invented by Alan “Ollie” Gelfand in 1978). It is the foundational skill for all aerial maneuvers.
Nose-End Grab
A grab means reaching down and touching the board with your hand while airborne. A nose-end grab (sometimes called a “nose grab”) means grabbing the nose (front tip) of the board.
How to do a nose-end grab:
- Perform an ollie to get airborne.
- At the peak of the jump, bring your front knee up toward your chest.
- Reach your front hand toward the nose of the board and grab it.
- Hold briefly, then release and extend before landing.
- Land with knees bent.
Wheelie (Manual / Nose Press)
A wheelie (also called a “manual” or “nose wheelie”) means riding on only one end of the board — balanced on either the nose or tail — while the other end is lifted off the snow.
How to do a tail wheelie:
- While moving on a moderate slope, shift your weight back over the tail of the board.
- Press down on the tail and lift the nose slightly off the snow.
- Hold the balance while the board rides on just the tail.
- Shift weight forward to bring the nose back down smoothly.
Nose wheelie: The reverse — press the nose down and lift the tail. Requires shifting weight forward.
Official Resources
🎬 Video: How to Do an Ollie (video) — https://youtu.be/N4hCpTt30GE
🎬 Video: How to Do a Nose-End Grab (video) — https://youtu.be/gZFWW4Vus-Q
🎬 Video: How to Do a Wheelie (video) — https://youtu.be/ZDUHDwxqNuE
Req 7c9 — Controlled Run
A controlled run demonstrates that you can ride an intermediate (blue square) slope from top to bottom with consistent speed management, safe line selection, and confident technique. This is the same idea as the Alpine skiing controlled run — but on a snowboard.
What “Controlled” Looks Like on a Snowboard
Linked turns — You use heel-side and toe-side turns connected together to manage speed, not just straight-lining and hoping you stop at the bottom.
Speed management — Your speed is governed by how aggressively you carve each turn and how long you hold the turn across the slope. Aggressive carving (sharper edge, longer across-the-slope arc) scrubs more speed. Wide-open turns straight down the fall line builds speed.
Body position — Weight centered over the board. Arms out slightly for balance. Eyes up and ahead, scanning the slope.
Safe stopping — When you need to stop, you carve a turn across the slope and bring the board perpendicular to the fall line with your edge engaged. You do not crash into a fence as your stopping technique.
Awareness — Following the Your Responsibility Code: check uphill before starting, yield to riders below you, do not stop in blind spots.
Preparing for Your Controlled Run
- Warm up on easier terrain first.
- Set your pace in the first two turns and maintain it.
- If you feel speed building uncomfortably, make a big, carving turn across the slope to bleed off speed before continuing.
- Keep your rear foot properly strapped in — you need full binding control for an intermediate slope.
Official Resources
🎬 Video: Making a Controlled Run (video) — https://youtu.be/77rXSf7-CWY
Req 7c10 — Varied Conditions
Real mountain terrain is rarely uniform. This requirement asks you to show that your riding technique holds up when conditions change — steeper pitches, different snow types, and bumpy mogul terrain.
Adapting to Different Conditions
Changes in Pitch
As the slope steepens, speed builds faster. You need to:
- Shorten your turns to scrub speed more frequently
- Shift weight slightly forward to maintain pressure on the front edge (avoid leaning back)
- Make confident, committed turns rather than hesitating — hesitation on a steep section leads to speed building up between turns
As the slope flattens, keep the board moving — on very flat sections, keep your weight slightly forward so you do not slow to a stop unexpectedly.
Changes in Snow Conditions
Hard pack / ice: Edges must work. Press your edge firmly and carve cleanly — sliding an edge on hard snow provides much less control. If your edges are dull, the board will wash out.
Powder: Stay balanced evenly on both feet (not favoring the heel edge). Ride slightly faster than normal — speed helps you float. Turns are longer and more sweeping in powder.
Variable / crud: Loose legs are critical. Let your ankles and knees absorb the irregular texture. Do not fight it with stiff legs — the board needs to bounce and flex independently.
Wet, heavy snow: Slower, stickier. Be aware that stops can happen suddenly. Maintain slightly more speed than you think you need for turns to complete.
Moguls
Moguls are large snow bumps formed by repeated turns in the same spots. On a snowboard they require:
- Short, quick turns between the moguls rather than long sweeping arcs
- Active absorption — bend your knees deeply as you ride up and over each bump, then extend slightly in the trough
- Looking ahead — pick your line through the mogul field two to three bumps ahead, not just at the bump immediately in front of you
Official Resources
🎬 Video: Types of Snow Conditions (video) — https://youtu.be/96SaQtglKHE
Req 7c11 — Major Snowboarding Organizations
Several organizations shape snowboarding in the United States — from instruction and certification to competition and professional sports.
Major U.S. Snowboarding Organizations
American Association of Snowboard Instructors (AASI)
Function: AASI is the national certification body for snowboard instructors in the United States. It is the snowboard division of the Professional Ski Instructors of America (PSIA). AASI develops teaching curricula, certifies instructors at multiple levels, and provides ongoing education for snow school professionals.
If you take a snowboard lesson at an accredited U.S. resort, your instructor was trained and certified under AASI standards.
U.S. Ski & Snowboard
Function: The national governing body for competitive skiing and snowboarding. U.S. Ski & Snowboard selects and trains the U.S. Olympic and national teams for all disciplines including halfpipe, slopestyle, big air, and snowboard cross. It is the organization responsible for American athletes competing internationally, including at the Winter Olympics.
National Ski Areas Association (NSAA)
Function: The trade association representing ski and snowboard resort operators across the country. NSAA develops and promotes safety standards (including the Your Responsibility Code and SMART Style), publishes industry statistics, and advocates for ski area interests. Most major snowboard safety programs at resorts trace back to NSAA guidelines.
National Ski Patrol (NSP)
Function: While primarily known for skiing, the NSP trains and certifies patrollers at virtually all ski and snowboard areas in the country. NSP members respond to snowboard injuries and accidents, perform mountain safety functions, and provide emergency medical care. Many NSP members hold OEC (Outdoor Emergency Care) or EMT certifications.
Official Resources
🎬 Video: American Association of Snowboarding Instructors (video) — https://youtu.be/UrtwvLd2sbU
You have completed all the requirements for Option C — Snowboarding. If you chose another option, continue to that section. Otherwise, head to Extended Learning.
Req 7d — Snowshoeing
You have chosen snowshoeing. This is the most accessible option — snowshoeing requires no special technique, no lifts, and no groomed trails. If there is snow on the ground and you can walk, you can snowshoe.
Work through all ten requirements below. The first nine are knowledge and skills that you can prepare for before and during your hike; the final requirement (7d10) adds navigation skills using a topographic map and compass.
What You’ll Complete
- Req 7d1 — Parts of a Snowshoe: Name the parts of a snowshoe.
- Req 7d2 — Choosing the Right Size: Explain how to choose the correct snowshoe size.
- Req 7d3 — Types & Specialized Uses: Describe the types of snowshoes and the factors to consider when choosing one.
- Req 7d4 — Care & Maintenance: Explain how to care for and maintain snowshoes.
- Req 7d5 — One-Day Hike Gear: List the items to take on a one-day snowshoe hike.
- Req 7d6 — Best Areas & Backcountry: Describe good snowshoeing areas and discuss backcountry advantages and dangers.
- Req 7d7 — Benefits of Snowshoeing: Discuss the benefits of snowshoeing as an activity.
- Req 7d8 — Trail Techniques: Demonstrate efficient trail breaking, uphill climbing, downhill travel, and traversing.
- Req 7d9 — 2-Mile Snowshoe Hike: Complete a 2-mile hike demonstrating ability to handle varied snow conditions.
- Req 7d10 — Map & Compass: Demonstrate proper use of a topographic map and compass.
Official Resources
How to Choose Snowshoes (video) Watch on YouTube for a clear walkthrough of snowshoe sizing, flotation, and terrain-based selection. This official video cannot be embedded here. Link: How to Choose Snowshoes (video) — https://youtu.be/vsco4SkXSTc?si=hyEIP4kbTHuAYHjtReq 7d1 — Parts of a Snowshoe
Modern snowshoes are built from aluminum frames or molded plastic decks with a binding system in the center. Knowing the names of the parts helps you understand how snowshoes work and how to discuss maintenance and selection intelligently.
The Main Parts of a Snowshoe
Frame The outer structural ring or frame that defines the shape of the snowshoe. On traditional wood-and-rawhide snowshoes, this was a bent wood oval. On modern snowshoes, it is typically tubular aluminum or a rigid polymer shell. The frame provides structural integrity and holds the deck.
Deck (Platform) The body of the snowshoe between the frame edges. The deck is a solid or mesh surface that supports the hiker’s weight and provides flotation in snow. On aluminum-frame snowshoes, the deck is typically a waterproof nylon or polyester fabric stretched between the rails. On plastic-shell snowshoes, the deck is the molded platform itself.
Binding The system that attaches the snowshoe to your boot. The binding sits in the center of the deck over the pivot point. On most modern snowshoes, bindings use straps that wrap over the toe and around the heel. They must be adjustable to fit different boot sizes.
Pivot Point / Pivot Rod The hinge that allows your heel to lift freely with each step while the front of the snowshoe stays in contact with the snow. This is what makes snowshoeing feel like walking rather than sliding. The toe of the boot sits above the pivot; when you step, your heel rises but the snowshoe deck stays roughly flat.
Crampons / Traction System Metal spikes or cleats mounted on the underside of the snowshoe, typically at the toe and heel areas. Crampons dig into hard-packed or icy snow to provide traction when climbing or traversing. Without them, snowshoes would slide on any surface harder than fresh powder.
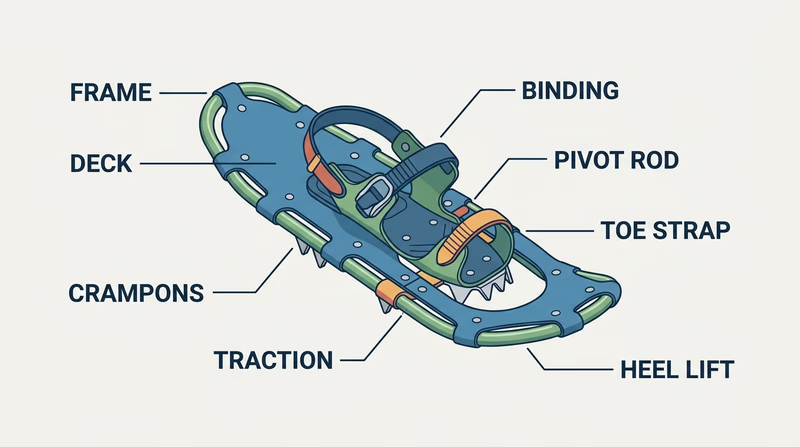
Heel Lift (on some models) A small bail or wire that can be flipped up under the heel to reduce calf strain when climbing steep terrain. When the heel lift is deployed, your foot is at a slightly different angle, taking pressure off the Achilles tendon and calf muscles on long uphill stretches.
Toe Cord / Toe Strap Part of the binding system, this strap secures the toe of the boot to the snowshoe. On some designs, the toe cord is a pivoting rubber or plastic part that grips the boot rather than a strap.
Req 7d2 — Choosing the Right Size
Snowshoe sizing is primarily based on your total weight — meaning the combined weight of your body plus everything you are carrying (pack, clothing, gear, water, food). Bigger and heavier total loads require larger snowshoes.
The Sizing Principle
A snowshoe works by distributing your weight over a larger surface area than your boot alone, preventing you from sinking deep into soft snow. This is called flotation. A larger snowshoe has more surface area and provides more flotation. But a larger snowshoe is also heavier and harder to maneuver.
The goal: Choose the smallest snowshoe that keeps you on top of the snow for the conditions you will encounter.
General Size Guidelines
Most manufacturers publish a weight range chart for each model. Here are common starting points:
| Total Weight | Typical Snowshoe Size |
|---|---|
| Under 120 lbs (54 kg) | 22 inch or smaller |
| 120–175 lbs (54–79 kg) | 25 inch |
| 175–220 lbs (79–100 kg) | 30 inch |
| Over 220 lbs (100+ kg) | 36 inch or larger |
These are approximate. Always check the specific manufacturer’s sizing chart for the model you are using.
Terrain Adjustment
Light or packed snow — Even a slightly undersized snowshoe works; the packed surface provides support regardless.
Deep, loose powder — Err larger. Powder provides very little support, so maximum flotation is needed.
Mountainous or technical terrain — Smaller, more agile snowshoes (even if slightly undersized for weight) are easier to maneuver on steep slopes, step-kicking, and technical terrain. Many backcountry snowshoes are intentionally compact for this reason.
Flat walking / recreational trails — Standard sizing by weight is ideal.
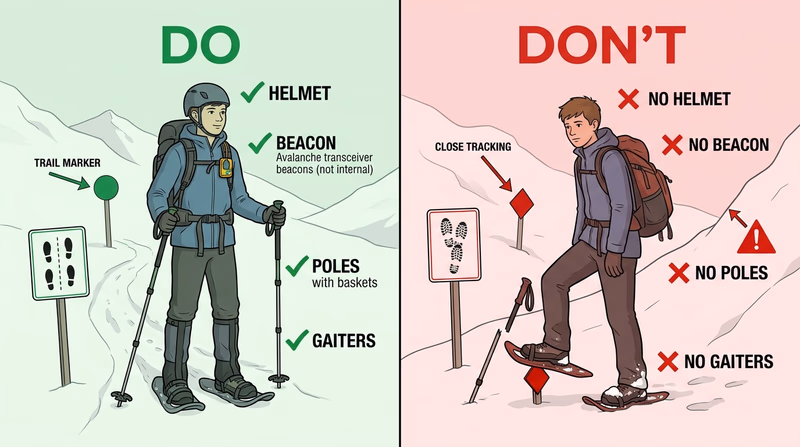
For Youth Hikers
Most youth snowshoes are sized for a total weight under 100 lbs. Young Scouts with smaller frames should use youth models rather than adult models even if the adult size technically covers their weight — the weight distribution and binding position are designed for proportionally different feet.
Req 7d3 — Types & Specialized Uses
Snowshoes are not all the same. Different designs are built for different terrain and uses. Understanding the types helps you choose the right tool for your outing.
Types of Snowshoes
Recreational / Flat-Terrain Snowshoes
The most common type. Designed for walking on relatively flat, groomed, or rolling terrain — parks, golf courses, fields, and easy forest trails. Features:
- Wide deck for maximum flotation
- Simple strapping system — easy to put on and take off
- Small or no crampons — adequate for packed or light powder but not icy slopes
- Available at the lowest price point and most rental programs
Trail / Backcountry Snowshoes
Designed for moderate off-trail terrain, rolling hills, and ungroomed winter hiking. Features:
- Narrower and longer than recreational models for more efficient hiking
- More aggressive crampons for better traction on variable snow
- Heel lift bars for reducing calf strain on climbs
- Rotating binding with better articulation for uphill and downhill travel
Mountaineering Snowshoes
Designed for technical backcountry terrain — steep slopes, hard-packed or icy conditions, and long alpine approaches. Features:
- Compact and highly aggressive crampons (often with large teeth for icy terrain)
- Very durable frame — often aluminum with reinforced deck
- Compatible with mountaineering boots
- May include bindings designed for double boots and gaiters
Running Snowshoes
Lightweight, minimalist designs for people who run on snowy trails. Features:
- Much smaller than hiking snowshoes
- Minimal flotation (designed for packed trails, not deep powder)
- Very light weight and low profile so running gait is relatively natural
- Not suitable for deep snow or off-trail travel
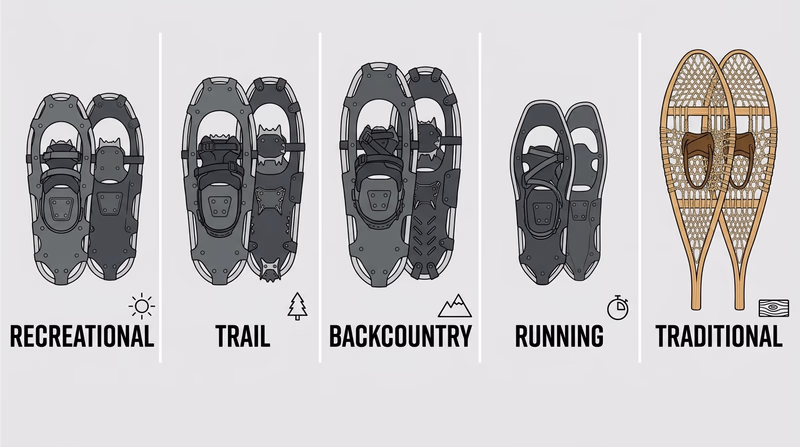
Traditional / Native American-Style Snowshoes
Wood frames (ash or birch) with rawhide or synthetic webbing. Historically used by Indigenous peoples across North America, each culture developed shapes suited to their terrain:
- Bearpaw (round/oval): For dense forests and uneven terrain; maneuverable
- Ojibwe (elongated with tail): For flat open terrain and deep snow; efficient stride
- Alaskan/Yukon (very long and narrow): For open tundra travel; maximum glide
Today these are used in traditional craft and historical programs more than functional recreation.
Factors to Consider When Choosing
| Factor | What to Think About |
|---|---|
| Total weight | Heavier = larger snowshoe needed for flotation |
| Snow type | Deep powder needs more deck area; packed snow allows smaller size |
| Terrain | Flat trails: recreational; hills and off-trail: trail/backcountry; steep/icy: mountaineering |
| Activity pace | Leisure hiking: prioritize comfort; running: prioritize minimal weight |
| Boot type | Check binding compatibility with your specific boots |
| Budget | Recreational models are significantly less expensive than mountaineering |
Req 7d4 — Care & Maintenance
Snowshoes are durable but not indestructible. Proper care keeps them functional, safe, and extends their lifespan through many winters.
After Each Use
Rinse and dry: Shake off loose snow, then wipe down the frame, deck, and bindings. Let the snowshoes air dry completely before storing. Moisture left on metal frames can cause corrosion; moisture trapped in binding straps can cause cracking or mildew.
Inspect the bindings: Check all straps and buckles for cracks, fraying, or worn ratchet teeth. A broken strap in the field is a significant problem — much easier to replace before the next outing.
Check the frame: Aluminum frames can bend if the snowshoe is stepped on or caught under a log. Minor bends can usually be straightened by hand. Cracked frame sections need repair or replacement.
Inspect the deck: Nylon decks can get small punctures or tears from sharp rocks, branches, or crampon edges. Small punctures usually do not affect function. Larger tears can be patched with flexible waterproof adhesive designed for outdoor gear repair.
Clean the crampons: Ice and packed snow can build up in crampon teeth over time. Brush or chip it out and check that all crampon teeth are present and sharp. Dull crampons provide less traction on hard snow.
Seasonal Storage
Clean thoroughly before putting snowshoes away for the season.
Store in a cool, dry location. Avoid prolonged exposure to:
- UV light: Breaks down nylon decks and plastic bindings over time.
- Extreme heat: Can warp plastic components and degrade rubber straps.
- Damp conditions: Promotes mildew and rust.
Do not store under heavy objects. A frame under compression for months can deform.
Hang or lay flat. Hanging by the frame in a garage or equipment room is ideal. Avoid bunching the straps under tension.
Repairs
Broken strap: Most binding straps are replaceable by threading a new strap through the existing buckle. Many manufacturers sell replacement parts.
Loose rivets: Rivets connect the binding pivot to the frame. Loose rivets allow the binding to shift. Re-rivet or replace with hardware-store equivalents of the same diameter and length.
Cracked frame: Aluminum frame cracks can be field-repaired with a wrap of duct tape but should be permanently repaired or the section replaced for long-term use.
Official Resources
🎬 Video: How to Repair Snowshoes (video) — https://youtu.be/7BwDagdaXew
🎬 Video: How to Store Snowshoes (video) — https://youtu.be/scwZ1geZpWA
Req 7d5 — One-Day Hike Gear
Snowshoeing takes you into winter terrain where the right gear can keep you comfortable and safe — and the wrong gear (or missing gear) can ruin your day or worse.
Essential Gear for a One-Day Snowshoe Hike
Equipment
- Snowshoes (properly sized for your total weight — see Req 7d2)
- Trekking poles — not required but highly recommended; they improve balance on uneven terrain, help on climbs and descents, and reduce fatigue
- Gaiters — keep snow out of boot tops, especially on off-trail travel in deep snow
- Boots — waterproof hiking boots or pac boots with room for warm socks
Clothing (Layering System)
- Base layer: Moisture-wicking synthetic or wool — no cotton
- Mid-layer: Fleece or insulating jacket for warmth
- Outer shell: Waterproof/windproof jacket and pants
- Hat that covers ears
- Neck gaiter or balaclava
- Warm, waterproof gloves or mittens
- Extra gloves — a wet pair of gloves in cold weather is a real hazard
- Spare socks
Navigation
- Trail map or topographic map of your area
- Compass
- Fully charged phone (kept in an inside pocket — cold drains batteries fast)
Safety
- First aid kit — blister care, bandages, pain reliever, emergency mylar blanket
- Whistle
- Fire starter — waterproof matches or lighter in a waterproof case
- Headlamp with fresh batteries — trails get dark early in winter
Food and Water
- Water — minimum 1–1.5 liters; use an insulated bottle (not a hydration bladder, which freezes)
- High-energy snacks: trail mix, energy bars, chocolate, or nuts
- Extra food for emergency use
- Warm beverage in a thermos — optional but highly motivating on cold days
Sun Protection
- Sunscreen (SPF 30+) and lip balm with SPF — snow reflects UV strongly
- Goggles or sunglasses
One-Day Snowshoe Hike Checklist
Check before every outing- Snowshoes sized correctly for your pack weight.
- Trekking poles and gaiters.
- Three-layer clothing system plus extra hat, gloves, and socks.
- Map and compass; charged phone in inside pocket.
- First aid kit, whistle, fire starter, headlamp.
- Water (1.5 L minimum), snacks, emergency food.
- Sunscreen, lip balm, goggles or sunglasses.
- Tell someone your route and expected return time.
Official Resources
🎬 Video: What to Bring Snowshoeing (video) — https://youtu.be/_gA5VlgKnOI?si=80SyezhTHEGfun_S
🎬 Video: What to Wear Snowshoeing (video) — https://youtu.be/p-7UMYNP6s0
Req 7d6 — Best Areas & Backcountry
Best Areas for Snowshoeing
Groomed Nordic Centers and Resorts
Many cross-country ski areas allow snowshoeing on designated trails. These offer:
- Pre-packed, well-marked trails
- Groomed surfaces that make the hike easier
- Facilities like warming huts and restrooms
- Ski patrol available for emergencies
The main limitation is that snowshoers must stay on designated paths and off Nordic ski tracks.
State and National Parks and Forests
Public lands with trails that are used for hiking in summer become snowshoe routes in winter. Advantages include:
- No trail fees in many areas
- Wide variety of terrain — from easy forest walks to rugged mountain routes
- Freedom to explore without staying on a designated loop
Considerations: Trails may be unmarked in deep snow. Cell service may be limited. Check with park rangers about current conditions and closures.
Golf Courses and Open Fields
In areas with consistent snow cover, golf courses and large open fields are excellent beginner destinations — flat, open, and low-risk. You can hike in large circles, practice technique, or explore without needing navigation skills.
Backcountry (Off-Trail)
Anywhere there is snow and no trail — forests, mountain terrain, open meadows. This is where snowshoeing becomes a true wilderness activity.
Advantages of Backcountry Snowshoeing
- Access to remote terrain not reachable by groomed trail
- Wildlife observation — fewer humans, quieter approach, more animal sightings
- Solitude and wilderness experience — exactly what many people seek
- No fees or crowding — completely free once you have your gear
- Terrain freedom — you decide where to go and how far
Dangers of Backcountry Snowshoeing
Getting lost: Snow covers trails, blazes, and landmarks. Navigation requires a map and compass (or GPS). Whiteout conditions can disorient even experienced hikers.
Avalanche risk: Steep backcountry terrain — especially slopes of 30–45 degrees — can avalanche. Snowshoers in avalanche terrain should carry beacon, probe, and shovel and know how to use them. Check the local avalanche forecast before any backcountry trip.
Falling through ice: Crossing frozen ponds or streams is tempting but dangerous. Ice thickness varies and is impossible to judge from the surface in all conditions. Avoid crossing frozen water unless you know for certain it is safe.
Post-holing: Without snowshoes, or with undersized snowshoes, you “post-hole” — break through the snow crust up to your knee or hip with every step. In deep backcountry snow this can be exhausting and dangerous if it slows you to the point where you cannot return before dark.
Remote emergencies: An injury far from a trailhead in cold weather is a serious situation. There may be no cell service, no patrol, and no shelter. Solo backcountry travel is high risk. Always tell someone your plan and expected return time.
Official Resources
🎬 Video: Where and How to Snowshoe Safely (video) — https://youtu.be/tYo3RNM2ock?si=e8ozQUSDO9Lp5T7L
Req 7d7 — Benefits of Snowshoeing
Snowshoeing is one of the most accessible outdoor winter activities available. Its benefits are physical, mental, and social — and it removes the barrier of high cost or technical skill that can make other winter sports difficult to start.
Physical Benefits
Cardiovascular fitness Snowshoeing at a moderate pace burns 400–600 calories per hour — comparable to running at the same pace on a treadmill, but in beautiful outdoor terrain. The aerobic demand is significant because you are lifting your legs against the weight of the snowshoes and through snow resistance with every step.
Strength and endurance Walking in snow engages more muscles than pavement walking. Climbing with snowshoes works the calves, quads, glutes, and hip flexors actively. Your core muscles stay engaged continuously for balance.
Low-impact exercise Unlike running on hard surfaces, snowshoeing provides cardio workout on a soft, forgiving surface. This makes it an excellent option for people with joint sensitivities who cannot run comfortably.
Balance and coordination Navigating uneven, changing terrain — ice, powder, packed snow, hills — builds functional balance and coordination that carry over to other activities.
Mental and Emotional Benefits
Reduced stress Spending time in nature in any season reduces stress hormones, lowers blood pressure, and improves mood. The quiet of a snow-covered forest is particularly effective for mental reset.
Mindfulness and focus Snowshoeing requires attention — watching your footing, reading terrain, navigating. That concentration pulls you out of distraction and into the present moment.
Seasonal wellness Winter can be isolating. Snowshoeing provides a reason to get outdoors even in cold months, fighting the lethargy and low mood that some people experience in winter.
Practical Benefits
Low barrier to entry You do not need to learn a complex technique. If you can walk, you can snowshoe within minutes of strapping on a pair.
Affordable Compared to skiing or snowboarding, snowshoeing equipment is relatively inexpensive. Entry-level snowshoes cost much less than ski gear, and most parks and trails are free.
Family-friendly and inclusive Snowshoes come in sizes for children as young as three or four, and special adaptive designs exist for people with disabilities. The activity is naturally self-paced and can be done at any fitness level.
Access to winter landscapes Snowshoeing opens terrain that is inaccessible by any other means in winter — old-growth forests, frozen meadows, remote ridgelines — giving you a perspective on the landscape few people ever see.
Official Resources
🎬 Video: Benefits of Snowshoeing (video) — https://youtu.be/Iej5x5vk304?si=-olKS2XTAsH5n3p8
Req 7d8 — Trail Techniques
These four techniques represent the core movement skills of snowshoeing. Each addresses a different terrain challenge you will encounter on almost any real-world snowshoe outing.
Breaking Trail
“Breaking trail” means being the first person through untracked snow — you are packing down the surface for yourself and anyone following.
Technique:
- Take deliberate, even steps. Lift your foot high enough to clear the snow with each step — do not shuffle.
- Plant your snowshoe firmly and let your weight settle before taking the next step.
- Keep a steady pace. Breaking trail is more tiring than following a packed path — rotate who leads in a group to share the effort.
- Use your trekking poles for balance and to test snow depth or firmness ahead.
- Aim for moderate terrain first. Deep, unbroken powder on steep terrain is exponentially harder than packed flats.
Climbing Uphill
Direct ascent (low angle): For gentle to moderate inclines, walk directly up the fall line with a slightly wider stance than on flat terrain. Lean slightly forward from the ankles — this presses the toe crampons into the snow for traction. If your snowshoes have heel lifts, flip them up to reduce calf strain.
Kick-step (steep terrain): On steeper slopes, kick the toe of the snowshoe into the slope to create a step, then stand on it and kick the next step. This is the same technique mountaineers use with crampons. Push the toe of the snowshoe into the slope firmly before trusting it with your full weight.
Sidestep: When a direct ascent is too steep or the snow too hard for kick-stepping, sidestep: stand sideways to the slope and step the uphill snowshoe into the hill, then bring the lower foot alongside. Repeat. This is slower but more secure on hard or icy slopes.
Traveling Downhill
Direct descent (gentle terrain): Walk directly down the fall line with a wide stance and slightly bent knees. Lean slightly back to weight the heel crampons for grip. Keep your weight over the entire snowshoe to prevent the toe from catching.
Plunge stepping (steeper terrain): Drive your heel into the slope aggressively with each step, essentially “punching” it in to create a platform. This engages the heel crampons maximally and creates a secure step. Keep knees bent and weight slightly back.
Sidestep descent: For very steep or icy slopes, face sideways and step down one step at a time, the same as the uphill sidestep in reverse.
Avoid running or uncontrolled slides — snowshoes do not have release bindings, and a fall or tumble with snowshoes on a steep slope can cause twisted ankles or worse.
Traversing
A traverse is moving across a slope diagonally rather than straight up or down.
Technique:
- Keep the uphill edges of your snowshoes pressed into the slope for grip.
- Lean your upper body slightly uphill.
- Take short, deliberate steps.
- Use trekking poles planted uphill for stability.
Traversing reduces the effective steepness of terrain and is often the safest way to gain or lose elevation on moderate to steep slopes.
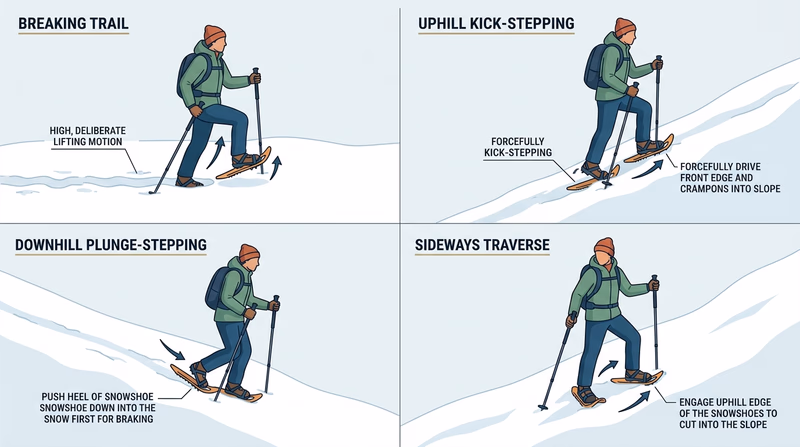
Official Resources
🎬 Video: How to Break Trail (video) — https://youtu.be/9gLm2viPkT4?si=GIe05Kq-w67IMEe_
🎬 Video: How to Snowshoe on Hills (video) — https://youtu.be/Mr1uR6ENxBY?si=3Y1zY3mtDaQJfdlb
🎬 Video: How to Sidestep (video) — https://youtu.be/zWabuDZBcVQ
Req 7d9 — 2-Mile Snowshoe Hike
This is the practical capstone for Option D. You will apply everything from Reqs 7d1–7d8 — equipment knowledge, technique, gear choices, and trail awareness — over a 2-mile route in real snow. The route should include enough variety in terrain and snow type to give you a genuine challenge.
What “Cope With” Means
The requirement uses the phrase “cope with an average variety of snow conditions.” This means you are expected to:
- Adapt your technique to whatever snow you encounter — not just walk in a straight line on packed groomed trail
- Maintain control and composure when snow changes (e.g., moving from packed trail to powder, or from flat to a slope)
- Make decisions about your path and pace based on what is in front of you
- Apply terrain-appropriate technique — using kick-stepping on climbs, plunge stepping on descents, and sideslipping on icy traverses when needed
You do not need to complete the hike perfectly or without effort. The demonstration is about showing you can handle different conditions thoughtfully, not that you have flawless form.
Snow Conditions You Might Encounter
| Condition | What to Expect | How to Cope |
|---|---|---|
| Packed / groomed | Easy walking, stable | Steady pace, efficient stride |
| Light powder | Deeper with each step, softer | Lift feet fully, let snowshoes float |
| Wet, heavy snow | Snowshoes may ball up | Clear underfoot regularly, shorter steps |
| Wind crust | Hard surface that may break through | Even weight distribution, deliberate steps |
| Icy patches | Low grip, lateral slip risk | Slow down, engage crampons intentionally |
| Uphill slope | Higher exertion, slipping risk | Kick-step or sidestep as needed |
| Downhill slope | Momentum, heel-catch risk | Plunge-step, weight back, bent knees |
Preparing for the Hike
Before you go:
- Check conditions and weather. Know what to expect so you can dress and pack appropriately.
- Review Req 7d5 gear list. Bring everything — water, snacks, extra gloves, map, first aid kit, headlamp.
- Warm up. Walk around with your snowshoes on before starting the route. Cold muscles and unfamiliar equipment together cause problems.
- Know the route. Review a trail map or discuss the route with your counselor beforehand.
During the hike:
- Pace yourself. Two miles in snowshoes through varied terrain is harder than two miles on a sidewalk. Start slower than you think you need to.
- Rotate the lead if you are in a group (see Req 7d8 — Breaking Trail).
- Communicate. If something is wrong — a binding feels loose, a foot is wet, you are overheating — say something before it becomes a problem.
- Drink water regularly, even if you are not thirsty. Cold air is dry and you are working hard.
After:
- Remove snowshoes before entering warm vehicles or buildings if possible. Snow balled into bindings is easier to clear outside.
- Check your gear per Req 7d4 (care and maintenance) before putting it away.
What the Counselor Will Look For
Your counselor is watching for:
- Technique application — do you use the right technique for each terrain challenge?
- Adaptability — do you adjust when conditions change?
- Safety awareness — do you stop when needed, communicate, and make sensible decisions?
- Endurance and pacing — do you manage your energy over the full 2 miles?
You do not need to move fast. This is a skills demonstration, not a race.
Official Resources
🎬 Video: How to Travel Cross-Country on Snowshoes (video) — https://youtu.be/3U37kHrGlvo?si=FozGoulaHs_9Ssqi
Req 7d10 — Map & Compass
Snowshoeing regularly takes you off marked trails and into backcountry terrain where trail signs, blazes, and landmarks can all disappear under snow. A topographic map and compass are your primary tools for knowing where you are and where you are going — and they work without cell service or batteries.
Reading a Topographic Map
A topographic (“topo”) map uses contour lines to represent the shape of the land in two dimensions.
Key concepts:
- Contour lines connect points of equal elevation. Every point on a single contour line is the same height above sea level.
- Contour interval is the elevation change between adjacent lines — shown in the map legend (e.g., 40 feet). The closer together the lines are, the steeper the terrain.
- Index contours are thicker lines printed at regular intervals (every 5th line) with the elevation labeled.
- V-shapes pointing uphill indicate a valley or drainage (a stream usually runs through the bottom of the V).
- V-shapes pointing downhill indicate a ridge.
- Closed circles represent peaks, hilltops, or depressions.
Reading terrain from a topo:
| Line Spacing | Terrain |
|---|---|
| Lines very close together | Steep cliff or near-vertical slope |
| Lines moderately spaced | Steady incline |
| Lines far apart | Gentle slope or flat terrain |
| Lines form a “U” or “V” | Valley or ridge |
Orienting the map: Before navigating, rotate the map so North on the map points toward magnetic North in the real world (using your compass). When the map is oriented correctly, terrain features in the real world should line up with the same features on the map.
Using a Compass
A baseplate compass has four main parts: the magnetic needle (red end points North), the rotating bezel (marked in degrees 0–360), the baseplate (with direction-of-travel arrow), and the orienting lines (inside the bezel).
Taking a Bearing From the Map
- Place the compass on the map with the baseplate edge connecting your current location to your destination.
- Rotate the bezel until the orienting lines inside the bezel align with the North–South grid lines on the map (North end pointing toward the top of the map).
- Read the bearing at the index mark (top of the baseplate). That is your magnetic bearing — but check if your map requires a declination correction.
Magnetic Declination
True North (the geographic North Pole) and Magnetic North (where your compass needle points) are not the same place. The difference is called declination and it varies by location. Your map legend will show the declination for that region — adjust your bearing accordingly, or use the declination adjustment on a more advanced compass.
Following a Bearing in the Field
- Hold the compass level and rotate your body until the magnetic needle aligns with the orienting arrow (red in the shed).
- Look up along the direction-of-travel arrow. Pick a landmark (a tree, a boulder) along that line.
- Walk to that landmark, then re-check your compass and pick the next landmark. This is called waypoint navigation.
- Keep your eyes up. Never walk while staring at the compass.
Dead Reckoning
Dead reckoning is estimating your position by tracking how far and in what direction you have traveled from a known starting point. For snowshoeing, a rough rule of thumb is about 2 miles per hour on flat groomed terrain; steeper terrain or deep powder cuts that significantly.
Putting It Together on a Snowshoe Route
- Before leaving: Study the topo and identify the major terrain features along your route — ridges, valleys, stream crossings, elevation changes.
- Orient your map each time you stop to check your position.
- Take a bearing to your next waypoint whenever you lose sight of it (e.g., in trees or during weather).
- Cross-check terrain: Verify that what you see in the real world (slopes, drainages, hills) matches the map. This is the most reliable way to confirm your position.
- In whiteout conditions: Stop. Take a bearing to a safe known location and navigate slowly to it. Do not wander.
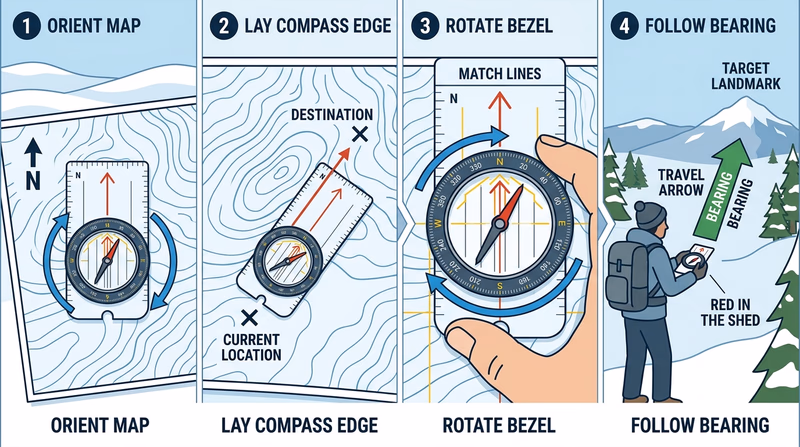
Official Resources
🎬 Video: How to Read a Topographic Map (video) — https://youtu.be/CoVcRxza8nI
🎬 Video: How to Use a Compass (video) — https://youtu.be/0cF0ovA3FtY
🎬 Video: How to Use a Topographic Map and Compass (video) — https://youtu.be/P1LL2FXK6o0
Extended Learning
Congratulations!
You have completed the Snow Sports merit badge requirements. Whether you chose Alpine skiing, Nordic skiing, snowboarding, or snowshoeing — or studied multiple options — you have built a real foundation in winter outdoor skills.
The knowledge you gained here does not expire when you hand in your merit badge card. Snow conditions, hazards, and terrain reading are skills you carry every time you head into the mountains in winter. Your Responsibility Code and SMART Style are guidelines that professional ski patrollers and competitive athletes follow too — not just Scouts.
Dig Deeper
Learn to read avalanche forecasts. The Colorado Avalanche Information Center (CAIC) and similar regional centers publish daily avalanche forecasts for backcountry terrain. Learning to read these forecasts — danger ratings, problem types, aspect and elevation charts — is a real skill that could save your life. Visit avalanche.org for free educational resources including the Avalanche Awareness tutorials.
Study snow science. Snow is not just “frozen water” — it is a complex material that changes structure over time through a process called metamorphism. Different crystal types (facets, depth hoar, surface hoar, rounding crystals) have dramatically different bonding properties, which is why snowpacks can be stable one week and dangerous the next. The American Avalanche Association offers courses at the Avalanche Level 1 and Rec 1 levels for beginners.
Practice navigation. Map and compass proficiency requires repetition. Practice triangulating your position using three landmarks, taking bearings in both directions, and navigating a simple course in a local park before you try it in real winter terrain.
Explore different gear. If you did Option A (Alpine), try a day of Nordic skiing or snowshoeing. If you did Option D (Snowshoeing), consider a beginner Nordic lesson. Each discipline teaches you something different about how your body moves on snow, and cross-training in winter activities makes you a better outdoorsperson overall.
Try This Next
Ski Patrol Explorer Post or Observer Program. The National Ski Patrol has Junior Patroller and Nordic Observer programs that give teenagers meaningful field experience alongside working patrol members. This is one of the best ways to develop both first aid and mountain skills in an organized setting.
Introduction to Backcountry Travel. If you completed Option B (Nordic) or Option D (Snowshoeing), consider an organized intro-to-backcountry course offered by local outdoor clubs, REI, or your state’s parks department. These typically cover route-finding, beacon basics, and terrain assessment.
Photography in Winter. Winter landscapes are uniquely photogenic. Sunset light on snow, wildlife tracks, ice formations — winter gives you subjects you cannot get any other time of year. Many snowshoers combine their outings with nature photography, wildlife observation, or bird watching.
Volunteer for Trail Grooming. Many Nordic centers and parks depend on volunteers to groom trails. Volunteering gives you access to equipment, early morning views before anyone else is on the snow, and appreciation from the whole community.
Orienteering Events. Orienteering clubs in most states run competitive and recreational navigation courses year-round, including winter events. Participating in even one orienteering course will sharpen your map and compass skills faster than any other method.
Organizations and Resources
National Ski Patrol (NSP) The NSP trains and certifies ski patrollers at resorts and backcountry areas across the country. Their website includes information on joining, training programs, and the Junior Patroller program. nsp.org
Professional Ski Instructors of America (PSIA) / American Association of Snowboard Instructors (AASI) The national certification body for ski and snowboard instruction in the United States. If you want to understand how skiing and snowboarding technique is taught at every level — or eventually teach it yourself — PSIA/AASI is where to start. thesnowpros.org
U.S. Ski & Snowboard The national governing body for Olympic-level alpine, nordic, freestyle, and snowboard sports. Their athlete development programs and educational resources are open to the public. usskiandsnowboard.org
National Ski Areas Association (NSAA) NSAA represents ski resorts and publishes the Responsibility Code, safety statistics, and environmental sustainability programs. Their “Skier Safety” resources are public and informative. nsaa.org
Avalanche.org — American Avalanche Association Free public avalanche forecasts, education resources, and the Avalanche Awareness online course. This is the first stop for anyone interested in backcountry winter travel. avalanche.org
United States Snowshoe Association (USSSA) Promotes competitive and recreational snowshoeing. Hosts events and maintains a community of snowshoers across all ability levels. snowshoeracing.com