Req 3 — Trail Marking System
Every ski resort in North America uses the same trail-marking system, and most resorts worldwide use a similar one. Knowing these symbols before you get on the mountain is not just helpful — it is a safety requirement. Choosing a trail that is beyond your skill level puts you and others at risk.
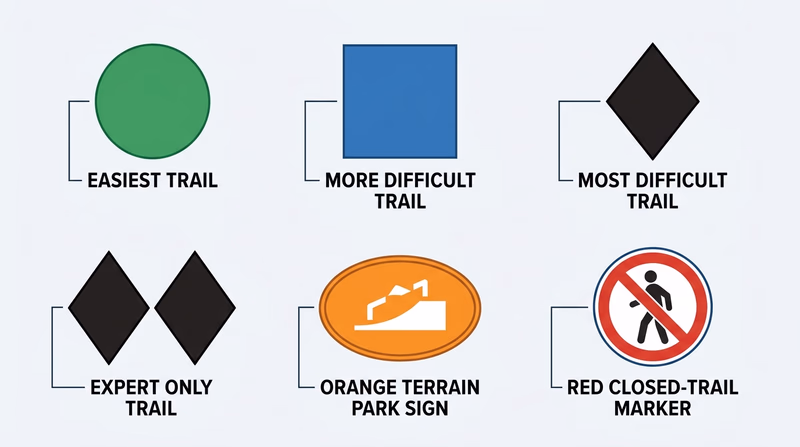
The North American Trail Difficulty System
The international system used in North America assigns a shape and color to each level of difficulty. You will see these symbols on trail signs, trail maps, and slope markers.
| Symbol | Color | Difficulty | What to Expect |
|---|---|---|---|
| Circle | Green | Easiest | Wide, gently sloping runs; ideal for beginners learning basic control |
| Square | Blue | More Difficult | Moderate pitch; requires ability to make turns and control speed |
| Diamond | Black | Most Difficult | Steep terrain; requires confident parallel turns and strong speed control |
| Double Diamond | Black | Expert Only | Extreme steepness, moguls, cliffs, or narrow chutes; for experts only |
Additional Markers You Will See
Orange rectangle or “Terrain Park” signs — Marks areas with jumps, rails, boxes, and other freestyle features. Terrain parks require additional skills and come with their own SMART Style code (see Req 6b).
Closed signs — A large orange or red “CLOSED” X across a trail entrance means the run is officially closed. Do not enter. Closed runs may hide cliff drops, thin snowcover over rocks, or avalanche hazard.
Boundary signs — Ropes and signs mark the boundary between the ski area and unpatrolled backcountry terrain. Going out of bounds means leaving the coverage of ski patrol and taking full responsibility for your safety.
Mileage and distance markers — Some trails post distance signs, especially at cross-country centers where routes are measured.
Why the System Matters
The difficulty ratings are calibrated by each resort to reflect conditions on that particular mountain. A blue square at a small midwestern ski area may be significantly different from a blue square at a large Rocky Mountain resort. Always review the trail map when arriving at a new mountain and ask resort staff or your counselor about conditions.
Reading the Trail Map
Before you ski, spend five minutes with the trail map:
- Find your starting point — Where is the lodge? Where does the chairlift drop you?
- Identify easy runs (green circles) from the top of each lift.
- Find landmarks — lodge buildings, patrol stations, first aid huts.
- Note closed areas and boundaries — Do not head toward them.
- Plan a meeting spot — If your group gets separated, agree on where to regroup.
Official Resources
🎬 Video: International Trail Marking System (video) — https://youtu.be/N_f6xMFVVHc
You can now read any North American ski trail map. Next, get your body ready for the physical demands of snow sports.