Req 7d10 — Map & Compass
Snowshoeing regularly takes you off marked trails and into backcountry terrain where trail signs, blazes, and landmarks can all disappear under snow. A topographic map and compass are your primary tools for knowing where you are and where you are going — and they work without cell service or batteries.
Reading a Topographic Map
A topographic (“topo”) map uses contour lines to represent the shape of the land in two dimensions.
Key concepts:
- Contour lines connect points of equal elevation. Every point on a single contour line is the same height above sea level.
- Contour interval is the elevation change between adjacent lines — shown in the map legend (e.g., 40 feet). The closer together the lines are, the steeper the terrain.
- Index contours are thicker lines printed at regular intervals (every 5th line) with the elevation labeled.
- V-shapes pointing uphill indicate a valley or drainage (a stream usually runs through the bottom of the V).
- V-shapes pointing downhill indicate a ridge.
- Closed circles represent peaks, hilltops, or depressions.
Reading terrain from a topo:
| Line Spacing | Terrain |
|---|---|
| Lines very close together | Steep cliff or near-vertical slope |
| Lines moderately spaced | Steady incline |
| Lines far apart | Gentle slope or flat terrain |
| Lines form a “U” or “V” | Valley or ridge |
Orienting the map: Before navigating, rotate the map so North on the map points toward magnetic North in the real world (using your compass). When the map is oriented correctly, terrain features in the real world should line up with the same features on the map.
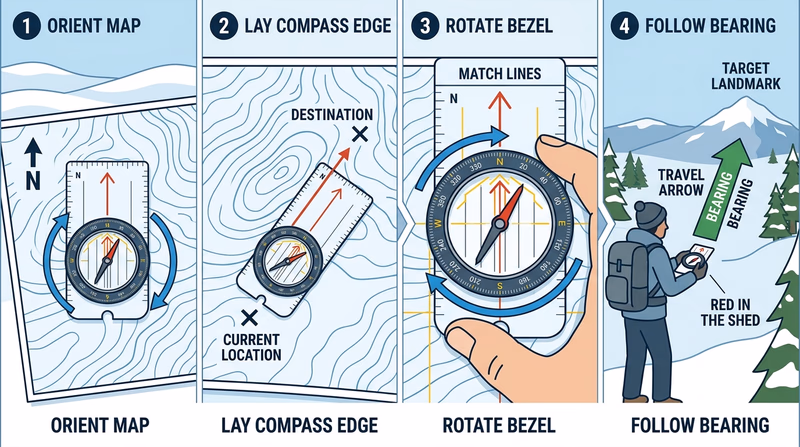
Using a Compass
A baseplate compass has four main parts: the magnetic needle (red end points North), the rotating bezel (marked in degrees 0–360), the baseplate (with direction-of-travel arrow), and the orienting lines (inside the bezel).
Taking a Bearing From the Map
- Place the compass on the map with the baseplate edge connecting your current location to your destination.
- Rotate the bezel until the orienting lines inside the bezel align with the North–South grid lines on the map (North end pointing toward the top of the map).
- Read the bearing at the index mark (top of the baseplate). That is your magnetic bearing — but check if your map requires a declination correction.
Magnetic Declination
True North (the geographic North Pole) and Magnetic North (where your compass needle points) are not the same place. The difference is called declination and it varies by location. Your map legend will show the declination for that region — adjust your bearing accordingly, or use the declination adjustment on a more advanced compass.
Following a Bearing in the Field
- Hold the compass level and rotate your body until the magnetic needle aligns with the orienting arrow (red in the shed).
- Look up along the direction-of-travel arrow. Pick a landmark (a tree, a boulder) along that line.
- Walk to that landmark, then re-check your compass and pick the next landmark. This is called waypoint navigation.
- Keep your eyes up. Never walk while staring at the compass.
Dead Reckoning
Dead reckoning is estimating your position by tracking how far and in what direction you have traveled from a known starting point. For snowshoeing, a rough rule of thumb is about 2 miles per hour on flat groomed terrain; steeper terrain or deep powder cuts that significantly.
Putting It Together on a Snowshoe Route
- Before leaving: Study the topo and identify the major terrain features along your route — ridges, valleys, stream crossings, elevation changes.
- Orient your map each time you stop to check your position.
- Take a bearing to your next waypoint whenever you lose sight of it (e.g., in trees or during weather).
- Cross-check terrain: Verify that what you see in the real world (slopes, drainages, hills) matches the map. This is the most reliable way to confirm your position.
- In whiteout conditions: Stop. Take a bearing to a safe known location and navigate slowly to it. Do not wander.
Official Resources
🎬 Video: How to Read a Topographic Map (video) — https://youtu.be/CoVcRxza8nI
🎬 Video: How to Use a Compass (video) — https://youtu.be/0cF0ovA3FtY
🎬 Video: How to Use a Topographic Map and Compass (video) — https://youtu.be/P1LL2FXK6o0