Surveying Merit Badge — Complete Digital Resource Guide
https://merit-badge.university/merit-badges/surveying/guide/
Introduction & Overview
Surveying is the science of figuring out exactly where things are on the land. Surveyors measure boundaries, map terrain, set construction points, and turn field observations into information people can trust. When you work on this merit badge, you learn how careful measurements shape roads, homes, trails, property lines, and even the maps on your phone.
A good surveyor is part detective, part mathematician, and part outdoor problem-solver. You will practice safe fieldwork, use real measuring methods, sketch a scaled map, and see how modern tools like GPS, drones, and laser scanning are changing the profession.
Then and Now
Then
Long before satellites and laser scanners, surveyors worked with chains, compasses, levels, and notebooks. Early survey crews helped mark town boundaries, divide farmland, and lay out roads and railroads. In the United States, surveying was especially important as communities expanded westward and land had to be described clearly enough to avoid disputes.
Those early measurements demanded patience. A crew might spend all day checking lines, setting stakes, and recording angles by hand. A small mistake in the field could become a big argument later if a fence, deed, or building ended up in the wrong place.
Now
Modern surveyors still depend on careful thinking, but their toolbox has grown. They use total stations, GPS receivers, drones, laser scanners, and computer mapping software to collect and organize data much faster than earlier crews could. Construction teams rely on surveyors before concrete is poured, engineers rely on them before roads are built, and landowners rely on them when boundaries need to be confirmed.
Even with all that technology, the job still comes down to the same goal: make dependable measurements and communicate them clearly. A survey that is fast but sloppy is not useful. Accuracy, records, and judgment still matter most.
Get Ready!
You do not need to be a math expert to enjoy surveying. You do need to be observant, organized, and willing to slow down long enough to measure carefully. This badge rewards Scouts who like hands-on work, outdoor problem-solving, and seeing how small details connect to the big picture.
Kinds of Surveying
Surveying is not one single job. Different kinds of surveyors solve different kinds of problems.
Boundary Surveying
Boundary surveyors help define property lines and corners. Their work supports deeds, legal descriptions, and land ownership questions. If two neighbors disagree about where one yard ends and the other begins, a boundary survey may help settle the issue.
Topographic Surveying
Topographic surveys record the shape of the land and the features on it. A topographic map may show slopes, hills, low spots, trees, rocks, streams, and buildings. This kind of surveying helps planners and builders understand a site before work begins.
Construction Surveying
Construction surveyors transfer a design from paper to the ground. They help crews know where to place roads, foundations, utilities, and grades. On a construction site, a surveyor’s stake or mark often tells workers exactly where something belongs.
Geodetic and GPS Surveying
Geodetic surveying looks at larger areas and takes the shape of Earth into account. This is the world of control points, satellite positioning, and highly precise coordinates. It supports mapping systems, major engineering projects, and the location tools many people use every day.
Hydrographic Surveying
Some surveyors work on or under water. Hydrographic surveying maps shorelines, river bottoms, harbors, and other underwater areas. It is important for navigation, construction, and environmental studies.
Next Steps
Your first requirement focuses on something every real survey crew needs: field safety. Before you set up instruments and measure angles, learn how to prevent and respond to the injuries and hazards that can happen outdoors.
Req 1 — Field Safety for Surveyors
A survey crew may spend hours in brush, sun, cold wind, rocky ground, or overgrown property corners. That means Requirement 1 is not extra background knowledge. It is part of doing the job well. If someone gets hurt far from the truck or overlooks a poisonous plant patch, the whole crew’s work stops.
Think Like a Survey Crew Member
Surveyors often work in places that look quiet but hide small hazards: rusty wire, thorny plants, ticks, hidden holes, snake cover, and weather that shifts fast. Before starting work, scan the area the same way you would scan a campsite.
Field Safety Scan
Use this before setting up an instrument- Ground hazards: Look for holes, loose rock, broken glass, wire, and steep or slippery slopes.
- Plant hazards: Notice poison ivy, poison oak, poison sumac, thorny brush, and sticker plants common in your area.
- Animal hazards: Check for snake habitat, fire ant mounds, wasp nests, ticks, and biting insects.
- Weather hazards: Ask whether heat, cold, lightning, wind, or dehydration will be the bigger problem today.
- Crew readiness: Make sure someone has water, a first-aid kit, and a clear plan for calling for help.
Cuts and Scratches
Cuts and scratches are common when moving through brush, handling stakes, or working around old fences and tools. Most are minor, but they can still become painful distractions or infected wounds if ignored.
First aid for cuts and scrapes
- Stop the bleeding with direct pressure.
- Clean the area with clean water.
- Cover it with a clean bandage or dressing.
- Watch for signs of deeper injury, heavy bleeding, or infection.
🎬 Video: How to Treat Cuts & Scrapes | First Aid Training (video) — https://youtu.be/L77rERL64zc?si=3OoxbYxRfSOm5dX7
Snakebites, Insect Stings, and Tick Bites
A surveyor does not need to panic around wildlife. A surveyor does need to notice where wildlife may be hiding and know what to do if something goes wrong.
Snakebite
Most snakebites happen when someone surprises or tries to handle a snake. The safest response is simple: step back, give it space, and let it move away.
If a bite happens, keep the person calm, limit movement, and get medical help quickly. Do not cut the bite, suck out venom, or apply a tourniquet.
Snake Bites (website) Official Scouting guidance on preventing snakebites and responding correctly if one happens in the field. Link: Snake Bites (website) — https://www.scouting.org/health-and-safety/safety-moments/snake-bites/Insect stings and arachnid bites
Bee, wasp, hornet, ant, and spider problems range from annoying to life-threatening. Remove a visible stinger if present, wash the area, use a cold pack for swelling, and watch for allergic reaction signs such as trouble breathing, widespread hives, or swelling of the face or throat.
🎬 Video: Bites or Stings of Insects and Arachnids (video) — https://youtu.be/qP2ETKAOPWo?si=_tmXRhrdNV5cbQRn
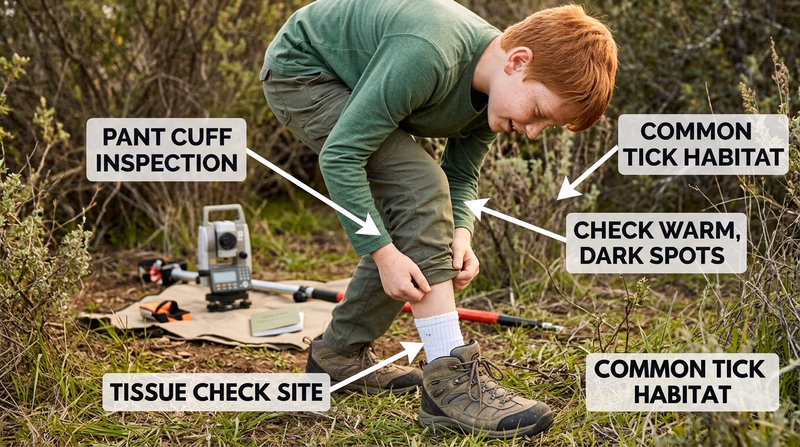
Tick bites
Ticks are a surveying hazard because crews work in grass, brush, and woods where ticks wait to latch onto clothing or skin. Use tweezers to remove a tick close to the skin with steady pressure. Then wash the area and tell an adult leader or parent so the bite can be monitored.
Heat, Cold, and Dehydration
Survey work can be slow and precise, which tricks people into forgetting how much the environment is affecting them. A Scout concentrating on a rod reading or a field sketch may not notice thirst, chills, or overheating until the problem is already serious.
Heat reactions and dehydration
Hot weather can lead to heavy sweating, dizziness, cramps, headache, nausea, and confusion. Dehydration often starts before you feel very thirsty.
🎬 Video: Heat and Cold Emergencies - How to Treat Dehydration (video) — https://youtu.be/3q0s8uKfE8I?si=9vjG5zfeGQpDo3mv
Cold reactions
Cold, wind, and wet clothing can cause shivering, numb fingers, poor coordination, and confusion. Those signs matter to a surveyor because cold hands and tired thinking lead to bad measurements as well as medical trouble.
🎬 Video: First Aid Training - St John Ambulance (video) — https://youtu.be/DXo5hmiFQmQ?si=pAKne0eAc6FdMZOo
Water and Weather Habits
Simple habits prevent many field injuries- Drink early: Start hydrated before you arrive.
- Dress in layers: Surveying often means standing still between short bursts of movement.
- Use sun protection: Hat, sunscreen, and shade breaks matter on open sites.
- Watch your crew: If someone becomes clumsy, dizzy, unusually quiet, or confused, stop and check on them.
Poisonous Plants and Animals in Your Area
Surveyors need local hazard knowledge because the job takes them off sidewalks and into edge spaces: fence rows, drainage areas, vacant lots, stream banks, and overgrown corners. That is exactly where poisonous plants and venomous animals may be hard to notice.
When you talk with your counselor, be ready to explain:
- which poisonous plants are common where you live
- how to recognize them in different seasons
- which venomous or dangerous animals are realistic local concerns
- how knowing that information changes where you walk, kneel, place equipment, and take breaks
You now know how to protect yourself and your crew before the measurements begin. Next, you will collect the kind of angle and distance data that turns a marked lot into a real survey.
Req 2 — Radial Measurements and GPS Checks
This requirement covers two connected jobs. First, you collect distances and angles from one setup point to corners and topographic features. Then you check part of that work with GPS. Together, those steps teach an important surveying lesson: measurements become more trustworthy when you understand both the method and its limits.
- Requirement 2a builds your field notes with an instrument, reference line, angles, and distances.
- Requirement 2b compares some of those same points with GPS so you can talk about differences in results.
Requirement 2a
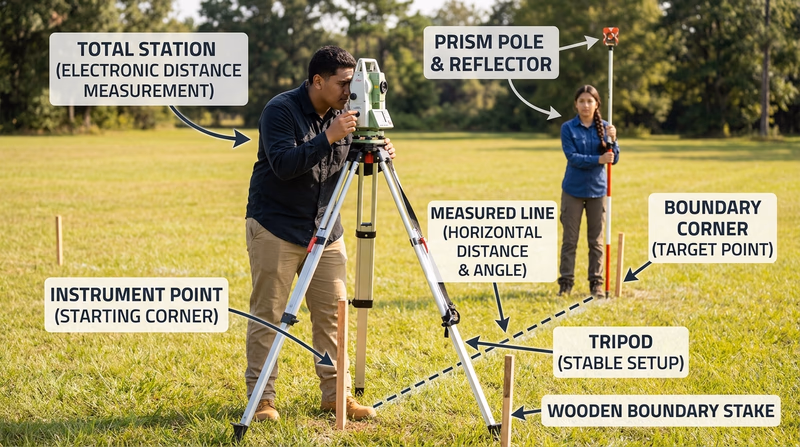
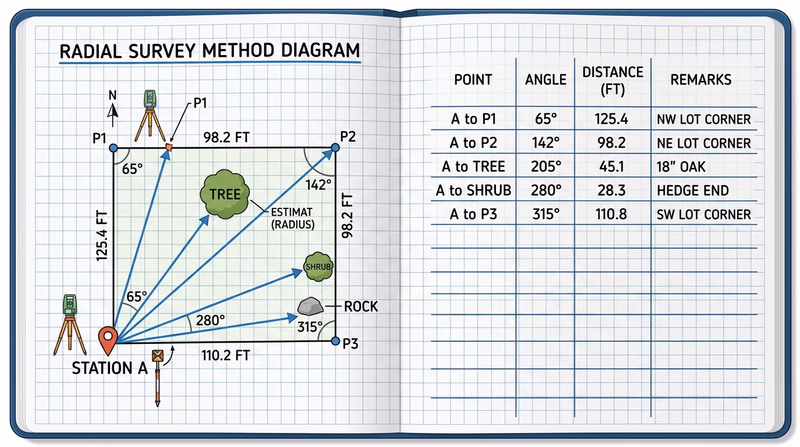
Requirement 2a is about building a map from a single known position. You stand over one corner, aim toward a reference corner, and then turn to each new point while recording the angle and distance. That method is called a radial survey because every measured line spreads out like spokes from one center.
Set up the instrument correctly
A perfect notebook cannot rescue a bad setup. If the instrument is not centered, level, and aimed at the right reference point, every later angle may be off.
🎬 Video: Total Station Basic Setup | 3 Minute Surveying Tips with Tony (video) — https://youtu.be/O3ZmSdbzkvs?si=amJ6NzQSU3OAHe8F
Before You Start Measuring
Get the setup right before collecting any numbers- Center the instrument: Place it directly over the chosen corner marker.
- Level it carefully: A tilted instrument creates bad readings.
- Choose a reference line: Sight one known corner first so every later angle has the same starting direction.
- Label your notebook page: Write the station point, date, weather, and names of the points you expect to measure.
Record angles and distances clearly
As you turn from the reference line to each remaining corner, record the angle turned and the measured distance. Then do the same for five nearby topographic features. The key is consistency. Use the same naming style for every point so you do not confuse “north oak” with “oak near fence” later when you draw the map.
A simple field-note pattern might include:
- point name or point number
- type of point, such as lot corner, tree, rock, or shrub
- angle turned from the reference line
- distance measured
- short remarks, such as “large boulder” or “double-trunk cedar”
Include topographic features, not just corners
Surveying is not only about property boundaries. Real survey crews also pay attention to features that affect how land is used. Trees, shrubs, rocks, fences, utility poles, and drainage areas all help describe a place. Those details make your later map more useful.
Requirement 2b
Now you compare two ways of measuring. Use GPS to locate three of the same points you already measured in 2a, then compare those distances with your earlier instrument-based work. Do not expect the numbers to match perfectly. The value of the comparison is understanding why.
Use GPS for a fair comparison
Choose points that are easy to identify again and are not hidden by heavy tree cover or other signal-blocking obstacles if possible. Record which three points you selected so your counselor can follow your comparison.
🎬 Video: GPS Surveying for Beginners - the Easy Land Surveying (video) — https://youtu.be/5p39acElZAU?si=98GYeFh3eCA-jNs8
Compare the results thoughtfully
When you compare the two methods, ask questions like these:
- Did GPS give nearly the same distance, or was it noticeably different?
- Was the point under tree cover, near buildings, or in another location that could affect satellite reception?
- Was your original instrument setup especially careful or rushed?
- Which method was faster? Which seemed more precise for this job?
What this requirement teaches
Requirement 2 shows why field notes matter. In the next requirement, you will depend on these notes to draw your survey map. If your notes are messy, the map will be messy. If your notes are complete and organized, the map starts to make sense.
You have now gathered the raw measurements that make a survey useful. Next, you will turn those angles and distances into a clean scaled drawing with the map elements every reader needs.
Req 3 — Plotting Your Survey Map
This is where your field notes become something another person can understand. A survey map is not just a picture of a lot. It is a clear, scaled record of where points are and how they relate to each other. If Requirement 2 was about collecting data, Requirement 3 is about communicating it.
Start with a clean plan
Before drawing, choose a scale that will fit your entire lot and nearby features on the page without crowding. A scale like 1 inch = 10 feet or 1 inch = 20 feet may work depending on the lot size. The goal is not to use a fancy scale. The goal is to use one that leaves room for labels and neat linework.
Map Setup Choices
Decide these before your pencil touches the page- Paper orientation: Portrait or landscape based on the shape of the lot.
- Working scale: Large enough to show detail, small enough to fit the full survey.
- Starting point: Choose the benchmark or station point that makes the drawing easiest to build.
- Label style: Decide how you will mark corners, topographic features, and notes consistently.
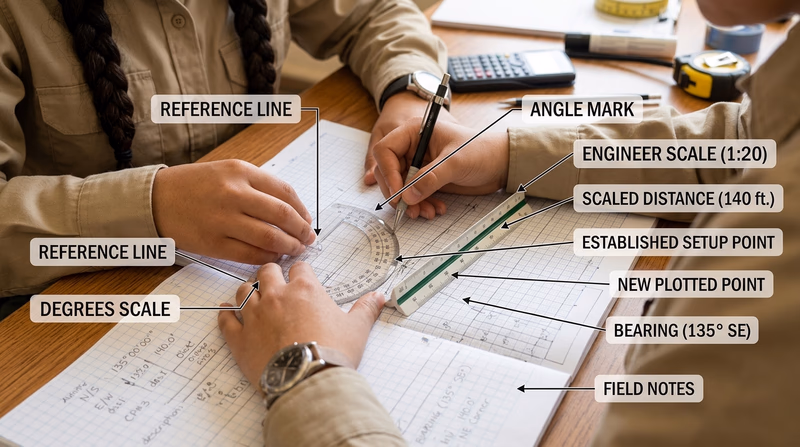
Plot points from your notes
Using your protractor, turn the angles from your station point the same way you did in the field. Then use your chosen scale to measure each distance and mark the point. Repeat that process for each lot corner and topographic feature.
Survey drawing rewards patience. A tiny mistake in one early point can throw off later lines, so check each plotted point before moving on.
🎬 Video: Drawing Diagrams of Legal Descriptions (Basic Example) (video) — https://youtu.be/ttvoWB2TNok?si=mMX_gPRmrIGw96ZY
Build in a logical order
A good order is:
- draw the starting station point
- mark the reference direction
- plot the remaining lot corners
- connect the lot outline
- add trees, shrubs, rocks, or other mapped features
- finish with title, date, north arrow, and scale bar
Include the required map elements
Your counselor is not only checking whether you plotted points. They are also checking whether you created a map that someone else can read.
North arrow
A north arrow tells the reader how the map is oriented. Without it, a neat drawing can still be confusing.
Scale bar
A scale bar gives a visual way to judge distance. It is useful even if the written scale is already listed in the title block.
Title and date
The title tells what the map represents, such as “Five-Sided Practice Lot Survey.” The date matters because conditions and site features can change over time.
Diagram of the lot
Your finished map should clearly show the lot shape and the points you measured. It should be easy to tell where corners are and how the topographic features relate to the lot.
Make it neat enough to trust
In surveying, neatness is part of accuracy. If labels overlap, if points are hard to identify, or if the north arrow and scale are missing, the map becomes harder to trust.
This map will also help you in Requirement 4 because it strengthens your sense of where each corner sits in relation to the others. Next, you will add another layer of information to the lot by figuring out elevation.
Req 4 — Finding Elevations from a Benchmark
Maps show position, but surveyors also care about height. Requirement 4 introduces leveling, which is how a crew finds whether points are higher or lower than a benchmark. This matters whenever land will be drained, graded, built on, or connected to roads and utilities.
Start from the benchmark
A benchmark is a point with a known elevation. In this requirement, you are using an assumed elevation of 100 feet. That gives you a starting value so you can calculate the elevation of the other four corners.
The benchmark does not need to represent the true height above sea level for this exercise. It only needs to be a dependable starting point that lets you compare all the other points consistently.
🎬 Video: Calculate Elevation & Grade with a Builders Level (video) — https://youtu.be/UDuYrsxHmrA?si=IV8K7mULkWQKU43P
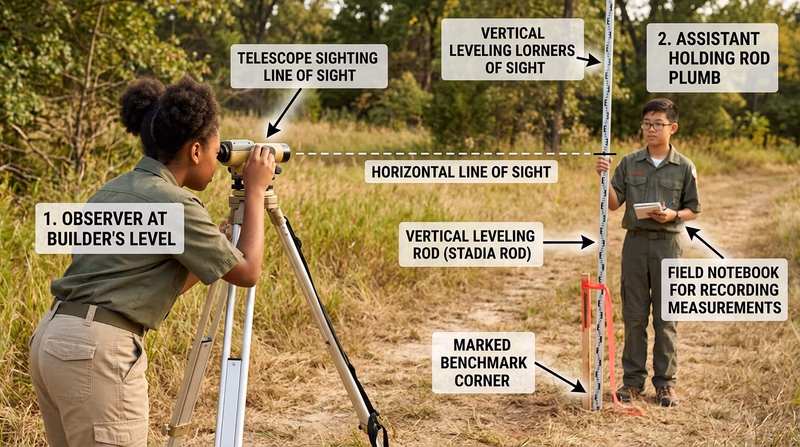
How the level and rod work together
The level creates a horizontal line of sight. The rod gives you a reading at each point. By comparing rod readings, you can determine whether another corner is above or below the benchmark.
A common pattern is:
- take a reading on the benchmark
- establish the height of instrument
- take readings on the other corners
- calculate each point’s elevation from those numbers
Leveling Workflow
Keep each step in order- Set the level on stable ground: A shaky tripod leads to shaky confidence.
- Level the instrument carefully: Recheck before taking readings.
- Hold the rod upright: A leaning rod changes the reading.
- Record every value immediately: Mark which corner each reading belongs to.
- Double-check math: One copied number can change every later result.
Example idea
If the benchmark is 100.00 feet and your first rod reading there is 4.25 feet, the height of instrument would be 104.25 feet. If another corner reads 5.10 feet, that corner would be 99.15 feet. The exact numbers in your exercise may differ, but the pattern stays the same: benchmark first, then compare every other reading back to it.
Why elevation matters in real surveying
Knowing that one corner is a little higher or lower than another can affect major decisions. Builders care about whether water will run toward or away from a structure. Road crews care about smooth grades. Engineers care about drainage, erosion, and how to move water safely across a site.
Common mistakes to avoid
Survey leveling is straightforward, but it punishes rushed work.
You have now measured the lot in two ways: horizontally with angles and distances, and vertically with elevation. Next, you will move from fieldwork into the record side of surveying by examining a real deed.
Req 5 — Reading a Property Deed
A surveyor’s work does not live only in the field. It also lives in records. A deed is one of the key documents that describes who owns a property and how that property is identified. Reading one carefully helps you see why written land descriptions must be clear, complete, and legally dependable.
What a deed does
A deed transfers ownership of real property from one party to another. It also gives identifying information that helps connect the property to legal records, tax records, and past transactions.
When you discuss a deed with your counselor, focus on what each part is for. You are not just memorizing labels. You are learning how survey information fits into ownership and land history.
Common parts of a deed
Different deeds may be formatted differently, but many include these major parts:
Grantor and grantee
The grantor is the person or group transferring the property. The grantee is the person or group receiving it. These names matter because a deed records the ownership transfer.
Legal description
This is the part surveyors care about most. The legal description identifies the property itself. It may use lot and block information from a subdivision, metes and bounds calls, or another formal description method.
Parcel or tax information
Some deeds include parcel numbers or related identifying details. These help connect the deed to local government records, but they do not replace the legal description.
Consideration and transfer language
A deed often includes wording that states the property is being conveyed and may mention the amount paid or another form of consideration.
Signatures, notarization, and recording information
Signatures show who executed the document. Notarization helps confirm identity and validity. Recording information shows when and where the deed was entered into the public record.
Questions to Ask About the Deed
Good prompts for your counselor discussion- How is the property described? Lot and block, metes and bounds, or another method?
- What information identifies the parties? Are the grantor and grantee clearly named?
- What part would a surveyor rely on most? Usually the legal description and any referenced plats or surveys.
- What could create confusion later? Missing pages, vague descriptions, or references that are hard to trace.
Why the legal description matters so much
The deed may be short or long, but the legal description is where the land itself gets pinned down. If that description is unclear, boundary questions can follow. Surveyors may need to compare the deed to plats, older deeds, monument locations, and actual evidence on the ground.
Where you might get the deed
Your requirement already points you toward a courthouse or title agency. Depending on where you live, deeds may be recorded by a county recorder, register of deeds, clerk, or similar office. A title company may also help locate a copy for an approved property.
What to notice during your discussion
As you talk with your counselor, try to connect the deed to earlier requirements:
- Requirement 2 showed how points and measurements are gathered.
- Requirement 3 showed how those measurements become a readable map.
- Requirement 5 shows how land must also be described in the record system.
That connection is important. Surveying is not only about taking measurements. It is also about producing information people can rely on in legal and practical decisions.
You have looked at how land is described in records. Next, you will turn toward the future of surveying and compare newer tools such as drones and laser scanning.
Req 6 — Drones and Laser Scanning
Surveying is still built on accuracy, field judgment, and careful records, but the tools keep changing. Requirement 6 asks you to look at two important technologies that can capture data faster and in new ways: drones and laser scanning. Neither tool is magic. Each one works best in certain situations and comes with tradeoffs.
Drones in surveying
A drone can collect images from above and help create maps, models, and site views that would be slow to gather from the ground alone. This is especially useful on large, open sites where a crew needs a broad look at terrain or construction progress.
Strengths of drones
- cover large areas quickly
- reach viewpoints that are hard to get from the ground
- create aerial imagery for maps and planning
- help document changes on a site over time
Weaknesses of drones
- need trained operators and safe flight planning
- may be limited by weather, wind, battery life, or airspace rules
- struggle in dense tree cover or places where the ground is hidden from above
- still need good ground control to support accurate results
Laser scanning
Laser scanning, often called LiDAR scanning in many contexts, captures huge numbers of points to create a detailed 3D model of a place. Instead of measuring one point at a time, the scanner records a dense cloud of points that shows surfaces, shapes, and structures.
Strengths of laser scanning
- captures complex shapes in rich detail
- creates strong 3D records of buildings, sites, and surfaces
- helps measure places where many points are needed
- can reduce the need to revisit a site just to grab one missed measurement
Weaknesses of laser scanning
- equipment and processing can be expensive
- data files can be very large and require specialized software
- scanning hidden or blocked areas may still require multiple setups
- more data does not automatically mean better decisions unless the crew manages it well
🎬 Video: Photogrammetry vs LiDAR - Which Is BETTER? (video) — https://youtu.be/NF2k8e6kvUY?si=QEKCX3GJuHW_wtkX
How to Compare New Survey Tools
Good points to cover with your counselor- Speed: Which tool gathers information faster for the type of site you have?
- Detail: Do you need a broad overhead map or a dense 3D model?
- Cost: What equipment, training, and software are required?
- Site limits: Will trees, buildings, weather, or regulations affect the work?
- Accuracy needs: What level of precision does the project demand?
Why both still need human judgment
A drone can collect images. A scanner can collect millions of points. But a surveyor still decides where control points belong, what data matters, how to check accuracy, and how to explain the results. Technology can speed up collection, but it does not replace professional judgment.

You have explored two newer ways surveyors capture data. Next, you will focus on one technology almost everyone knows by name: GPS.
Req 7 — Why GPS Matters in Surveying
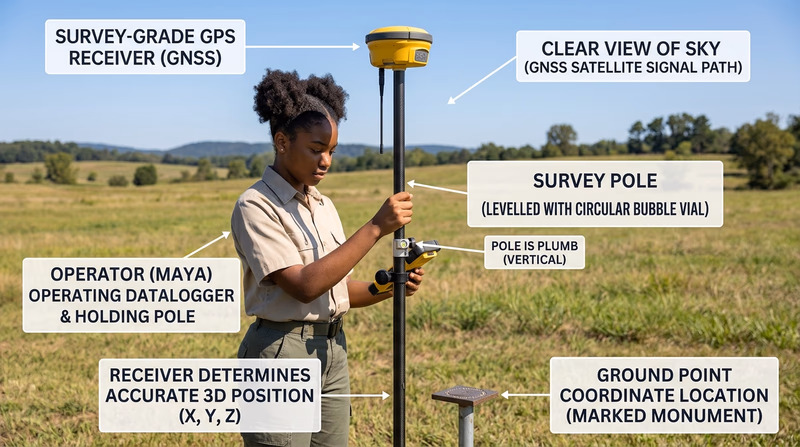
GPS stands for Global Positioning System. It is a satellite-based system that helps a receiver figure out position by comparing signals from multiple satellites. For everyday users, that might mean getting directions on a phone. For surveyors, it means locating points on Earth with far greater speed and reach than older methods alone could provide.
What GPS does
A GPS receiver listens for timing signals sent by satellites. By comparing how long the signals took to arrive, the receiver can estimate where it is. Survey-grade equipment improves that process with stronger hardware, correction methods, and careful procedures so the final position is much more precise than what a phone usually gives you.
🎬 Video: How Does GPS Work? | The Secret Genius of Modern Life | BBC Earth Science (video) — https://youtu.be/KItEcCJfHAs?si=ta74Ncw563CCpist
Why GPS is important to surveyors
GPS changed surveying because it reduced the need to measure every position by chaining lines from one visible point to the next. Surveyors can now establish control, check positions, and connect projects across long distances much more efficiently.
Ways GPS helps the profession
- speeds up positioning over large areas
- supports mapping, construction layout, and control work
- helps crews work where long lines of sight are difficult to maintain
- connects local projects to broader coordinate systems
Why GPS did not replace everything else
GPS is powerful, but it is not perfect everywhere. Tree cover, buildings, terrain, and signal issues can reduce accuracy or slow down work. That is why surveyors still use total stations, levels, and other tools alongside GPS.
GPS Strengths and Limits
Balanced points to bring into your discussion- Strength: Works well for wide-area positioning and connecting points over distance.
- Strength: Can save time compared with older point-to-point methods alone.
- Limit: Signal blockage can reduce reliability near buildings, cliffs, or heavy trees.
- Limit: Good results still depend on proper equipment, setup, and checks.
How GPS is changing surveying
GPS has made surveying faster, more connected, and more digital. Crews can move data into mapping software quickly, coordinate projects across regions, and tie their work into broader geographic systems. It also supports newer technologies you saw in the previous requirement, because drones, digital mapping, and many modern workflows rely on accurate positioning.
You now understand one of the biggest tools shaping modern surveying. Next, you will turn that knowledge toward people by exploring careers that depend on these skills.
Req 8 — Surveying Career Paths
This requirement helps you zoom out and ask a practical question: who uses surveying skills in real life, and what does it take to join them? Even if you do not become a surveyor, researching these careers shows how field measurement, mapping, and spatial thinking connect to construction, engineering, land management, and technology.
Start with three possible careers
Here are three strong examples you could compare:
Land surveyor
Land surveyors measure boundaries, set control points, support construction, and prepare records people use for ownership and development decisions. This career blends outdoor fieldwork with office analysis and record research.
GIS specialist or mapping technician
These professionals organize geographic data in digital maps and databases. They may work with GPS data, aerial imagery, utility systems, natural resources, or planning departments.
Civil engineering technician or construction layout technician
These roles use surveying knowledge to help roads, buildings, drainage systems, and utilities get built in the correct location and grade.
🎬 Video: Careers in Surveying and Mapping (Video) — https://youtu.be/4V14pXYyIuo?si=-R9CyC9I8ZVvi9-D
What to research about one career
After choosing one path, gather information in a structured way so your discussion is more than a list of random facts.
Career Research Checklist
Bring these points into your notes for your counselor- Training and education: Does the job require a certificate, two-year degree, four-year degree, apprenticeship, or a mix?
- Certification or licensing: Is there a state license, exam, or professional credential involved?
- Experience: What entry-level work helps someone get started?
- Expenses: What could cost money, such as school, equipment, exams, or travel?
- Employment outlook: Are jobs growing in your region or nationally?
- Starting salary and advancement: What might a beginner earn, and how can they move up?
- Your interest: Which parts of the job sound exciting, and which parts do not?
How to talk about advancement
Surveying-related careers often grow in stages. Someone may begin as a rod person, field assistant, drafter, or technician and later move into crew chief, project management, specialized mapping, licensed surveying, or engineering support roles.
That makes this a good career field for Scouts who like the idea of learning by doing. Some people start with hands-on work outdoors and then build toward more responsibility, more technical tasks, and more leadership.
Good questions to answer in your discussion
- What kind of workday does this person probably have?
- How much of the job is outdoors versus indoors?
- What training is required before someone can work independently?
- What would make the career rewarding?
- What parts might be challenging?
You have completed the requirement-by-requirement path of the badge. The next page goes beyond the official requirements and shows how surveying connects to bigger projects, places, and ideas.
Extended Learning
Congratulations!
You have worked through the core ideas of surveying: field safety, measurement, mapping, elevation, records, technology, and careers. That is a strong foundation. Surveying is one of those subjects where the more closely you look, the more connected it becomes to nearly everything people build, own, protect, and navigate.
Reading the Landscape Like a Surveyor
After this badge, start noticing land differently. Sidewalk ramps, drainage ditches, retaining walls, lot corners, road centerlines, trail signs, and utility markers all tell a story about measurement and planning. Surveyors help make those systems line up in the real world.
One great next step is to visit a familiar place and ask yourself questions a surveyor might ask: Where does water flow after a storm? Which areas are higher or lower? Where would a property corner likely be? Which features are probably natural, and which were placed based on measured plans?
From Field Notes to Digital Models
Modern surveying does not end with a paper sketch. Field data often becomes digital maps, terrain models, construction layouts, and 3D site records. If you enjoyed Requirement 3, you may also enjoy learning basic GIS, CAD, or mapping software later on. Those tools help surveyors and planners turn raw coordinates into information teams can actually use.
The important idea is that measurement and communication belong together. A point on the ground is useful only if somebody can understand where it is, how it was measured, and what it means.
Why Control Points Matter
Many large projects depend on control points, which are carefully established reference locations used to keep later measurements consistent. Think of them as trusted anchors for future work. If a whole project depends on the same control network, crews can return on different days and still connect their work accurately.
That idea scales up from your merit badge lot all the way to highways, airports, and major mapping systems. Good control turns many separate measurements into one reliable system.
Real-World Experiences
Visit a County Recorder or GIS Office
Walk a Construction Site Perimeter
Compare a Trail Map to the Real Ground
Talk with a Local Survey Crew
Organizations
Professional organization that supports the surveying profession, education, and public understanding of what surveyors do.
Organization: National Society of Professional Surveyors — https://www.nsps.us/
Federal science agency known for topographic maps, geographic data, and land information that connects closely to surveying and mapping.
Organization: U.S. Geological Survey — https://www.usgs.gov/
Part of NOAA, this organization maintains the national spatial reference framework that helps surveyors tie local measurements to larger coordinate systems.
Organization: National Geodetic Survey — https://www.ngs.noaa.gov/
Educational site with approachable explanations of GIS, LiDAR, remote sensing, and other topics that pair well with modern surveying interests.
Organization: GIS Geography — https://gisgeography.com/