Req 2 — Radial Measurements and GPS Checks
This requirement covers two connected jobs. First, you collect distances and angles from one setup point to corners and topographic features. Then you check part of that work with GPS. Together, those steps teach an important surveying lesson: measurements become more trustworthy when you understand both the method and its limits.
- Requirement 2a builds your field notes with an instrument, reference line, angles, and distances.
- Requirement 2b compares some of those same points with GPS so you can talk about differences in results.
Requirement 2a
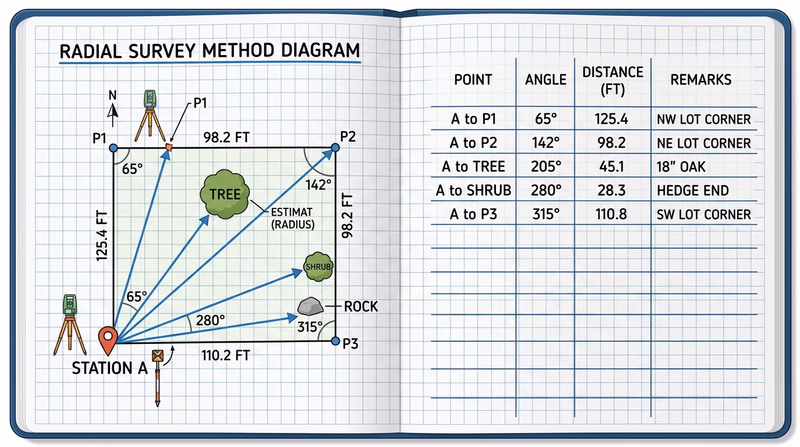
Requirement 2a is about building a map from a single known position. You stand over one corner, aim toward a reference corner, and then turn to each new point while recording the angle and distance. That method is called a radial survey because every measured line spreads out like spokes from one center.
Set up the instrument correctly
A perfect notebook cannot rescue a bad setup. If the instrument is not centered, level, and aimed at the right reference point, every later angle may be off.
🎬 Video: Total Station Basic Setup | 3 Minute Surveying Tips with Tony (video) — https://youtu.be/O3ZmSdbzkvs?si=amJ6NzQSU3OAHe8F
Before You Start Measuring
Get the setup right before collecting any numbers
- Center the instrument: Place it directly over the chosen corner marker.
- Level it carefully: A tilted instrument creates bad readings.
- Choose a reference line: Sight one known corner first so every later angle has the same starting direction.
- Label your notebook page: Write the station point, date, weather, and names of the points you expect to measure.
Record angles and distances clearly
As you turn from the reference line to each remaining corner, record the angle turned and the measured distance. Then do the same for five nearby topographic features. The key is consistency. Use the same naming style for every point so you do not confuse “north oak” with “oak near fence” later when you draw the map.
A simple field-note pattern might include:
- point name or point number
- type of point, such as lot corner, tree, rock, or shrub
- angle turned from the reference line
- distance measured
- short remarks, such as “large boulder” or “double-trunk cedar”
Include topographic features, not just corners
Surveying is not only about property boundaries. Real survey crews also pay attention to features that affect how land is used. Trees, shrubs, rocks, fences, utility poles, and drainage areas all help describe a place. Those details make your later map more useful.
Requirement 2b
Now you compare two ways of measuring. Use GPS to locate three of the same points you already measured in 2a, then compare those distances with your earlier instrument-based work. Do not expect the numbers to match perfectly. The value of the comparison is understanding why.
Use GPS for a fair comparison
Choose points that are easy to identify again and are not hidden by heavy tree cover or other signal-blocking obstacles if possible. Record which three points you selected so your counselor can follow your comparison.
🎬 Video: GPS Surveying for Beginners - the Easy Land Surveying (video) — https://youtu.be/5p39acElZAU?si=98GYeFh3eCA-jNs8
Compare the results thoughtfully
When you compare the two methods, ask questions like these:
- Did GPS give nearly the same distance, or was it noticeably different?
- Was the point under tree cover, near buildings, or in another location that could affect satellite reception?
- Was your original instrument setup especially careful or rushed?
- Which method was faster? Which seemed more precise for this job?
What this requirement teaches
Requirement 2 shows why field notes matter. In the next requirement, you will depend on these notes to draw your survey map. If your notes are messy, the map will be messy. If your notes are complete and organized, the map starts to make sense.
You have now gathered the raw measurements that make a survey useful. Next, you will turn those angles and distances into a clean scaled drawing with the map elements every reader needs.