Req 3 — Plotting Your Survey Map
This is where your field notes become something another person can understand. A survey map is not just a picture of a lot. It is a clear, scaled record of where points are and how they relate to each other. If Requirement 2 was about collecting data, Requirement 3 is about communicating it.
Start with a clean plan
Before drawing, choose a scale that will fit your entire lot and nearby features on the page without crowding. A scale like 1 inch = 10 feet or 1 inch = 20 feet may work depending on the lot size. The goal is not to use a fancy scale. The goal is to use one that leaves room for labels and neat linework.
Map Setup Choices
Decide these before your pencil touches the page
- Paper orientation: Portrait or landscape based on the shape of the lot.
- Working scale: Large enough to show detail, small enough to fit the full survey.
- Starting point: Choose the benchmark or station point that makes the drawing easiest to build.
- Label style: Decide how you will mark corners, topographic features, and notes consistently.
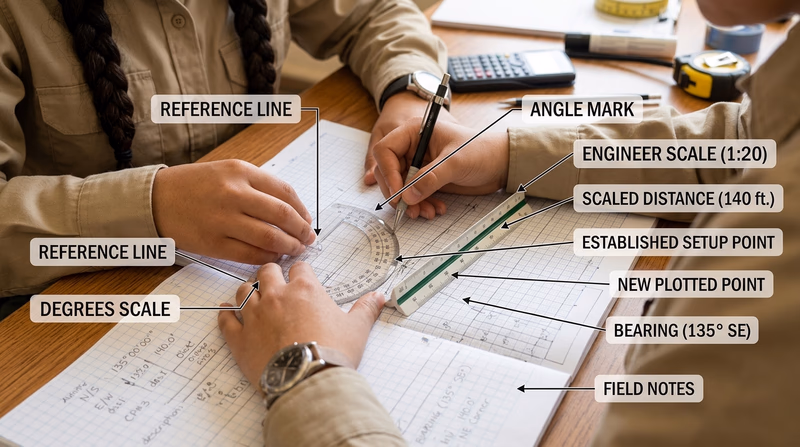
Plot points from your notes
Using your protractor, turn the angles from your station point the same way you did in the field. Then use your chosen scale to measure each distance and mark the point. Repeat that process for each lot corner and topographic feature.
Survey drawing rewards patience. A tiny mistake in one early point can throw off later lines, so check each plotted point before moving on.
🎬 Video: Drawing Diagrams of Legal Descriptions (Basic Example) (video) — https://youtu.be/ttvoWB2TNok?si=mMX_gPRmrIGw96ZY
Build in a logical order
A good order is:
- draw the starting station point
- mark the reference direction
- plot the remaining lot corners
- connect the lot outline
- add trees, shrubs, rocks, or other mapped features
- finish with title, date, north arrow, and scale bar
Include the required map elements
Your counselor is not only checking whether you plotted points. They are also checking whether you created a map that someone else can read.
North arrow
A north arrow tells the reader how the map is oriented. Without it, a neat drawing can still be confusing.
Scale bar
A scale bar gives a visual way to judge distance. It is useful even if the written scale is already listed in the title block.
Title and date
The title tells what the map represents, such as “Five-Sided Practice Lot Survey.” The date matters because conditions and site features can change over time.
Diagram of the lot
Your finished map should clearly show the lot shape and the points you measured. It should be easy to tell where corners are and how the topographic features relate to the lot.
Make it neat enough to trust
In surveying, neatness is part of accuracy. If labels overlap, if points are hard to identify, or if the north arrow and scale are missing, the map becomes harder to trust.
This map will also help you in Requirement 4 because it strengthens your sense of where each corner sits in relation to the others. Next, you will add another layer of information to the lot by figuring out elevation.