Swimming Merit Badge — Complete Digital Resource Guide
https://merit-badge.university/merit-badges/swimming/guide/
Introduction & Overview
Swimming is one of the most important life skills you can learn. It keeps you safe around water, builds strength and endurance, and opens the door to a lifetime of aquatic adventures — from lake days with friends to ocean snorkeling trips. The Swimming merit badge is an Eagle-required badge, and for good reason: water is everywhere, and knowing how to handle yourself in it could save your life or someone else’s.
This guide will help you understand water safety, master five essential swimming strokes, learn rescue techniques, and build the confidence to swim in any environment. Whether you are a beginner refining your form or an experienced swimmer pushing your limits, there is something here for you.
Then and Now
Then — Swimming as Survival
Humans have been swimming for thousands of years. Ancient Egyptian wall paintings from around 2500 BCE show people using swimming strokes. Greek and Roman soldiers trained in swimming as part of military preparation — a Roman who could not swim was considered uneducated. In Japan, swimming was a required skill for samurai warriors, and competitive swimming events were held as far back as 36 BCE.
- Purpose: Military training, survival, crossing rivers, fishing
- Mindset: Swimming meant staying alive — there were no lifeguards, no pools, and no flotation devices
Now — Swimming for Safety, Sport, and Fun
Today, swimming is both a major competitive sport and one of the most popular recreational activities in the world. The modern Olympic Games have included swimming since 1896. Community pools, water parks, and open water events bring millions of people into the water every year. At the same time, organizations like the American Red Cross and Scouting America teach water safety skills that prevent drowning — the leading cause of unintentional death for children ages 1–4 and a top cause for older youth.
- Purpose: Recreation, competition, fitness, water safety, therapy
- Mindset: Enjoy the water safely, push your limits, and be prepared to help others
Get Ready! Swimming is a skill that stays with you for life. Once you learn proper technique and water safety, you will be confident in pools, lakes, rivers, and oceans. Let’s dive in!
Kinds of Swimming
Recreational Swimming
This is what most people think of when they hear “swimming” — jumping in a pool or lake on a hot day, playing water games with friends, or cooling off at the beach. Recreational swimming does not require perfect form, but knowing basic strokes and water safety makes it a lot more enjoyable.
Competitive Swimming
Competitive swimmers race against the clock and each other in pools or open water. Events range from 50-meter sprints to 1500-meter distance races, plus relays and individual medley events that combine multiple strokes. Competitive swimming demands disciplined training, precise technique, and mental toughness. USA Swimming is the national governing body for competitive swimming in the United States.
Open Water Swimming
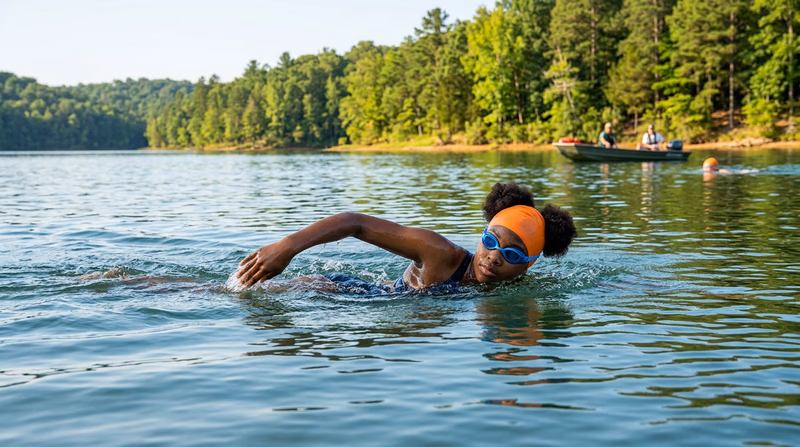
Open water swimming takes place in lakes, rivers, and oceans — anywhere outside a pool. Conditions change constantly: currents, waves, temperature, and visibility all add challenge. Open water swimmers must be comfortable navigating without lane lines or pool walls and must understand how weather and water conditions affect safety.
Survival Swimming
Survival swimming is not about speed or form — it is about staying alive in the water. Skills like treading water, floating, and using the HELP position (Heat Escape Lessening Posture) can keep you safe if you fall into water unexpectedly. The Swimming merit badge teaches several survival techniques that could one day save your life.
Fitness and Therapeutic Swimming
Swimming is one of the best full-body workouts available. It builds cardiovascular endurance, strengthens muscles, and improves flexibility — all without the impact stress that running or jumping puts on your joints. Doctors and physical therapists often recommend swimming for people recovering from injuries, managing chronic conditions, or looking for a low-impact way to stay fit.
Req 1a — Safe Swim Defense
What Is Safe Swim Defense?
Safe Swim Defense is Scouting America’s official framework for keeping everyone safe during swimming activities. It is built around eight key points that address the most common causes of drowning. Every Scout leader must complete Safe Swim Defense training before supervising any Scouting swim activity, and every Scout should understand these principles.
The eight points of Safe Swim Defense are:
- Qualified Supervision — A responsible adult who understands water safety must be in charge.
- Personal Health Review — Swimmers should be in good health and free from conditions that could impair them in the water.
- Safe Area — The swimming area must be inspected for hazards before anyone enters the water.
- Response Personnel — Trained rescue personnel must be present and ready to act.
- Lookout — A designated lookout watches swimmers from a fixed position at all times.
- Ability Groups — Swimmers are divided by skill level (nonswimmer, beginner, swimmer) and assigned to appropriate areas.
- Buddy System — Every swimmer has a buddy. They enter the water together, stay together, and leave together.
- Discipline — Everyone follows the rules. No exceptions. Horseplay, diving in shallow water, and ignoring boundaries are not tolerated.
Common Drowning Situations
Your counselor will want you to explain how Safe Swim Defense addresses each of these specific scenarios. Here is what you need to know:
Unfenced Residential Pools
Home pools are one of the most dangerous water environments, especially for young children. Without fences and self-latching gates, children can wander into the pool area unsupervised. Safe Swim Defense addresses this through qualified supervision and discipline — no one enters the water without a responsible adult present.
Nonswimmers Entering Deep Water
When people who cannot swim wander into water over their heads, they can drown in seconds. Safe Swim Defense prevents this through ability groups — nonswimmers are restricted to shallow water with a maximum depth of chest-high. The buddy system adds another layer of protection, since a buddy would immediately notice if someone was in trouble.
Risky Behaviors
Running on a pool deck, diving into shallow water, pushing others into the water, and holding someone underwater are all behaviors that lead to injuries and drownings. The discipline point of Safe Swim Defense exists specifically for this: clear rules are established and enforced before anyone enters the water.
Medical Impairment in the Water
Seizures, heart conditions, diabetic episodes, or even a full stomach can impair a swimmer in the water. The personal health review identifies these risks beforehand. Swimmers with medical conditions should inform the supervisor so accommodations can be made.
Drop-Offs
A drop-off is a sudden change in water depth — the bottom goes from waist-deep to over your head in a single step. Drop-offs are especially dangerous in natural water settings like lakes and rivers. The safe area point requires the swimming area to be checked for drop-offs and marked clearly before swimming begins.
Cold Water
Cold water saps your energy and can cause hypothermia faster than most people realize. Water does not need to be icy to be dangerous — even 70°F water can cause hypothermia over time. Safe Swim Defense addresses this through the safe area inspection, which includes checking water temperature, and through qualified supervision to recognize signs of cold stress.
Murky Water
If you cannot see the bottom, you cannot see hazards — or a struggling swimmer. Murky water makes it nearly impossible for a lookout to spot someone in trouble. Safe Swim Defense requires the safe area to have adequate visibility. If visibility is poor, swimming should be restricted or canceled.
River Currents
Rivers can look calm on the surface but have powerful currents underneath. Swimmers can be swept downstream, pinned against obstacles, or pulled under. Safe Swim Defense deals with river currents through the safe area check — current speed is evaluated, and the swimming area is positioned to avoid strong currents.
Rip Currents
A rip current is a narrow, powerful channel of water flowing away from shore. It can pull even strong swimmers out to sea quickly. If you are caught in a rip current, do not swim against it. Swim parallel to shore until you are out of the current, then swim back to shore at an angle.
Surf
Ocean waves add complexity to swimming. Waves can knock you off your feet, push you underwater, and disorient you. Strong surf combined with rip currents and undertow can overwhelm even experienced swimmers. Safe Swim Defense requires qualified supervision with knowledge of ocean conditions and the safe area to be evaluated for surf hazards.
Scouting America Safe Swim Defense The official Safe Swim Defense page from Scouting America, including the full guidelines and training information. Link: Scouting America Safe Swim Defense — https://www.scouting.org/health-and-safety/aquatics/safe-swim-defense/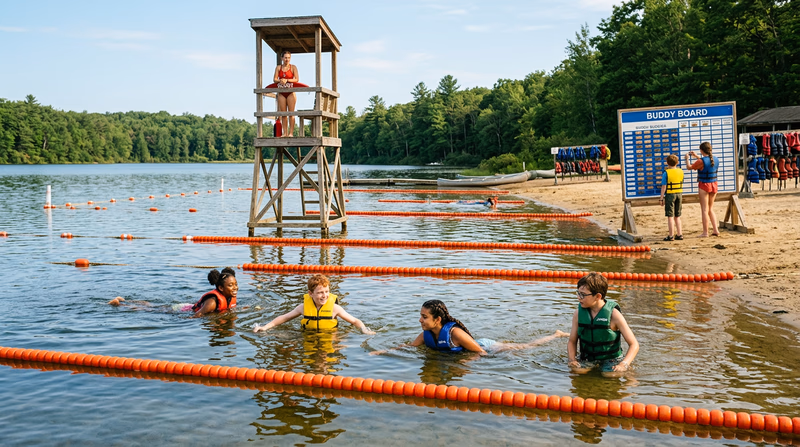
Req 1b — Health Concerns
Swimming is a fantastic activity, but the combination of water, sun, and physical exertion creates health risks you need to understand. Your counselor will want you to discuss each of these concerns — what causes them, how to prevent them, and what to do if they happen.
Temperature-Related Concerns
Hypothermia
Hypothermia occurs when your body loses heat faster than it can produce it, and your core temperature drops below 95°F (35°C). Water pulls heat from your body much faster than air does, so hypothermia is a serious risk for swimmers — even in water that does not feel especially cold.
Signs: Shivering, confusion, slurred speech, clumsiness, drowsiness, slow breathing
Prevention:
- Know the water temperature before swimming
- Limit time in water below 70°F
- Wear a wetsuit in cold water
- Get out of the water at the first sign of shivering
Treatment: Get the person out of the water immediately. Remove wet clothing and wrap them in dry blankets. Give warm (not hot) drinks if they are alert. Seek medical help for severe cases.
Dehydration
It sounds strange — getting dehydrated while surrounded by water — but it happens. Swimming is hard work, and you sweat even in the pool. You just do not notice because the water washes the sweat away.
Signs: Thirst, headache, dizziness, dark urine, fatigue
Prevention: Drink water before, during breaks, and after swimming. Do not wait until you feel thirsty.
Treatment: Move to shade, sip water slowly, rest. If symptoms are severe (confusion, fainting), seek medical help.
Heat Exhaustion and Heatstroke
These are heat-related illnesses that happen when your body overheats, usually from swimming outdoors in hot weather — especially during long sessions on the pool deck between swims.
Heat exhaustion signs: Heavy sweating, cool and clammy skin, fast and weak pulse, nausea, dizziness
Heatstroke signs: High body temperature (above 103°F), hot and red skin, fast and strong pulse, confusion, loss of consciousness
Prevention: Take breaks in the shade, drink plenty of water, wear sunscreen, avoid prolonged exposure during peak heat (10 a.m. to 4 p.m.).
Treatment for heat exhaustion: Move to a cool place, loosen clothing, apply cool wet cloths, sip water.
Treatment for heatstroke: This is a medical emergency. Call 911 immediately. Move the person to a cool area and cool them rapidly with cold water or ice packs on the neck, armpits, and groin. Do not give fluids if they are unconscious.
Sun Exposure
Sunburn
Water reflects UV rays, increasing your sun exposure. You can get a severe sunburn while swimming without realizing it because the water keeps your skin cool.
Prevention: Apply water-resistant sunscreen (SPF 30 or higher) 15 minutes before swimming and reapply every two hours or after toweling off. Wear a rash guard for extended time in the water.
Treatment: Cool compresses, aloe vera, stay out of the sun. Seek medical attention for blistering sunburns or sunburn accompanied by fever.
Physical Concerns
Muscle Cramps
A cramp is a sudden, involuntary contraction of a muscle. In the water, cramps usually hit the calves, feet, or hands. They are painful but rarely dangerous on their own — the real danger is the panic that can follow.
Prevention: Warm up before swimming, stay hydrated, avoid swimming immediately after a large meal, and build up your swimming endurance gradually.
Treatment: Stay calm. Float on your back and gently stretch the cramped muscle. If you are in deep water, signal your buddy and move toward shallow water or the pool wall.
Hyperventilation
Hyperventilation is rapid, deep breathing that lowers carbon dioxide levels in your blood. Some swimmers intentionally hyperventilate before underwater swimming, thinking it lets them hold their breath longer. This is extremely dangerous. It does not increase oxygen — it tricks your brain into not feeling the urge to breathe, which can cause you to black out underwater.
Prevention: Never hyperventilate before swimming underwater. Take normal, relaxed breaths before a breath-hold.
Treatment: If someone hyperventilates on deck, have them breathe slowly into cupped hands. If someone loses consciousness in the water, remove them immediately and begin rescue breathing if needed.
Spinal Injury
Diving into shallow water is the most common cause of swimming-related spinal injuries. Hitting the bottom or a submerged object with your head can fracture vertebrae and damage the spinal cord, potentially causing permanent paralysis.
Prevention: Never dive into water of unknown depth. Always enter feetfirst in unfamiliar water. Follow all posted depth markers and diving rules.
Treatment: If you suspect a spinal injury, do not move the person. Stabilize their head and neck in line with their body. If they are in the water, support them faceup at the surface without bending or twisting the spine. Call 911 immediately.
Environmental Hazards
Stings and Bites
In open water, you may encounter jellyfish, sea urchins, stingrays, insects, or snapping turtles. Freshwater swimmers may face leeches, water moccasins, or fire ants near the water’s edge.
Prevention: Wear water shoes in natural water. Shuffle your feet when wading (the “stingray shuffle”). Learn what hazards exist in your local waterways before swimming.
Treatment: For jellyfish stings, rinse with vinegar and remove tentacles with tweezers. For insect stings, remove the stinger and apply a cold compress. For any bite or sting with severe pain, swelling, or allergic reaction, seek medical help.
Cuts and Scrapes
Rocky lake bottoms, broken shells, rough pool surfaces, and debris can all cause cuts and scrapes.
Prevention: Wear water shoes in natural settings. Inspect the swimming area for sharp objects before entering. Use the pool ladder instead of climbing over rough edges.
Treatment: Clean the wound with clean water, apply pressure to stop bleeding, and cover with a waterproof bandage. Get out of the water — an open wound should not be submerged. Seek medical attention for deep cuts or signs of infection.
American Red Cross — Water Safety Tips Water safety guidance from the American Red Cross, including tips for pools, beaches, and open water. Link: American Red Cross — Water Safety Tips — https://www.redcross.org/get-help/how-to-prepare-for-emergencies/types-of-emergencies/water-safety.html
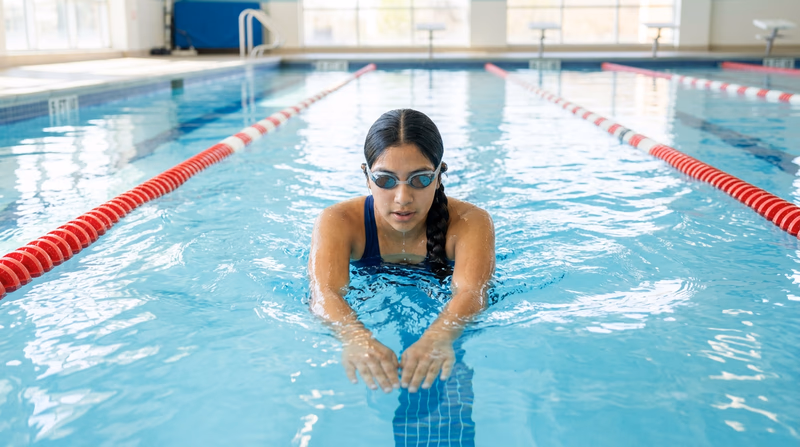
Req 2 — Swimmer Test
What Is the Swimmer Test?
The Scouting America swimmer test is a gateway requirement — you must pass it before you can work on any of the remaining Swimming merit badge requirements. The test confirms that you have the basic swimming ability needed to safely complete the more advanced tasks ahead.
The swimmer test consists of the following:
- Jump feetfirst into water over your head. You must completely submerge and then return to the surface.
- Swim 75 yards in a strong manner using one or more of the following strokes: sidestroke, breaststroke, trudgen, or crawl.
- Swim 25 yards using an easy resting backstroke.
- Float on your back for one minute with minimal movement.
The total swimming distance is 100 yards (75 + 25). The test is not timed for speed — the focus is on demonstrating strong, controlled swimming and the ability to rest and float in the water.
Breaking Down Each Component
The Feetfirst Entry
This is not a fancy dive — it is a simple, safe entry into deep water. Stand at the edge of the pool or dock, step forward, and drop in feetfirst. Keep your body vertical, arms close to your sides or slightly out for balance. Let yourself submerge, then kick to the surface and begin swimming.
Why feetfirst? Entering feetfirst is the safest way to enter water of unknown or limited depth. It also tests your comfort with being fully submerged.
The 75-Yard Swim
You can use any combination of the following strokes for this portion: sidestroke, breaststroke, trudgen, or crawl (front crawl). Choose the stroke you are most comfortable with, or switch between strokes as needed.
The key word is “strong manner.” Your counselor is looking for:
- Steady forward progress
- Recognizable stroke technique
- Controlled breathing
- No signs of distress
The 25-Yard Resting Backstroke
After your 75-yard swim, switch to an easy resting backstroke for the final 25 yards. This portion tests your ability to switch to a relaxed, energy-conserving stroke. The elementary backstroke — a slow, symmetrical stroke performed on your back — is the most common choice here.
Keep your breathing steady and your movements unhurried. This is your chance to recover and demonstrate control.
The One-Minute Float
After swimming 100 yards, you must float on your back for at least one minute with minimal movement. This tests your ability to rest in the water without expending energy.
Tips for floating:
- Lean your head back so your ears are in the water
- Spread your arms out to the sides, palms up
- Keep your hips up by pressing your chest toward the sky
- Take slow, deep breaths — full lungs help you float
- Relax. Tension makes you sink
Preparing for the Test
Swimmer Test Preparation
Practice each component before your merit badge session- Feetfirst entry into deep water: Practice at your local pool until it feels natural.
- 75 yards of strong swimming: Swim at least 100 yards continuously in practice so 75 feels easy.
- 25 yards of resting backstroke: Practice the elementary backstroke until you can do it smoothly.
- One-minute back float: Time yourself floating at home and work up to two minutes for confidence.
- Full sequence: Run through the entire test from start to finish at least once.
Req 3 — Swimming Strokes
For this requirement, you need to demonstrate five swimming strokes with good form. Your counselor will watch your technique and provide feedback. Below is a breakdown of each stroke — what it looks like, what makes it “good form,” and common mistakes to avoid.
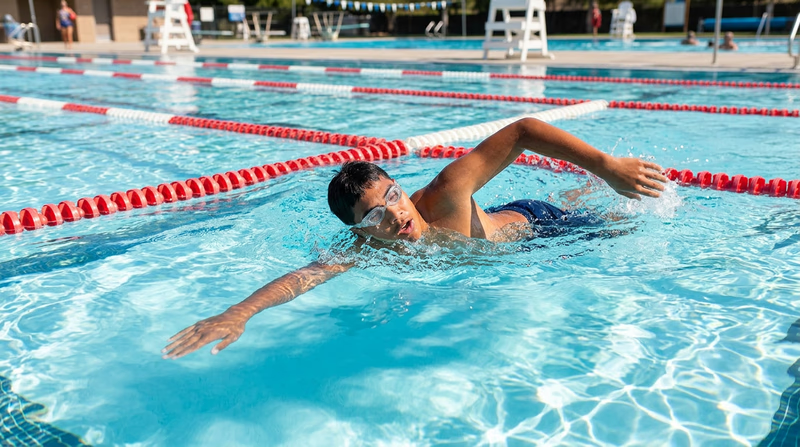
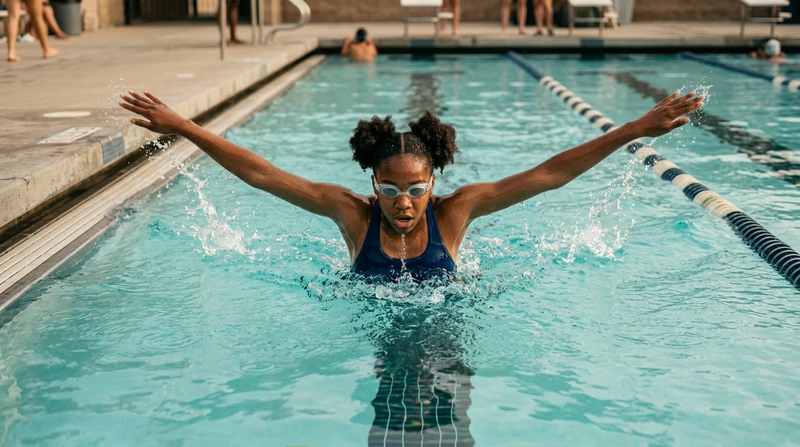
Front Crawl (Freestyle)
The front crawl is the fastest and most commonly used swimming stroke. You will use it more than any other stroke in both competitive and recreational swimming.
Body position: Lie facedown in the water with your body as flat and streamlined as possible. Keep your hips near the surface.
Arm movement: Alternate arms in a continuous windmill motion. Reach forward with one arm, enter the water fingertips first, pull straight back under your body, then recover by lifting the arm out of the water and swinging it forward.
Kick: Flutter kick — small, quick, alternating kicks from the hips. Keep your legs mostly straight with relaxed ankles.
Breathing: Turn your head to one side during the arm recovery. Exhale underwater through your nose or mouth. Inhale quickly when your mouth clears the water. Do not lift your head forward — that drops your hips and creates drag.
Trudgen
The trudgen is an older stroke that combines an overarm crawl motion with a scissor kick. It is less common today but still part of the Swimming merit badge requirements as an alternative to the front crawl.
Body position: Similar to the front crawl — facedown, body flat.
Arm movement: Same alternating overarm motion as the front crawl.
Kick: Instead of a flutter kick, use a scissor kick timed with the arm strokes. The kick happens on one side, typically when the breathing-side arm enters the water.
Breathing: Turn to the side to breathe, same as the front crawl.
Back Crawl (Backstroke)
The back crawl is the only competitive stroke swum entirely on your back. It is excellent for building back and shoulder strength.
Body position: Lie on your back with your body flat and ears in the water. Keep your hips up — do not sit in the water.
Arm movement: Alternate arms in a windmill pattern. One arm reaches overhead and enters the water pinky-first, pulls down along your side, then exits at the hip and recovers overhead.
Kick: Flutter kick, same as the front crawl but on your back. Keep kicks small and from the hips.
Breathing: Since your face is always out of the water, breathing is easy. Establish a rhythm: inhale on one arm recovery, exhale on the other.
Sidestroke
The sidestroke is a restful, efficient stroke used for long-distance swimming and lifesaving. Lifeguards use a modified sidestroke when towing someone to safety.
Body position: Lie on your side with your bottom arm extended forward and your top arm resting along your body. Your ear rests on your extended lower arm.
Arm movement: The lead arm (bottom) reaches forward, sweeps down toward your chest, and extends forward again. The trailing arm (top) reaches from your hip up to your chest, then pushes back down to your hip. The arms move in an alternating “pick the apple, put it in the basket” motion.
Kick: Scissor kick — your legs separate (one forward, one back), then snap together like scissors. Time the kick with the arm pull for maximum glide.
Glide: The sidestroke has a distinct glide phase. After the kick and arm pull, let your momentum carry you forward before starting the next stroke. This is what makes it so efficient.
Breaststroke
The breaststroke is one of the oldest known swimming strokes and is popular for recreational swimming because your head can stay above water.
Body position: Facedown with your body as streamlined as possible. During the glide, your arms are extended forward and legs are together.
Arm movement: Start with arms extended. Sweep your hands outward and downward in a heart-shaped pattern. Pull back to your chest, then shoot your hands forward into the glide position.
Kick: Whip kick (frog kick) — bring your heels toward your buttocks, turn your feet outward, then push back and together in a circular motion. The kick provides most of the power in the breaststroke.
Breathing: Lift your head forward to breathe during the arm pull. Your head comes up naturally as your arms sweep outward.
Timing: Pull, breathe, kick, glide. The glide is important — rushing eliminates the resting phase and makes the stroke less efficient.
Elementary Backstroke
The elementary backstroke is the easiest stroke to learn and the best stroke for resting in the water. You will use it during the endurance swim in Requirement 4.
Body position: On your back, body flat, arms at your sides, legs together. This is your glide position.
Arm movement: Slide your hands up along your sides to your armpits. Extend your arms outward at shoulder level, then sweep them back down to your sides. Think “chicken, airplane, soldier” — hands to armpits (chicken wings), arms out (airplane), arms at sides (soldier/glide).
Kick: Whip kick, same as the breaststroke but on your back. Draw your heels toward your buttocks, turn your feet outward, push back and together.
Timing: Arms and legs move together. Pull and kick simultaneously, then glide. The glide is the longest phase — relax and let the water carry you.
USA Swimming — Learn to Swim Resources from USA Swimming on stroke technique, finding lessons, and improving your skills. Link: USA Swimming — Learn to Swim — https://www.usaswimming.org/parents-resources/learn-to-swim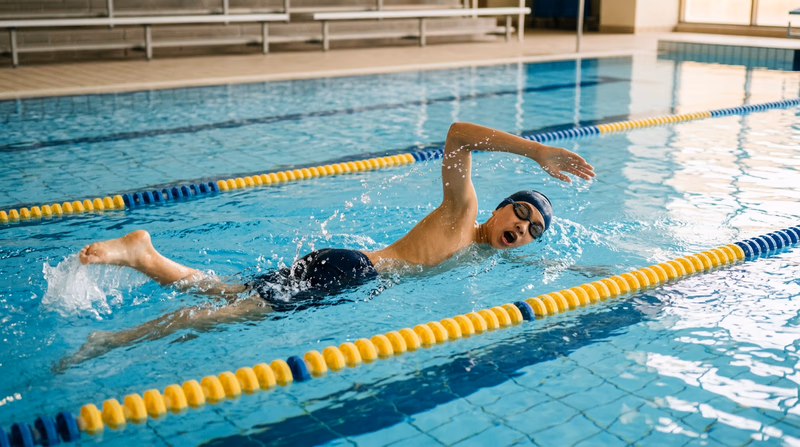
Req 4 — Endurance Swim
Understanding the Endurance Swim
This requirement brings together everything you practiced in Requirement 3. You will swim 150 yards continuously — that is six lengths of a standard 25-yard pool — using all five strokes. The swim is not timed for speed. Your counselor is watching for continuous swimming with good form on each stroke.
Here is the breakdown:
| Stroke | Distance | Pool Lengths |
|---|---|---|
| Front crawl or trudgen | 25 yards | 1 |
| Back crawl | 25 yards | 1 |
| Sidestroke | 25 yards | 1 |
| Breaststroke | 25 yards | 1 |
| Elementary backstroke | 50 yards | 2 |
| Total | 150 yards | 6 |
The elementary backstroke gets 50 yards because it is a resting stroke — this portion serves as your cool-down and demonstrates your ability to swim efficiently over a longer distance.
Planning Your Order
There is no single “best” order, but here are two strategies:
Strategy 1: Hard to Easy
- Front crawl (25 yds) — highest energy demand first
- Back crawl (25 yds) — still face-up recovery between the two hardest strokes
- Breaststroke (25 yds) — moderate effort
- Sidestroke (25 yds) — restful and efficient
- Elementary backstroke (50 yds) — finish relaxed
Strategy 2: Alternate Effort
- Front crawl (25 yds) — hard
- Sidestroke (25 yds) — easy
- Back crawl (25 yds) — moderate
- Elementary backstroke (50 yds) — easy
- Breaststroke (25 yds) — moderate finish
Pick the order that works best for your strengths. Practice the full sequence at least once before your merit badge session.
Tips for Success
Transitions
When you switch strokes at the wall, you do not need to stop — but you can take a moment to push off and settle into the new stroke. A smooth transition shows your counselor that you are in control.
Pacing
This is not a race. Swim at a pace you can maintain for the full 150 yards. If you sprint the front crawl and arrive at the wall gasping, you will struggle through the remaining strokes. Steady and controlled wins.
Breathing
Each stroke has its own breathing pattern. During transitions, take a couple of extra breaths at the wall if needed. Controlled breathing keeps your heart rate manageable and prevents the panicky feeling of being out of air.
Form Over Speed
Your counselor is looking for “good form” on every stroke. Here is a quick refresher on what that means:
- Front crawl: Smooth arm turnover, face in the water with side breathing, steady flutter kick
- Back crawl: Body flat, hips up, alternating arm windmill, flutter kick
- Sidestroke: On your side, coordinated arm pull and scissor kick with a visible glide
- Breaststroke: Symmetrical arm sweep and whip kick with a glide phase
- Elementary backstroke: Simultaneous arm-and-kick motion with a long, relaxed glide
If you need a refresher on any stroke, review Req 3 — Swimming Strokes.
Endurance Swim Preparation
Get ready for your 150-yard swim- Practice each stroke individually for at least 50 yards: Build comfort with every stroke.
- Swim the full 150 yards continuously at least once: Know you can do it before test day.
- Choose your stroke order and practice it: Eliminate surprises.
- Practice wall transitions: Push off smoothly and settle into the new stroke quickly.
- Focus on pacing: Swim at 70-80% effort, not 100%.
Req 5a — Rescue Methods
The Order of Rescue: Reach, Throw, Row, Go
Water rescue follows a clear priority order, from safest to most dangerous. You should always start with the safest option and only move to riskier methods if simpler ones are not possible.
- Reach — Extend something to the victim from a safe position
- Throw — Toss a flotation device or line to the victim
- Row — Use a boat or watercraft to reach the victim
- Go — Swim to the victim (last resort, trained rescuers only)
For this requirement, you will demonstrate the first two methods: reaching and throwing.
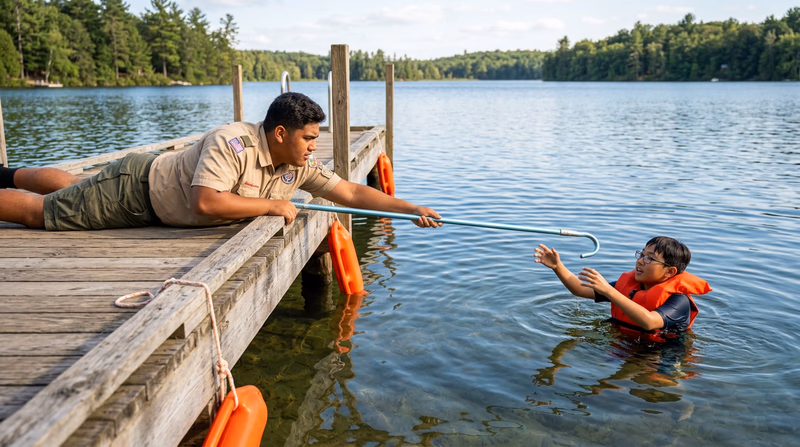
Reaching Rescues
A reaching rescue means extending something to the victim while you stay on solid ground or in shallow water. This is the safest and fastest type of rescue.
Reaching with Your Arm or Leg
If the victim is close to the edge of a pool, dock, or shoreline:
- Lie flat on your stomach at the edge to lower your center of gravity and avoid being pulled in.
- Extend your arm toward the victim and tell them to grab your wrist (not your hand — wrist grips are harder to break).
- If they are slightly farther away, sit on the edge, brace yourself, and extend your leg for them to grab.
- Pull them to safety once they have a firm grip.
Reaching with an Object
If the victim is too far for an arm or leg reach, extend an object:
- Pool noodle, kickboard, or towel — hold one end and extend the other
- Branch, pole, or paddle — anything long and sturdy
- Shepherd’s crook (the hooked rescue pole found at most pools)
The key is to brace yourself so you do not get pulled in. Lie flat, hook your feet on something solid, or have someone hold your legs.
Throwing Rescues
When the victim is too far to reach, throw something that floats to them.
What to Throw
- Ring buoy (the red-and-white rings mounted near pools and docks)
- Throw bag (a bag filled with coiled rope — common at waterfront areas)
- Any flotation device: life jacket, cooler, empty water jug, sealed plastic container
- A rope or line with something tied to the end for weight
How to Throw
- Get the victim’s attention. Shout “Grab this!” before you throw.
- Aim past the victim slightly — it is easier for them to pull a line toward them than to swim to it.
- Throw underhand for accuracy with ring buoys and throw bags.
- If you miss, quickly re-coil and throw again. Do not wade in.
- Once they grab it, pull them to safety or tell them to kick toward shore while holding on.
Why Not Just Swim Out?
Your counselor will ask you to explain why swimming rescues should be avoided when reaching or throwing is possible. Here is why:
A Drowning Person Is Dangerous
A person who is drowning is in survival mode. They are not thinking clearly. Their instinct is to grab anything — including you — and push it down to get their head above water. A panicking victim can easily overpower a rescuer, dragging both of them under.
It Takes Training
Swimming rescues require specialized training in approach techniques, defensive positions, and escape methods. Even strong swimmers can be overwhelmed by a panicking victim without this training. The Lifesaving merit badge covers these advanced rescue swimming skills.
It Is Slower and Riskier
Swimming to a victim takes time, burns energy, and puts you in the water — where you are vulnerable. A reaching rescue takes seconds. A throwing rescue can cover 50+ feet almost instantly. Both keep you safe on shore.
How Rescue Swimmers Avoid Contact
If a swimming rescue is the only option (and it should truly be the last resort), trained rescue swimmers use these techniques to avoid dangerous contact:
- Approach from behind. A victim facing away from you cannot grab you.
- Bring a flotation device. Push it toward the victim so they grab it instead of you.
- Talk to them. “Turn over! Grab this! I am here to help!” A victim who is responsive is less dangerous.
- Maintain distance. Stay at arm’s length and extend a rescue device between you and the victim.
- If grabbed, trained rescuers know escape techniques — submerging, twisting, and pushing away. These are taught in lifeguard and Lifesaving merit badge training.
Req 5b — Line Rescue
What Is a Line Rescue?
A line rescue is a throwing rescue where a rescuer on shore throws a line (rope) to a victim in the water, then pulls them to safety. It involves three people:
- The rescuer — throws the line to the victim
- The tender — assists the rescuer on shore, helps brace and pull, manages the line
- The victim — the person in the water who grabs the line
For this requirement, you will perform the rescue in both the tender and rescuer roles, with a practice victim (another Scout or your counselor) positioned about 30 feet from shore in deep water.
The Rescuer’s Role
The rescuer is the person who throws the line and directs the rescue.
Step-by-Step
- Assess the situation. Confirm the victim’s location and that a line rescue is the right method (victim is too far to reach, but within throwing distance).
- Prepare the line. Uncoil or remove the line from its bag. Hold one end securely — never let go of your end.
- Get the victim’s attention. Shout clearly: “Hold on! I am throwing you a line!”
- Throw the line. Aim to land the line across the victim or just past them. Use an underhand throw for accuracy. If using a throw bag, throw the entire bag — the rope feeds out as it flies.
- If you miss, re-coil and throw again. Speed matters, but accuracy matters more.
- Once the victim grabs the line, tell them to hold on with both hands and roll onto their back.
- Pull them to shore. Work with your tender to pull steadily. Do not jerk the line.
The Tender’s Role
The tender is the rescuer’s partner on shore. This role is just as important as the rescuer’s.
Step-by-Step
- Brace the rescuer. Stand behind the rescuer and help anchor them so they are not pulled into the water.
- Manage the line. Make sure the line is free of tangles and ready to throw. Feed out line as needed.
- Help pull. Once the victim grabs the line, help the rescuer pull them to shore with steady, even pulls.
- Watch the victim. Keep your eyes on the victim and communicate what you see: “They have the line!” or “They lost it — throw again!”
- Be ready to call for help. If the rescue is not working, the tender should call 911 or get additional help.
Communication Is Key
A successful line rescue depends on clear communication between all three people:
| Who | Says What |
|---|---|
| Rescuer → Victim | “Hold on! I am throwing a line!” |
| Rescuer → Victim | “Grab the line! Roll on your back!” |
| Tender → Rescuer | “Line is clear!” or “Retangle — hold on!” |
| Tender → Rescuer | “They have it — pull!” |
| Rescuer → Victim | “Hold tight! We are pulling you in!” |
Practicing the Line Rescue
Your counselor will set up this scenario with a practice victim in deep water about 30 feet from shore. Here is how to prepare:
Line Rescue Practice
Get comfortable with both roles before your session- Practice your throw: Set a target 30 feet away on land and practice hitting it with a coiled rope.
- Switch roles: Practice as both rescuer and tender so you are comfortable in each role.
- Communication: Practice calling out commands clearly and loudly.
- Bracing: Practice the tender’s bracing stance — wide feet, low center of gravity, leaning slightly back.
- Pulling technique: Steady hand-over-hand pulls, not jerky tugs.
Connecting to Real Life
The skills you learn in this requirement are real rescue skills. Line rescues are used by firefighters, park rangers, whitewater guides, and lifeguards every day. Knowing how to throw a line accurately and how to work with a partner in a rescue situation could genuinely save someone’s life.
These skills build directly on the reaching and throwing techniques you learned in Req 5a — Rescue Methods.
Scouting America — Aquatics Safety Scouting America's aquatics safety resources, including rescue techniques and waterfront procedures. Link: Scouting America — Aquatics Safety — https://www.scouting.org/health-and-safety/aquatics/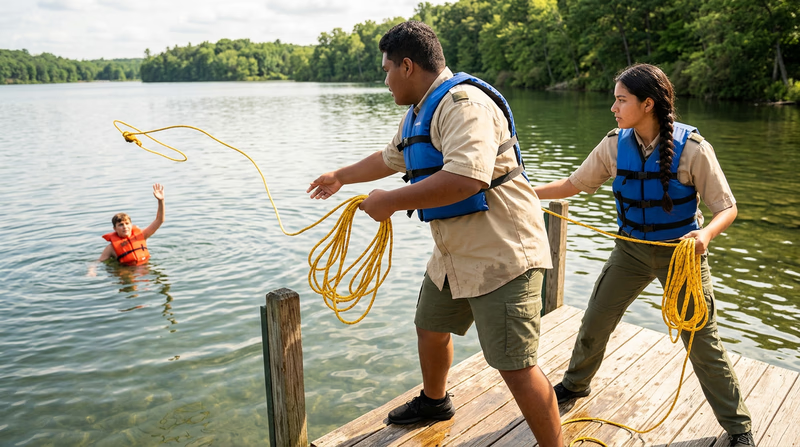
Req 6 — Floating & Survival
This requirement is about survival — the skills that keep you alive when you are in the water for an extended time. Whether you fall off a boat, get caught in a current, or find yourself stranded in open water, these techniques conserve your energy and body heat until help arrives.
6a: Back Float (Three Minutes)
Floating faceup on your back is the most restful position you can be in while in the water. It keeps your face above the surface so you can breathe freely, and it requires almost no energy.
How to Float on Your Back
- Lean back and let the water support your head. Your ears should be submerged.
- Extend your arms out to the sides or slightly above your head, palms up.
- Keep your lungs full. Take deep, slow breaths. Full lungs act like a built-in life jacket.
- Relax your hips. If your hips sink, gently press your chest upward and arch your back slightly.
- Stay still. The less you move, the less energy you use.
Three minutes might sound easy on land, but floating still in the water requires patience and calm. Practice regularly until you can float for five minutes without thinking about it.
6b: Survival Floating (Five Minutes)
Survival floating (also called “drownproofing”) is different from back floating. It is designed for situations where you are in the water for a long time and need to conserve every bit of energy. In survival floating, you spend most of your time facedown in the water, lifting your head to breathe only when necessary.
The Survival Float Technique
- Start position: Take a deep breath. Let yourself hang vertically in the water with your face submerged, arms relaxed in front of you, legs dangling.
- Rest. Stay in this position for several seconds. The air in your lungs keeps you near the surface.
- When you need to breathe, slowly raise your arms outward and bring one foot forward (like preparing to take a step).
- Lift your head just enough to get your mouth above water. Exhale and inhale quickly.
- Drop back down into the resting position.
- Repeat for as long as needed.
The key is spending as much time resting as possible and as little time lifting your head to breathe. Most of your time is spent relaxed and motionless.
6c: HELP and Huddle Positions
For this part, you will wear a U.S. Coast Guard-approved life jacket and demonstrate two heat-conserving positions.
The HELP Position
HELP stands for Heat Escape Lessening Posture. It is used when you are alone in the water and wearing a life jacket.
- Draw your knees up to your chest.
- Cross your arms tightly against your chest.
- Keep your head above water (the life jacket does this for you).
- Stay as still as possible.
This position protects the areas of your body that lose heat fastest: your head, neck, sides of the chest, and groin. In cold water, the HELP position can increase your survival time by up to 50% compared to treading water.
The Huddle Position
The huddle is used when you are in the water with other people, all wearing life jackets.
- Form a tight circle facing inward.
- Put your arms around each other’s shoulders or life jackets.
- Pull your legs together in the center of the group.
- Keep your heads close together and above water.
The huddle traps body heat between group members and reduces heat loss for everyone. It also makes the group easier for rescuers to spot from a distance.
6d: Why Swimming and Floating Speed Up Hypothermia
Your counselor will ask you to explain why swimming or survival floating causes hypothermia faster than staying still in the HELP or huddle position. Here is the science:
Movement Creates Heat Loss
When you swim or move in cold water, you do three things that accelerate heat loss:
- You pump warm blood to your extremities. Exercise pushes blood to your arms and legs, where it flows close to the skin surface and loses heat rapidly to the surrounding cold water.
- You expose more surface area. Spreading your arms and legs to swim exposes the high-heat-loss areas of your body — your armpits, sides of the chest, and inner thighs.
- You push away the thin layer of warmed water next to your skin. Your body naturally warms a thin boundary layer of water against your skin. Swimming constantly replaces this with fresh cold water.
The Numbers
Studies by the U.S. Coast Guard show that a person swimming in cold water loses body heat approximately 35% faster than a person holding still in the HELP position. In 50°F water, a swimmer might survive 1 to 2 hours, while a person in the HELP position might survive 2 to 4 hours.
U.S. Coast Guard — Cold Water Safety Official Coast Guard guidance on cold water survival, including the HELP position and hypothermia prevention. Link: U.S. Coast Guard — Cold Water Safety — https://www.uscgboating.org/recreational-boaters/cold-water-survival.php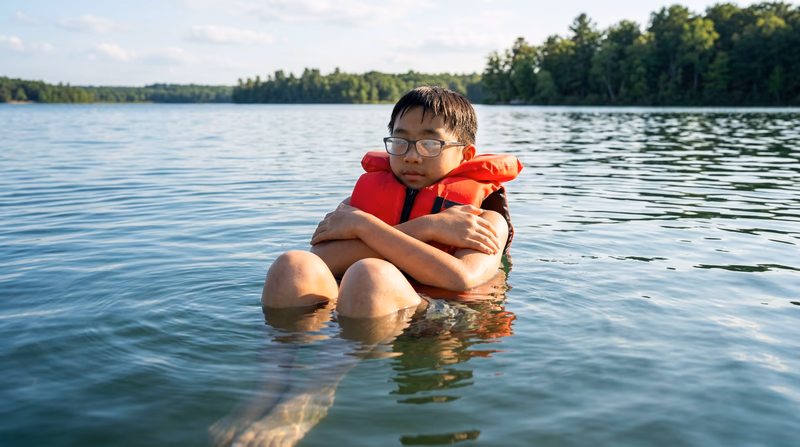
Req 7 — Surface Diving
Surface diving is the technique of going from swimming at the surface to diving underwater — without jumping off a board or deck. These skills are essential for recovering objects from the bottom, checking underwater conditions, and advanced swimming activities like snorkeling.
All three parts of this requirement take place in water over your head but no deeper than 10 feet.
7a: Feetfirst Surface Dive
The feetfirst surface dive is the safest way to go underwater from the surface. You descend in a vertical position with your feet pointing down, which lets you see what is below you and control your descent.
Technique
- Start in a vertical treading position. Keep your head above water.
- Press your arms down forcefully from the surface to your sides. This drives your body upward out of the water.
- As your body rises, bring your arms overhead quickly. Your weight and gravity will push you downward, feetfirst.
- As you descend, use your hands to press upward (toward the surface) to drive yourself deeper.
- When you reach the bottom, grab the object.
- Push off the bottom and kick to the surface.
7b: Headfirst Surface Dive (Pike or Tuck)
The headfirst surface dive gets you underwater faster and deeper than the feetfirst method. You can use either the pike or tuck technique.
Pike Dive
The pike dive is performed with straight legs:
- Swim forward at the surface with some momentum.
- Bend sharply at the waist (like touching your toes) so your upper body points straight down.
- Lift your legs straight up out of the water. The weight of your legs above the surface drives you down.
- As you submerge, use a breaststroke pull to swim toward the bottom.
- Grab the object and kick to the surface.
Tuck Dive
The tuck dive is a more compact version:
- Swim forward at the surface.
- Tuck your knees to your chest and roll forward into a ball.
- Extend your body downward as you rotate, straightening your legs above you.
- Swim to the bottom and retrieve the object.
The pike dive is more powerful and gets you deeper, but the tuck dive is easier to learn and works well in shallower water.
7c: Underwater Swimming Sequence
This part tests your ability to dive, swim underwater, surface for air, and repeat. You will do a headfirst surface dive to at least 5 feet, swim three strokes underwater, surface, breathe, and repeat the entire sequence two more times (three total dives).
Technique
- Dive headfirst using the pike or tuck method to at least 5 feet deep.
- Swim three strokes underwater. Use a modified breaststroke pull — it is the most efficient underwater stroke. Keep your movements smooth and your body streamlined.
- Angle upward and kick to the surface.
- Take a full breath. Do not rush — get a complete breath before diving again.
- Dive again and repeat. Three complete dive-swim-surface cycles total.
Key Considerations
Equalize your ears. As you dive deeper, water pressure increases against your eardrums. Pinch your nose and gently blow to equalize the pressure. If your ears hurt, do not force it — return to the surface and try again more slowly.
Do not hyperventilate. Take normal, calm breaths between dives. As discussed in Req 1b — Health Concerns, hyperventilating before underwater swimming is dangerous and can cause blackout.
Pace yourself. You have three dives to complete. Do not rush. Take 15 to 30 seconds at the surface between dives to recover and breathe.
Preparing for Requirement 7
Surface Diving Practice
Build your skills before your session- Feetfirst surface dive: Practice in the deep end until you can touch the bottom consistently.
- Pike or tuck dive: Practice the entry until you can submerge smoothly without belly-flopping.
- Object retrieval: Practice picking up a weighted object (dive brick, dive ring) from the bottom.
- Underwater swimming: Swim three breaststroke pulls underwater without surfacing.
- Ear equalization: Practice pinching your nose and blowing gently to equalize pressure.
- Full sequence: Do three consecutive headfirst dives with surface breathing in between.
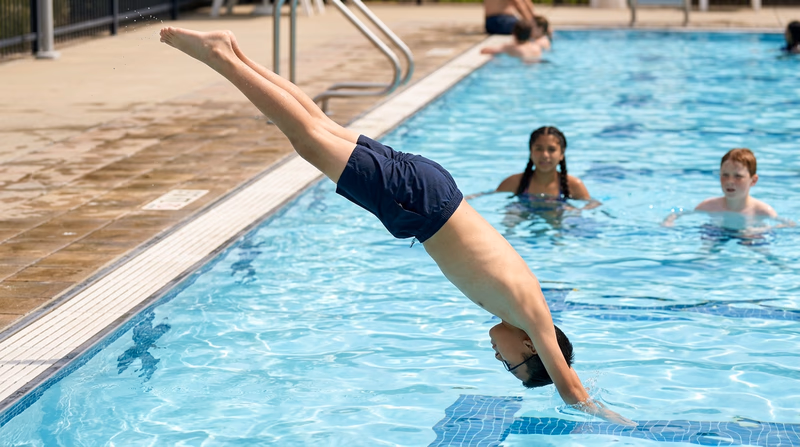
Req 8 — Standing & Shallow Dives
Two Types of Dives
This requirement asks you to demonstrate two different headfirst dives from a dock or pool deck into water at least 7 feet deep (or deeper if local rules require it). Both are standing dives — you start on the deck, not on a diving board.
The Standing Headfirst Dive
This is a basic standing dive — sometimes called a “front dive” — from the edge of a pool or dock.
Setup
- Stand at the edge with your toes curled over the lip of the pool deck or dock.
- Feet together or slightly apart (no wider than shoulder width).
- Arms extended overhead, hands together, biceps squeezing your ears. This creates a streamlined entry shape.
- Head between your arms, eyes looking at the entry point in the water.
Execution
- Bend your knees slightly and lean forward.
- Push off with your legs while keeping your arms locked overhead.
- Aim for a spot about 3 to 4 feet from the edge.
- Enter the water fingertips first, body straight and streamlined.
- Angle your hands slightly upward after entry to guide your body back toward the surface. Do not dive straight to the bottom.
Common Mistakes
- Belly flop: Caused by not bending at the waist enough or pushing out instead of up and over. Focus on your hands entering first.
- Going too deep: Caused by aiming straight down. Aim at a 30 to 45-degree angle and steer up after entry.
- Falling in instead of diving: Caused by not pushing off with your legs. Use your legs to generate forward momentum.
The Long Shallow Dive
A long shallow dive covers more horizontal distance and enters the water at a flatter angle than a standard standing dive. It is used to enter water quickly while staying near the surface — a useful skill for racing starts and rescue entries.
Setup
Same as the standing dive: toes at the edge, arms overhead, hands together.
Execution
- Bend your knees more deeply than for a standard dive.
- Push outward and slightly upward — you want horizontal distance, not depth.
- Keep your body nearly flat as you enter the water. Your entry angle should be very shallow, almost like sliding across the surface.
- Enter fingertips first and immediately angle your hands and head upward to stay near the surface.
- Glide near the surface after entry, then begin swimming.
The goal is to cover distance, not depth. A good long shallow dive should carry you 8 to 12 feet from the edge while keeping you within 2 to 3 feet of the surface.
Differences from the Standing Dive
| Standing Dive | Long Shallow Dive | |
|---|---|---|
| Angle | Steeper (30–45°) | Flat (10–20°) |
| Depth | Moderate | Minimal |
| Distance | Short (3–5 ft) | Long (8–12 ft) |
| Push direction | Forward and slightly down | Forward and slightly up |
| Use case | General entry | Racing starts, rescue entries |
Safety Reminders
Before performing either dive, always verify:
Diving Safety Check
Verify these before every headfirst dive- Water depth is at least 7 feet (or more if local rules require): Never guess — check.
- The water is clear enough to see the bottom: If you cannot see the bottom, do not dive headfirst.
- The area in front of you is clear of other swimmers: Look before you dive.
- There are no underwater obstructions: No rocks, steps, ledges, or lane lines in your dive path.
- A qualified supervisor is present: Required by Safe Swim Defense for all diving activities.

Req 9 — Fitness Benefits
What Is Aerobic Exercise?
Aerobic exercise is any physical activity that raises your heart rate and keeps it elevated for a sustained period. The word “aerobic” means “with oxygen” — these activities use oxygen to fuel your muscles over time, unlike short bursts of intense effort (like a sprint or a single heavy lift).
Common forms of aerobic exercise include running, cycling, dancing, hiking, and of course, swimming. Health experts recommend that young people get at least 60 minutes of moderate-to-vigorous physical activity every day, and aerobic exercise should make up most of that time.
Health Benefits of Regular Aerobic Exercise
Your counselor will want you to explain the major health benefits of regular aerobic exercise. Here are the key ones:
Cardiovascular Health
Aerobic exercise strengthens your heart muscle. A stronger heart pumps more blood with each beat, which means it does not have to work as hard at rest. Regular aerobic exercise lowers resting heart rate, reduces blood pressure, and decreases the risk of heart disease — the leading cause of death in the United States.
Respiratory Fitness
Your lungs become more efficient with regular aerobic exercise. You take in more oxygen per breath and deliver it to your muscles more effectively. This improved lung capacity means you get less winded during physical activity and recover faster.
Weight Management
Aerobic exercise burns calories. Combined with healthy eating, regular aerobic activity helps maintain a healthy body weight. It also boosts your metabolism, meaning your body burns more calories even when you are resting.
Mental Health
Exercise releases endorphins — chemicals in your brain that improve mood and reduce stress. Regular aerobic exercise has been shown to reduce symptoms of anxiety and depression, improve sleep quality, and boost self-confidence.
Bone and Muscle Strength
Weight-bearing aerobic exercises (like running and hiking) strengthen bones. All aerobic exercise improves muscle endurance and helps maintain lean muscle mass.
Disease Prevention
Regular aerobic exercise reduces the risk of type 2 diabetes, certain cancers, and metabolic syndrome. It also strengthens the immune system, helping your body fight off illness.
Why Swimming Is Special
Swimming is not just another form of aerobic exercise — it has unique advantages that make it favored by doctors, physical therapists, and athletes alike.
Full-Body Workout
Swimming engages nearly every major muscle group in your body simultaneously. Your arms, shoulders, core, back, hips, and legs all work together with each stroke. Few other exercises provide such a complete workout in a single activity.
Low Impact, High Reward
When you are in the water, buoyancy supports about 90% of your body weight. This means swimming puts almost no stress on your joints, bones, and connective tissues. You get all the cardiovascular and muscular benefits of intense exercise without the pounding that running and jumping inflict on your knees, ankles, and hips.
This is why swimming is called a “low-impact” exercise — and it is a huge advantage for:
- People recovering from injuries
- People with arthritis or chronic joint pain
- Athletes cross-training to reduce overuse injuries
- Older adults who need joint-friendly exercise
Therapeutic Exercise
Doctors and physical therapists prescribe swimming and water-based exercises for a wide range of conditions:
- Joint injuries and surgery recovery: The water supports the body while allowing full range of motion.
- Arthritis: Warm-water exercise reduces joint stiffness and pain.
- Back pain: Swimming strengthens the core muscles that support the spine without compressing it.
- Asthma: The warm, humid air around indoor pools can be easier on the airways than cold, dry air during land-based exercise.
- Neurological conditions: Water provides resistance for strengthening while reducing the risk of falls.
Lifelong Activity
Swimming is one of the few sports you can do from infancy to old age. Unlike high-impact sports that become harder on the body over time, swimming actually becomes more beneficial as you age. Many competitive swimmers continue racing into their 70s, 80s, and beyond through Masters Swimming programs.
Mental and Emotional Benefits
The rhythmic nature of swimming — stroke, breathe, stroke, breathe — has a meditative quality. Many swimmers report that time in the pool helps them clear their minds, reduce stress, and improve focus. The combination of physical exertion and rhythmic breathing produces a calm, centered feeling that swimmers sometimes call “swimmer’s high.”
Preparing for Your Counselor Discussion
Your counselor will ask you to explain these benefits in your own words. You do not need to memorize medical facts — focus on understanding the big ideas:
- Aerobic exercise strengthens your heart, lungs, and muscles while reducing disease risk and improving mental health.
- Swimming is uniquely valuable because it provides a full-body workout with almost zero joint impact.
- Swimming works as therapy because water supports the body, allows pain-free movement, and provides natural resistance.
- Swimming is for life — you can swim at any age, any fitness level, and in nearly any community.
Extended Learning
A. Congratulations!
You have completed all nine requirements for the Swimming merit badge — one of the most important Eagle-required badges in Scouting. You now have the knowledge and skills to swim safely, rescue others, survive in the water, and stay fit for life. But earning the badge is just the beginning. The world of swimming and water activities is enormous, and there is always more to explore.
B. Competitive Swimming and Racing
If you enjoyed pushing yourself during the endurance swim and stroke demonstrations, competitive swimming might be your next step. Swimmers compete in events ranging from 50-yard sprints to mile-long distance races, plus relays and individual medley events that combine all four competitive strokes (butterfly, backstroke, breaststroke, and freestyle).
Most communities have a local swim team affiliated with USA Swimming, the national governing body. Teams are organized by age group, so you will train and compete with swimmers your own age. Many high schools also have varsity swim teams.
Getting started: Contact your local YMCA, recreation center, or USA Swimming club to find a team near you. Most teams accept swimmers of all skill levels — you do not need to be fast to start competing. What matters is a willingness to train hard and improve.
Masters Swimming is the adult version of competitive swimming, open to anyone 18 and older. It is a great way to stay connected to the sport after high school.
If open water appeals to you more than pool lanes, open water swimming events take place in lakes, rivers, and oceans at distances from 1 mile to 10 kilometers and beyond. Open water swimming became an Olympic event in 2008 and has been growing in popularity ever since. These events require comfort with navigation, sighting (looking up to stay on course), and changing conditions — skills that build directly on what you learned in this merit badge.
C. Lifeguarding and Water Safety Instruction
Your Swimming merit badge training introduced you to rescue techniques and water safety. Taking the next step into lifeguarding or water safety instruction lets you use those skills to protect others.
Lifeguard certification is available through the American Red Cross and the YMCA, typically starting at age 15. The course covers surveillance techniques, rescue skills, first aid, CPR, and AED use. Lifeguarding is one of the most popular summer jobs for teens, and the skills you learn are valuable for a lifetime.
Water Safety Instructor (WSI) certification trains you to teach swimming lessons. The Red Cross WSI course is available starting at age 16. Teaching others to swim is deeply rewarding — and every person you teach to swim is one fewer person at risk of drowning. Many Scout camps need WSIs on staff, making this a natural fit for Scouts who want to work at camp.
The Lifesaving merit badge builds directly on Requirements 5 and 6 of this badge, teaching advanced rescue swimming, in-water rescue techniques, and victim management. If you found the rescue requirements interesting, the Lifesaving merit badge is the logical next step.
D. Underwater Skills and Aquatic Sports
The surface diving skills you learned in Requirement 7 are the gateway to a whole world of underwater activities:
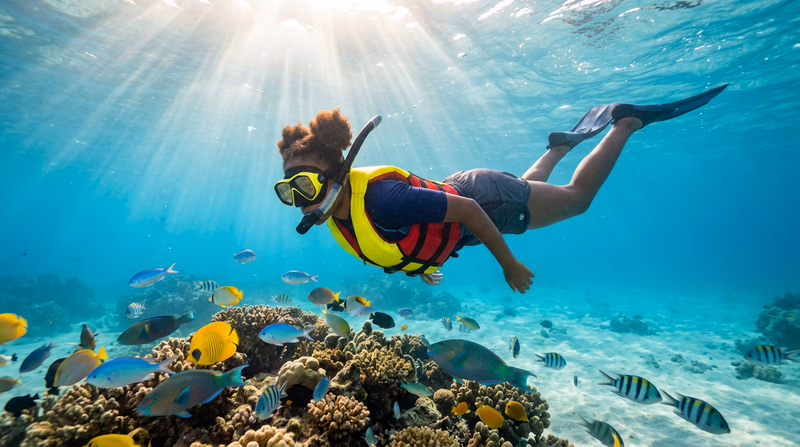
Snorkeling lets you explore underwater environments while breathing through a snorkel at the surface. It requires minimal equipment — just a mask, snorkel, and fins — and opens up coral reefs, kelp forests, and freshwater springs to explore. Many Scout troops include snorkeling in beach trips and summer camp programs.
Scuba diving takes you deeper, allowing you to breathe underwater using a self-contained breathing apparatus. The Scuba Diving merit badge introduces the basics, and organizations like PADI and SSI offer junior certifications starting at age 10 (with restrictions) and full open water certification at age 15.
Water polo is a team sport played in deep water that combines swimming endurance, ball-handling skills, and team strategy. It is one of the most physically demanding sports in the world — players tread water for the entire game while passing, shooting, and defending. Many high schools and recreation centers have water polo programs.
Synchronized swimming (now called artistic swimming) combines swimming, dance, and gymnastics in the water. Performers execute choreographed routines set to music, often involving complex formations and underwater maneuvers. It requires exceptional breath control, flexibility, and teamwork.
E. Real-World Experiences
Swimming Experiences to Seek Out
Take your skills beyond the pool- Volunteer as a swim lesson aide: Help teach younger children to swim at your local pool or YMCA. Contact your local recreation department to ask about volunteer opportunities.
- Participate in a swim-a-thon: Many communities host charity swim events where you swim laps to raise money for a cause. It is a great way to test your endurance and give back.
- Try a new aquatic environment: If you usually swim in pools, try an open water swim at a supervised beach or lake. If you are a lake swimmer, visit a community pool and try lap swimming. New environments build adaptability.
- Visit an aquatic center: Tour a competitive swim facility or Olympic training center. Watch a swim meet to see elite technique in action. USA Swimming’s website lists events near you.
- Earn another aquatic merit badge: The Lifesaving, Canoeing, Kayaking, Rowing, Scuba Diving, and Water Sports merit badges all build on your swimming skills.
F. Organizations and Resources
USA Swimming The national governing body for competitive swimming in the United States. Find a local swim team, learn about events, and access training resources. Link: USA Swimming — https://www.usaswimming.org/ American Red Cross — Aquatics Swimming lessons, lifeguard certification, and water safety instructor training from the American Red Cross. Link: American Red Cross — Aquatics — https://www.redcross.org/take-a-class/swimming YMCA Water Safety The YMCA's water safety programs, including swim lessons, lifeguard training, and community water safety education. Link: YMCA Water Safety — https://www.ymca.org/what-we-do/healthy-living/water-safety U.S. Masters Swimming Organized swimming for adults ages 18 and older, with local clubs, coached workouts, and competitions at every level. Link: U.S. Masters Swimming — https://www.usms.org/ World's Largest Swimming Lesson An annual global event that brings together thousands of swimmers to set a world record and raise awareness about drowning prevention. Find a participating location near you. Link: World's Largest Swimming Lesson — https://www.wlsl.org/ Stop Drowning Now A nonprofit dedicated to drowning prevention through education, water safety resources, and community outreach. Link: Stop Drowning Now — https://www.stopdrowningnow.org/