Req 6 — Floating & Survival
This requirement is about survival — the skills that keep you alive when you are in the water for an extended time. Whether you fall off a boat, get caught in a current, or find yourself stranded in open water, these techniques conserve your energy and body heat until help arrives.
6a: Back Float (Three Minutes)
Floating faceup on your back is the most restful position you can be in while in the water. It keeps your face above the surface so you can breathe freely, and it requires almost no energy.
How to Float on Your Back
- Lean back and let the water support your head. Your ears should be submerged.
- Extend your arms out to the sides or slightly above your head, palms up.
- Keep your lungs full. Take deep, slow breaths. Full lungs act like a built-in life jacket.
- Relax your hips. If your hips sink, gently press your chest upward and arch your back slightly.
- Stay still. The less you move, the less energy you use.
Three minutes might sound easy on land, but floating still in the water requires patience and calm. Practice regularly until you can float for five minutes without thinking about it.
6b: Survival Floating (Five Minutes)
Survival floating (also called “drownproofing”) is different from back floating. It is designed for situations where you are in the water for a long time and need to conserve every bit of energy. In survival floating, you spend most of your time facedown in the water, lifting your head to breathe only when necessary.
The Survival Float Technique
- Start position: Take a deep breath. Let yourself hang vertically in the water with your face submerged, arms relaxed in front of you, legs dangling.
- Rest. Stay in this position for several seconds. The air in your lungs keeps you near the surface.
- When you need to breathe, slowly raise your arms outward and bring one foot forward (like preparing to take a step).
- Lift your head just enough to get your mouth above water. Exhale and inhale quickly.
- Drop back down into the resting position.
- Repeat for as long as needed.
The key is spending as much time resting as possible and as little time lifting your head to breathe. Most of your time is spent relaxed and motionless.
6c: HELP and Huddle Positions
For this part, you will wear a U.S. Coast Guard-approved life jacket and demonstrate two heat-conserving positions.
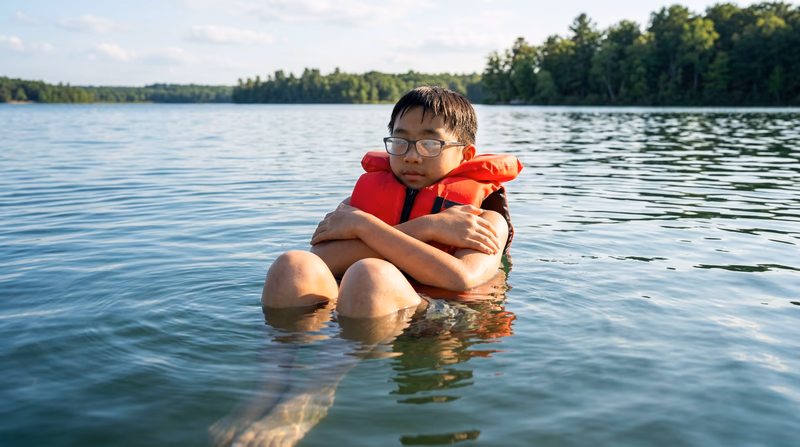
The HELP Position
HELP stands for Heat Escape Lessening Posture. It is used when you are alone in the water and wearing a life jacket.
- Draw your knees up to your chest.
- Cross your arms tightly against your chest.
- Keep your head above water (the life jacket does this for you).
- Stay as still as possible.
This position protects the areas of your body that lose heat fastest: your head, neck, sides of the chest, and groin. In cold water, the HELP position can increase your survival time by up to 50% compared to treading water.
The Huddle Position
The huddle is used when you are in the water with other people, all wearing life jackets.
- Form a tight circle facing inward.
- Put your arms around each other’s shoulders or life jackets.
- Pull your legs together in the center of the group.
- Keep your heads close together and above water.
The huddle traps body heat between group members and reduces heat loss for everyone. It also makes the group easier for rescuers to spot from a distance.
6d: Why Swimming and Floating Speed Up Hypothermia
Your counselor will ask you to explain why swimming or survival floating causes hypothermia faster than staying still in the HELP or huddle position. Here is the science:
Movement Creates Heat Loss
When you swim or move in cold water, you do three things that accelerate heat loss:
- You pump warm blood to your extremities. Exercise pushes blood to your arms and legs, where it flows close to the skin surface and loses heat rapidly to the surrounding cold water.
- You expose more surface area. Spreading your arms and legs to swim exposes the high-heat-loss areas of your body — your armpits, sides of the chest, and inner thighs.
- You push away the thin layer of warmed water next to your skin. Your body naturally warms a thin boundary layer of water against your skin. Swimming constantly replaces this with fresh cold water.
The Numbers
Studies by the U.S. Coast Guard show that a person swimming in cold water loses body heat approximately 35% faster than a person holding still in the HELP position. In 50°F water, a swimmer might survive 1 to 2 hours, while a person in the HELP position might survive 2 to 4 hours.
U.S. Coast Guard — Cold Water Safety Official Coast Guard guidance on cold water survival, including the HELP position and hypothermia prevention.