Req 3 — Maintenance and Emergency Stops
A safe driver still needs a safe vehicle. This requirement is a hands-on inspection page: lights, windows, wipers, tires, emergency tire tools, and stopping-distance awareness. Treat it like a preflight check for a trip. Small problems that seem annoying in the driveway can become dangerous at speed.
Requirement 3a
Lights do two jobs at once: they help you see and they help other people understand what you are about to do. A burned-out signal light or dirty taillight removes information other drivers depend on.
What to check
Walk around the vehicle with an adult and test:
- headlights on low beam and high beam
- front and rear turn signals
- brake lights
- hazard flashers
- reverse lights if practical
Make sure the lenses are not caked with mud, snow, or road salt. Then sit in the driver’s seat and identify the switches so you know how to use them quickly.
🎬 Video: Types of Car Lights & Their Purposes (video) — https://youtu.be/8FW-7dfAIwQ
Requirement 3b
A driver cannot respond to what they cannot see. Visibility problems include dirt, inside fogging, cracked glass, frost, glare, water film, worn wipers, and clutter stacked so high in the back seat that it blocks the rear window.
The smear-and-clear test
Spray washer fluid or water onto the windshield and run the wipers. Good blades should clear the glass smoothly. Bad blades chatter, skip, streak, or leave a greasy film that catches headlights.
Visibility problems to notice
Look through every window, not just the windshield
- Front: Bug splatter, glare, frost, streaks, cracks
- Rear: Dirt, fog, cargo blocking the view
- Side windows and mirrors: Rain spots, ice, dirt, poor adjustment
- Weather: Mist, heavy rain, snow spray, road slush
🎬 Video: How to Check Your Wipers (video) — https://youtu.be/MmA6Cbn5vH8
Requirement 3c
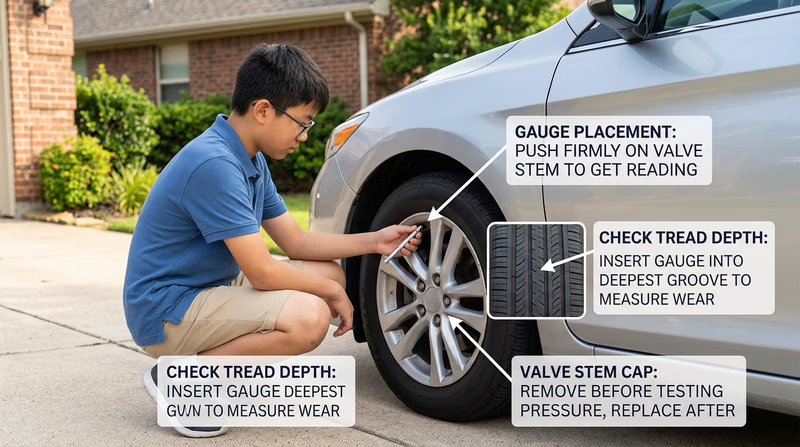
Your tires are the only parts of the vehicle touching the road. All braking, turning, and accelerating depend on those four contact patches. That is why tire condition matters so much.
The recommended tire pressure is usually found on a sticker inside the driver’s door frame, not on the maximum-pressure number molded into the tire sidewall. Use a tire gauge when the tires are cold. For tread, many people use the penny test, but any tread-depth gauge works even better.
Why pressure and tread matter
- Traction: Better grip in turns and during braking
- Stopping distance: Underinflated or worn tires need more distance to stop
- Tire wear: Wrong pressure wears the tread unevenly
- Fuel economy: Underinflated tires create more rolling resistance
🎬 Video: How to Check Your Tires (video) — https://youtu.be/2Tcvmp4Cqao
Requirement 3d
A flat tire feels like a problem you can solve later until it happens in the rain, after dark, or on a shoulder with traffic rushing by. Knowing where the tools are and how they work turns panic into a checklist.
Tools to locate first
Most vehicles that still carry a spare tire also carry:
- a jack
- a lug wrench
- a spare tire or temporary spare
- a place to store or lower the spare
- owner-manual instructions
Some newer vehicles replace the spare with an inflator-and-sealant kit. That can temporarily seal some punctures, but not sidewall damage or major tire failures.
Safe flat-tire habits
Steps to explain in your demonstration
- secure the vehicle on level ground
- set the parking brake and hazards
- place the jack at the correct lift point
- loosen lug nuts before fully lifting if appropriate
- lift the vehicle enough to remove and replace the tire
- tighten lug nuts in a star pattern
- lower the vehicle and retighten
- check the repaired or replacement tire as soon as possible
🎬 Video: Tire Inflator and Sealant Kit (video) — https://youtu.be/X3kjWwCENX4
Requirement 3e
This is one of the best reality checks in the badge. Many people think of stopping as one event, but it has two major parts:
- reaction distance — how far the car travels before the driver even begins braking
- braking distance — how far the car travels after the brakes are applied
At higher speeds, both distances grow, and braking distance grows especially fast. Wet pavement lengthens stopping distance even more because tires have less grip.
What your demonstration should show
Use a safe location away from traffic and the official graphic template or another counselor-approved one. Mark the distances for:
- 25 mph on dry pavement and wet pavement
- 55 mph on dry pavement and wet pavement
- 70 mph on dry pavement and wet pavement
The point is not to memorize a single number. The point is to see how much ground a vehicle covers before it can stop.
Stopping Distance Table and Graphs (PDF) The official distance chart and graph set you can use to mark off emergency-stop distances for the required demonstration. Link: Stopping Distance Table and Graphs (PDF) — https://filestore.scouting.org/filestore/Merit_Badge_ReqandRes/Requirement%20Resources/Traffic%20Safety/Stopping%20Distances%20Table%20and%20Graphs.pdf?_t=1764661254🎬 Video: Thinking, Braking, and Stopping Distances (video) — https://youtu.be/ZLHgYgEAPhY
🎬 Video: Stopping Distance Demonstration (video) — https://youtu.be/3mDp0k8Nfjc?si=Zoy8bAbLADxtlsz3
By this point you have looked at the driver, the vehicle, and the stopping space needed to avoid a crash. Next, you will look at the laws and procedures that shape what drivers must do on public roads.