Welding Merit Badge — Complete Digital Resource Guide
https://merit-badge.university/merit-badges/welding/guide/
Introduction & Overview
Welding is the skill of joining metal with heat, pressure, or both. It is one of the trades that quietly holds the modern world together — bridges, trailers, pipelines, bicycles, farm equipment, playgrounds, and skyscrapers all depend on strong welds. This merit badge introduces you to the science, safety, and hands-on practice behind that work.
Welding also teaches a very Scout-like habit of mind: prepare carefully, pay attention, and do the job right the first time. You will learn how to protect yourself, how different welding and cutting methods work, and how to make simple joints that your counselor can inspect and discuss with you.
Then and Now
Then — Fire, Forge, and Skilled Hands
Long before electric welding machines existed, metalworkers joined iron and steel by heating them in a forge and hammering them together. Blacksmiths made tools, hinges, wagon parts, and hardware for entire communities. As railroads, ships, and factories expanded during the 1800s and early 1900s, industry needed faster and more reliable ways to join metal than rivets, bolts, or forge work alone.
That need pushed welding forward. Oxy-fuel welding opened the door to heating and cutting metal with controlled flames, and electric arc welding made it possible to melt filler metal directly into a joint. What started as shop craft became a major industrial skill.
Now — Precision Work in Every Industry
Today, welding shows up almost everywhere heavy work gets done. Welders build and repair structural steel, farm machinery, pipelines, trailers, ships, race cars, pressure vessels, and custom metal art. Modern shops may use stick, MIG, TIG, plasma cutting, robotic welding cells, and computer-controlled fabrication tables.
Even with better machines, the fundamentals still matter: clean material, the right setup, careful safety habits, and steady technique. A strong weld is still the result of knowledge plus practice.
Get Ready!
Welding can feel exciting the first time an arc starts or a torch lights — and that is exactly why preparation matters. Before you think about bead shape or sparks, think about safety, setup, and control. If you build those habits first, the rest of the badge makes much more sense.
Kinds of Welding
Welding is not one single process. Different jobs call for different heat sources, filler metals, shielding methods, and shop setups.
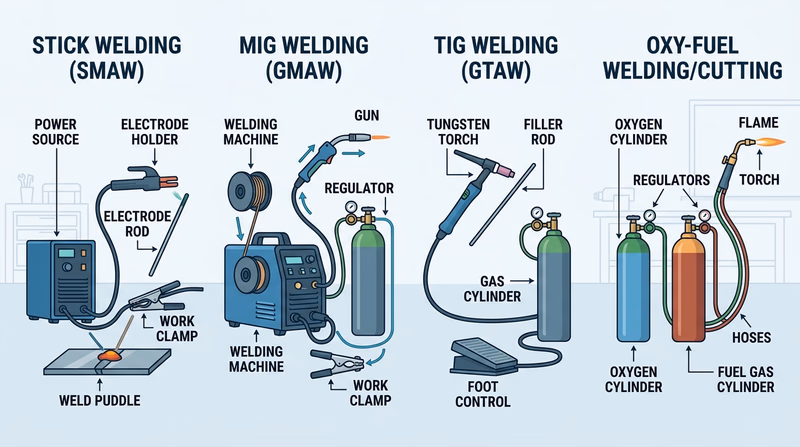
Shielded Metal Arc Welding (Stick)
Stick welding uses a coated electrode to create an electric arc between the rod and the metal. The coating helps protect the molten weld puddle and leaves behind slag that must be cleaned off after the weld cools. Stick welding is popular because the equipment is portable, works outdoors better than many gas-shielded processes, and handles dirty or rusty steel better than some cleaner shop methods.
Gas Metal Arc Welding (MIG)
MIG welding feeds wire continuously through a gun while shielding gas protects the weld from air. Many beginners like MIG because it is easier to start and stop cleanly, and the wire feed helps make smooth beads. It is common in school shops, fabrication shops, and auto-body work.
Gas Tungsten Arc Welding (TIG)
TIG welding uses a nonconsumable tungsten electrode and a shielding gas, usually with a separate filler rod. It takes more coordination than MIG or stick, but it gives excellent control and very clean welds. TIG is often used for thin metals, stainless steel, aluminum, and jobs where appearance matters.
Oxy-Fuel Welding and Cutting
Oxy-fuel equipment mixes fuel gas with oxygen to create a flame hot enough to weld, heat, braze, or cut metal. It is less common than arc welding for many modern shop welds, but it is still important because it teaches flame control and is widely used for heating and cutting.
Cutting Methods Work Alongside Welding
Most welders also spend time cutting, fitting, cleaning, and preparing metal. A weld can only be as good as the joint you prepared. That is why this badge includes both welding processes and metal-cutting methods: good fabrication starts before the weld begins.
Next Steps
You are about to start where every real welding class starts: hazard awareness. Before you can make a good weld, you need to understand what can injure you, what can damage the shop, and how to respond if something still goes wrong.
Req 1 — Welding Hazards and First Aid
This opening requirement covers the most important lesson in the whole badge: no weld is worth an injury. You need to recognize the main hazards in a welding area and know what immediate first aid looks like if something still goes wrong. Think in two layers as you read: How do I prevent this? and What do I do first if it happens anyway?
Your first welding mindset
Before you strike an arc, train yourself to scan for these risks- Heat and sparks: Ask what can burn you, ignite nearby materials, or stay dangerously hot after the weld ends.
- Light and electricity: Protect your eyes and skin from arc rays, and keep yourself out of the electrical path.
- Air quality and chemicals: Pay attention to ventilation, fumes, coatings, and gas cylinders.
- Shop control: Keep cords, clamps, workpieces, and emergency equipment organized so you can react fast.
Requirement 1a
The most common welding hazards are not mysterious. They are the predictable result of intense heat, bright arc light, electricity, hot metal, compressed gases, and airborne contaminants all happening in a small space. Good welders do not rely on luck. They build habits that reduce those hazards before the machine is even turned on.
Burns and hot metal
Fresh welds, nearby base metal, slag, and spatter can stay hot enough to burn you long after the bright part of the job is over. Gloves protect your hands, but only if they are dry and in good condition. Pliers, chipping tools, and clear communication also matter so nobody grabs the wrong piece.
Ways to prevent or lessen burn hazards:
- Wear proper gloves, long sleeves, long pants, and closed-toe leather footwear.
- Mark or announce hot metal so nobody touches it casually.
- Keep your work area clear so you do not stumble into a table or clamp.
- Let parts cool in a designated area instead of dropping them wherever there is space.
Arc rays and eye injuries
The welding arc gives off intense ultraviolet and infrared radiation. That can injure your eyes and skin even if you look only for a moment. The painful eye injury many welders call “arc eye” feels like sand in your eyes several hours later.
Ways to prevent or lessen eye hazards:
- Use the correct helmet and lens shade for the process and amperage.
- Wear safety glasses under the helmet so you stay protected when chipping slag or grinding.
- Use welding curtains or shields so bystanders are protected too.
- Never watch another welder’s arc with unprotected eyes.
Electrical shock
Arc welding equipment can shock you if your body becomes part of the circuit. Wet gloves, damp floors, damaged cables, and careless contact with the electrode holder all make that more likely.
Ways to prevent or lessen electrical hazards:
- Keep gloves, clothing, and floors dry.
- Inspect leads, stingers, clamps, and insulation before use.
- Do not wrap cables around your body.
- Shut down equipment before changing electrodes or doing maintenance.
Fumes, gases, and poor ventilation
Welding fumes are tiny particles and gases created by heat. The exact danger depends on the base metal, filler metal, surface coatings, shielding gas, and whether the area is enclosed. Breathing too much fume can make you dizzy, nauseated, or sick right away, and repeated exposure can cause long-term health problems.
Ways to prevent or lessen fume hazards:
- Use local exhaust or good shop ventilation.
- Keep your head out of the fume plume.
- Remove paint, oil, solvent, and coatings when instructed.
- Learn what materials are being welded and check the SDS when chemicals or consumables are involved.
Fire and explosion hazards
Sparks can travel far beyond the weld table. Paper, sawdust, oily rags, aerosol cans, solvents, and fuel containers do not belong in a welding area. Tanks, drums, or sealed containers can become deadly if heated without the right procedure.
Ways to prevent or lessen fire hazards:
- Remove combustibles from the area before welding.
- Keep a fire extinguisher nearby and know how to use it.
- Check behind and below the work area where sparks might land.
- Never weld on unknown containers, even if they look empty.
A simple way to explain hazards to your counselor
A strong discussion answer often follows this pattern:
- Name the hazard — electrical shock, arc rays, fumes, burns, fire, or chemicals.
- Say when it happens — wet gloves, poor ventilation, exposed skin, cluttered shop, coated metal.
- Describe the prevention — PPE, ventilation, inspection, fire watch, dry work area.
- Explain the backup plan — power off, cool the burn, move to fresh air, get adult help, use emergency equipment.
🎬 Video: Keep Yourself Safe: 6 Welding Safety Hazards & How To Avoid Them (video) — https://youtu.be/-oq3mS7EBX8?si=ePEbVQwTrMP92s8X
Requirement 1b
This requirement is about staying calm and taking the correct first step. You are not trying to become a doctor. You are showing that you can recognize the problem, stop the hazard, begin basic first aid, and get qualified adult or emergency help when needed.
Electrical shock
Prevention: Keep equipment dry, inspect cables, avoid touching live parts, and stand on dry surfaces.
First aid: Shut off power before touching the person if they may still be in contact with current. Call for help immediately. If the person is unresponsive and you are trained in CPR, begin care once the scene is safe. Electrical injuries can be more serious than they look, so medical evaluation matters.
Eye injuries
Prevention: Wear safety glasses and a proper helmet, and use welding screens around the area.
First aid: If something is in the eye, do not rub it. If it is dust or a small particle, gentle flushing may help. If the injury involves a burn, severe pain, vision change, or a particle stuck in the eye, cover the eye lightly and get medical help. Arc flash injuries may not hurt right away, so delayed pain still counts as an emergency worth reporting.
Burns
Prevention: Use gloves, sleeves, correct tools, and careful hot-metal handling.
First aid: Cool minor burns with cool running water, not ice, for several minutes. Remove jewelry near the burn if it is not stuck. Cover with a clean, dry dressing. Do not pop blisters or apply grease, butter, or ointments unless a medical professional directs it. Large, deep, electrical, or facial burns need prompt medical care.
How to Treat Welding Burns (website) A practical overview of mild welding-burn care and the warning signs that mean a burn needs professional treatment. Link: How to Treat Welding Burns (website) — https://weldingheadquarters.com/how-to-treat-welding-burns/?utm_source=chatgpt.comFume inhalation and dizziness
Prevention: Ventilate the area, avoid breathing the plume, and stop work if the air does not feel right.
First aid: Move the person to fresh air right away. Loosen tight clothing if needed and keep them at rest. If breathing is difficult, symptoms are severe, or the person does not improve quickly, get emergency help. Dizziness in a shop can also mean heat stress, dehydration, or dangerous air quality, so treat it seriously.
Skin irritation and chemical exposure
Prevention: Wear gloves and protective clothing, wash after handling consumables, and read the SDS for materials in use.
First aid: Brush off dry material if appropriate, then rinse exposed skin with plenty of water. Remove contaminated clothing. If a chemical is involved, the SDS often tells you the immediate first-aid step and what symptoms to watch for.
Filler metals and welding gases
Filler metals, coatings, shielding gases, and cleaning chemicals can all add risk. Some hazards come from what is on the metal, not just the metal itself. That is why you will study SDS and protective gear in Req 2.
What your counselor is looking for
Your counselor will likely care less about perfect medical vocabulary and more about whether you can think clearly:
- Can you explain how to prevent the injury?
- Can you make the scene safer before helping?
- Can you give the right basic first-aid response?
- Can you say when adult, counselor, or emergency help is needed?
That same calm approach will help in the shop when you move on to PPE, setup, and actual welding practice.
Req 2 — Safety Gear, SDS, and Equipment Care
This requirement turns safety from an idea into a routine. You will learn how to read hazard information, dress correctly for the job, and care for your tools so the work area stays predictable and safe. The theme here is simple: good welding starts before the weld starts.
Requirement 2a
An SDS, or Safety Data Sheet, is one of the best examples of a named safety tool that welders actually use. It gives you practical information about a chemical or material: what the hazards are, how to handle it, how to store it, what PPE to use, and what first aid to give if exposure happens.
The Welding merit badge pamphlet explains that safety data sheets are available for filler materials you may be using and that they give proper procedures for working with, handling, storing, and disposing of materials. It also notes that an SDS can alert you to hazardous substances in a welding rod or hazards created during welding with that material.
Why the SDS matters
If someone hands you a welding rod, shielding gas, anti-spatter spray, solvent, or metal cleaner, the SDS helps answer questions like these:
- What is in this product?
- What hazards does it create while stored, handled, or heated?
- What PPE should I wear?
- What should I do if it gets in my eyes, on my skin, or into the air I am breathing?
- How should spills, leaks, or disposal be handled?
That makes the SDS important because it turns vague caution into specific action.
The key SDS sections you should know
The pamphlet notes that, by law, SDS documents use 16 sections. You do not need to memorize all of them word for word, but you should know the sections most useful in a welding setting:
- Identification — what the product is and who made it.
- Hazard identification — the main warning information.
- Composition/information on ingredients — what is in the product.
- First-aid measures — what to do first after exposure.
- Fire-fighting measures — how to respond if fire is involved.
- Accidental release measures — what to do for leaks or spills.
- Handling and storage — how to store and use it safely.
- Exposure controls/personal protection — ventilation limits and PPE guidance.
- Physical and chemical properties — how the product behaves.
- Stability and reactivity — what conditions or materials may trigger a bad reaction.
- Toxicological information — health effects.
- Other information — such as revision date.
How to use an SDS in a welding shop
Four questions to ask before using a material- What are the hazards? Look for fumes, skin irritation, flammability, or toxic ingredients.
- How do I protect myself? Check the PPE and ventilation sections.
- What happens if something spills or splashes? Read the first-aid and accidental-release sections.
- How should it be stored? Confirm temperature, separation, and cylinder or chemical handling rules.
🎬 Video: Safety Data Sheets Training Video (video) — https://youtu.be/_yWF-w3CwmU?si=RygDv1LH-6pEBP-L
Requirement 2b
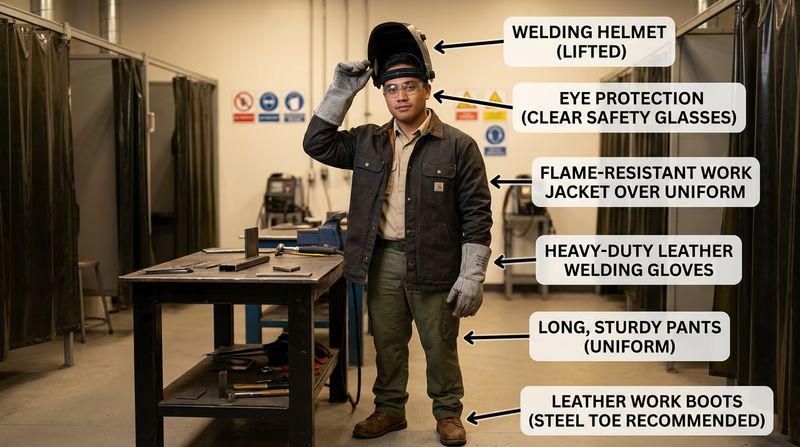
Dressing properly for welding is not about looking like a welder. It is about blocking sparks, arc rays, hot metal, and flying debris before they reach your skin or eyes. Each part of your clothing system has a job.
Head and eye protection
Your welding helmet protects your eyes and face from light, heat, and flying particles. Under the helmet, you still wear safety glasses. That way you stay protected when the helmet is raised and when you chip, brush, or grind slag.
Hands and upper body
Welding gloves should match the process and give enough protection without making you clumsy. Your shirt or jacket should be made from sturdy, nonmelting material and cover your arms fully. Sleeves should stay down. Synthetic fabrics can melt onto your skin, which is why cotton, leather, or purpose-built welding gear is preferred.
Legs and feet
Wear long pants without cuffs that can trap sparks. Leather work boots or other sturdy closed-toe footwear are standard. High tops help keep sparks and slag out. Sandals, sneakers with mesh, and anything open at the ankle are bad choices.
What “properly dressed” really means
A counselor is usually looking for a complete, practical setup:
- Helmet in good condition
- Safety glasses underneath
- Welding gloves
- Long sleeves
- Long pants
- Closed-toe leather footwear
- No loose jewelry, no dangling drawstrings, and no flammable clutter in pockets
🎬 Video: Welding Safety PPE Guide | Must-Have Essentials for Safe Welding Practices (video) — https://youtu.be/YsAmLFF03jI?si=llTGf61a3qyktawl
Requirement 2c
Taking care of equipment is part of safety, not just housekeeping. Cables that are frayed, helmets with cracked lenses, damp gloves, and regulators tossed into a drawer all increase the chance of injury or poor weld quality.
Care for welding equipment and tools
Inspect equipment before and after use. Look for damaged cords, loose connections, worn contact tips, dirty clamps, cracked hoses, and any sign that a tool has been overheated or dropped. Clean tools after use so spatter, dust, and metal filings do not build up.
Storage habits that prevent problems
Store equipment where it stays dry, protected, and easy to inspect. Coil cables neatly instead of twisting them sharply. Put helmets where the lens will not be scratched. Keep consumables organized so the right rod, wire, or filler material is easy to identify later. Store cylinders upright and secured according to shop rules.
PPE care matters too
Gloves, jackets, sleeves, and footwear do not protect well if they are soaked, torn, oil-covered, or packed with metal dust. Let PPE dry fully after use. Replace worn gear before it fails in the middle of a job.
🎬 Video: A DIY Guide to Maintaining and Storing your Welding Equipment (video) — https://youtu.be/roCt2U2ccaI?si=wpUZM8xiPDdeXA1H
🎬 Video: Safely Use and Care of PPE | ACSA Training | CSTS Clip (video) — https://youtu.be/HrjpCHfbYJE?si=NeeiVkfW-8XJlOKe
A good counselor conversation sounds practical
If your counselor asks how you care for equipment, do not stay abstract. Walk through the real sequence: inspect, clean, cool, coil, store, dry, and report. That shows you understand how safe welding habits continue even after the bead is finished.
In Req 1, you learned what can go wrong. In this requirement, you learned how to build a safer system before anything goes wrong at all.
Req 3 — Welding Terms and Process Basics
This requirement is the “why it works” part of the badge. Once you understand the basic terms, welding stops looking like random sparks and starts making sense as a controlled process: heat creates a molten puddle, filler may be added, and the weld must be protected from the surrounding air while it solidifies.
Four key terms
Welding is the process of joining materials, usually metals, by causing them to fuse together. Depending on the process, that fusion may happen with heat alone or heat plus pressure.
Electrode is the part of the welding circuit that carries current to create the arc. In some processes, the electrode is also consumed and becomes filler metal. In TIG, the tungsten electrode carries current but is not meant to melt into the joint.
Slag is the solid material left on top of some welds after the molten flux or impurities cool. In stick welding, slag helps protect the weld while it is hot, but it must be removed afterward so you can inspect the bead and continue welding cleanly.
Oxidation is a chemical reaction between a material and oxygen. In welding, too much oxidation is usually bad because it contaminates hot metal and weakens the weld area. In oxy-fuel cutting, though, controlled oxidation is exactly what cuts the metal.
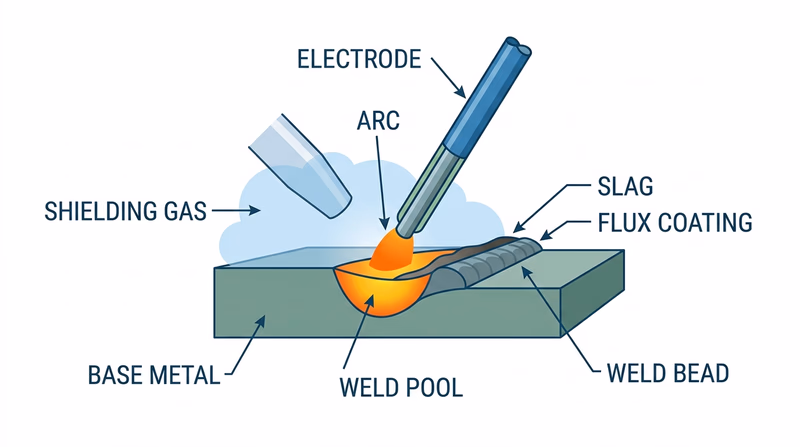
What happens during welding
Most welding processes follow the same basic story:
- Energy is concentrated at the joint. This may come from an electric arc, a flame, resistance heating, or another source.
- The base metal heats up. In many processes, the edges of the joint begin to melt.
- Filler metal may be added. The filler helps build the joint and fill the gap.
- The molten weld pool is protected. Flux, shielding gas, or both keep the atmosphere from contaminating the hot metal.
- The weld cools and solidifies. The final bead becomes part of the joint.
How heat is generated
For the processes most Scouts will discuss in this badge, heat usually comes from one of two sources:
- Electric arc — current jumps across a gap between the electrode and the workpiece, producing intense heat.
- Oxy-fuel flame — fuel gas and oxygen burn in a controlled flame hot enough to heat, weld, or cut metal.
In stick welding, the arc forms between the covered metal electrode and the work. In MIG welding, the arc forms between a continuously fed wire electrode and the work. In TIG welding, the arc forms between a tungsten electrode and the work.
What kind of filler metal is added?
The answer depends on the process:
- Stick (SMAW) — the coated electrode itself is consumed, and its core becomes filler metal.
- MIG (GMAW) — a continuously fed wire acts as filler metal.
- TIG (GTAW) — a separate filler rod may be added by hand, or sometimes no filler is added at all.
- Oxy-fuel welding — filler rod may be added separately depending on the joint and task.
What protects the molten metal from the atmosphere?
The welding pamphlet explains this clearly in its discussion of shielding. In stick welding, the electrode coating breaks down and gives off vapors that shield the weld area from atmospheric contamination. That coating also creates slag. In gas-shielded processes such as MIG and TIG, an externally supplied gas protects the molten weld pool.
That is why terms like flux, shielding gas, and slag matter so much. If the molten puddle is left exposed to the atmosphere, contamination can weaken the weld.
A quick compare: stick, MIG, and TIG
| Process | Heat source | Filler metal | Protection from atmosphere |
|---|---|---|---|
| Stick (SMAW) | Electric arc | Consumable covered electrode | Flux gases and slag from electrode coating |
| MIG (GMAW) | Electric arc | Continuously fed wire | External shielding gas |
| TIG (GTAW) | Electric arc | Separate filler rod or none | External shielding gas |
How to explain this to your counselor
A strong explanation sounds connected, not memorized. Try a sentence like this:
“Welding joins metal by using concentrated heat to create a molten puddle. Depending on the process, the electrode may also be the filler metal or may only carry current. The puddle has to be protected from the atmosphere by flux, slag, or shielding gas so oxygen does not contaminate the weld.”
That one explanation ties together all four terms in a practical way.
Understanding Common Welding Terms—A Guide for Beginners (website) A beginner-friendly glossary that helps reinforce the shop vocabulary you will need when discussing welding processes with your counselor. Link: Understanding Common Welding Terms—A Guide for Beginners (website) — https://www.millerwelds.com/resources/article-library/understanding-common-welding-terms-a-guide-for-beginnersIn Req 2, you learned how to prepare the shop and protect yourself. The next step is preparing the metal itself by learning how welding shops cut material to size before joining it.
Req 4 — Mechanical and Thermal Cutting
Cutting is part of fabrication, not just prep work. Before metal can be fit, clamped, and welded, it usually has to be sized and shaped accurately. This requirement asks you to compare two big families of cutting methods and then describe one process well enough to show that you understand how it works in a real shop.
Mechanical cutting methods
Mechanical cutting removes or separates metal by force, abrasion, or machine action rather than by melting or burning it. Common examples include:
- Shears
- Band saws
- Chop saws and cold saws
- Abrasive cutoff wheels
- Snips
- Nibblers
- Drill-and-cut combinations or machining tools in a fabrication setting
Mechanical methods are often chosen when the shop wants cleaner dimensions, less heat distortion, or a process that works well on thin stock and repeated cuts.
Thermal cutting methods
Thermal cutting uses heat to separate metal. The welding pamphlet specifically identifies oxy-fuel cutting and plasma arc cutting as two widely used thermal methods. Other thermal methods exist in industry, but these are the ones most connected to the badge.
In the pamphlet’s explanation of oxy-fuel cutting, a torch heats metal to kindling temperature and then a stream of oxygen oxidizes the metal. The burned metal is removed from the kerf, which is the narrow cut zone.
One process to know well: oxy-fuel cutting
Oxy-fuel cutting is a strong process to choose for your counselor discussion because the pamphlet explains both how it works and what its tradeoffs are.
How to use oxy-fuel cutting
At a basic level, the process works like this:
- Secure the workpiece and clear the area of combustibles.
- Check the torch, hoses, regulators, cylinders, and tip.
- Set the correct gas flow and light the torch safely.
- Adjust the flame correctly for the job.
- Preheat the metal at the starting point until it reaches kindling temperature.
- Trigger the cutting oxygen stream to begin the cut.
- Move steadily along the layout line while controlling torch angle, speed, and distance.
- Shut down the equipment in the correct order and handle the hot material safely.
You would not perform all of that alone without counselor supervision, but you should be able to describe the sequence.
One advantage and one limitation
The pamphlet gives you a useful answer here. It says the advantages of oxy-fuel cutting include low cost, portability, and versatility of cutting direction and size. A clear single advantage to discuss is portability: you can take the setup to the work instead of always bringing the work to a large stationary machine.
A clear limitation is that oxy-fuel cutting has poorer tolerances compared with machine tools. In plain language, it is not always the best choice when you need the cut to be extremely precise or clean.
How mechanical and thermal methods differ in practice
| Question | Mechanical cutting | Thermal cutting |
|---|---|---|
| What does the cutting? | Blade, wheel, shear, or machine force | Heat, flame, arc, or oxidation |
| Heat distortion risk | Usually lower | Usually higher |
| Common shop use | Straight cuts, repeated sizing, cleaner edges | Fast cutting, field work, thicker steel, irregular shapes |
| Main tradeoff | May require more machine setup or specific tooling | Can create heat-affected zones, sparks, fumes, and rougher edges |

When you talk with your counselor, connect cutting back to the final weld. A better cut usually means easier fit-up, better tacks, and less frustration later. That is exactly why the next requirement asks you to compare welding processes and set one up correctly.
Req 5 — Process Selection and Setup
This requirement connects theory to shop action. First you compare welding processes and the equipment each one needs. Then you pick one process and build a safe, ready-to-inspect setup for the welds in Req 6.
Requirement 5a
A good comparison does more than name the process. It shows that you understand what parts make the process work and what shop situations each process handles well.
Example comparison: Stick vs. MIG
Stick welding (SMAW)
Typical equipment components:
- Power source
- Electrode holder (stinger)
- Work clamp and ground lead
- Welding leads/cables
- Covered electrodes
- Helmet, gloves, and protective clothing
- Chipping hammer and wire brush for slag cleanup
Advantage: Stick welding is portable, versatile, and works well outdoors.
Limitation: It creates slag that must be cleaned, and changing electrodes slows the work.
MIG welding (GMAW)
Typical equipment components:
- Power source
- Wire feeder or built-in feed system
- Welding gun
- Work clamp and cable
- Spool of wire electrode
- Shielding gas cylinder
- Regulator/flowmeter
- Contact tips and nozzle
- Helmet, gloves, and protective clothing
Advantage: MIG is often easier for beginners to learn and makes fast, continuous welds.
Limitation: Wind can disrupt the shielding gas, so it is less forgiving outdoors.
Other processes you might compare
You could also compare TIG and oxy-fuel, or stick and TIG, depending on what your counselor uses. What matters is that you can connect the process to its equipment and tradeoffs.
What makes a strong process comparison
Use this structure when talking with your counselor- Name the process and what creates the heat.
- List the equipment parts needed to run it safely.
- Explain one advantage in a real shop situation.
- Explain one limitation that affects where or how it is used.
🎬 Video: 4 Types of Welding Explained: MIG vs TIG vs Stick vs Flux Core (video) — https://youtu.be/y-OKi8oSNQ4?si=sTy6oV_X2gC7tqr3
Requirement 5b
This is a setup requirement, not a speed requirement. Your goal is to create a clean, safe, organized station that your counselor can inspect with confidence before you begin welding.
Start with the big decision
Pick the process your counselor wants you to use for the hands-on welds in Req 6. That process determines which parts of the setup matter most. For example:
- Stick uses cables, holder, work clamp, and the correct electrode selection.
- MIG adds wire feed, shielding gas, regulator/flowmeter, and polarity settings.
- TIG adds tungsten setup, shielding gas, and often a foot pedal or fingertip control.
What to include in your setup discussion
Gas regulators
If your chosen process uses shielding gas, the regulator and flow control must be attached correctly and handled with care. Gas cylinders should be upright and secured. You should know which gas the process uses and why.
Work clamps and cables
The work clamp must connect to clean metal so current flows properly. Cables should be routed where they will not be cut, tripped over, pinched, or overheated. Loose or damaged connections can lead to poor arc performance and safety problems.
Filler materials
Use the correct electrode, wire, or filler rod for the process and the metal you are welding. The wrong filler can make the weld weaker, harder to run, or unsuitable for the joint.
Equipment settings
Voltage, amperage, polarity, wire-feed speed, and gas flow all affect weld quality. You do not need to guess them from memory alone. Your counselor, machine chart, and shop procedure should guide the initial settings.
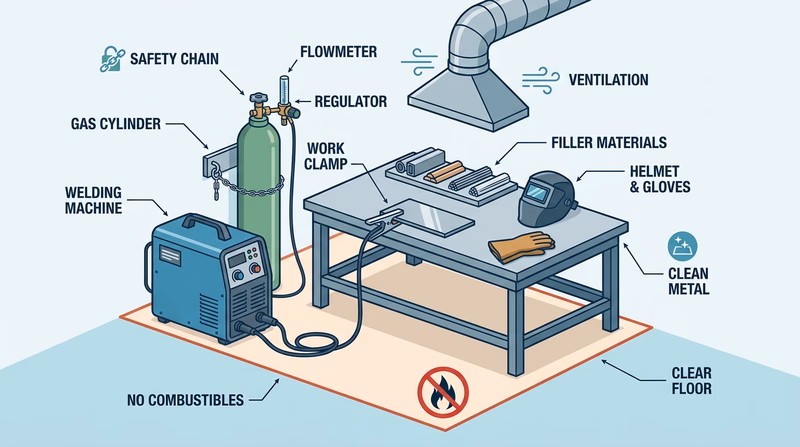
Why counselor inspection matters
The inspection is not just a rule to slow you down. It is a chance to catch unsafe routing, bad grounding, missing PPE, wrong consumables, or poor gas setup before those problems become sparks, porosity, or injuries.
If you can explain your station clearly — what process it is, what each component does, and why the area is safe — you are in great shape for the practical welds that come next.
Req 6 — Beads and Basic Joints
This is the practical heart of the badge. You are moving from setup and vocabulary into actual bead control and simple joint work. The goal is not perfection. The goal is to show your counselor that you can prepare the material, control the process, accept feedback, and improve from one weld to the next.
Requirement 6a
This exercise teaches control. Straight lines are useful, but curves and corners quickly reveal whether your travel speed, hand position, and arc control are consistent.
What this exercise is really testing
- Can you mark the metal clearly?
- Can you start and stop without wandering off the line?
- Can you keep the bead reasonably even while changing direction?
Use the scribe or soapstone mark as a path, not as a target to completely bury. You want your bead to follow the pattern in a controlled way.
🎬 Video: Welding letters and numbers for a casting form (video) — https://youtu.be/UBbdcviujmM?si=NwNeRUjFrwt8rFOU
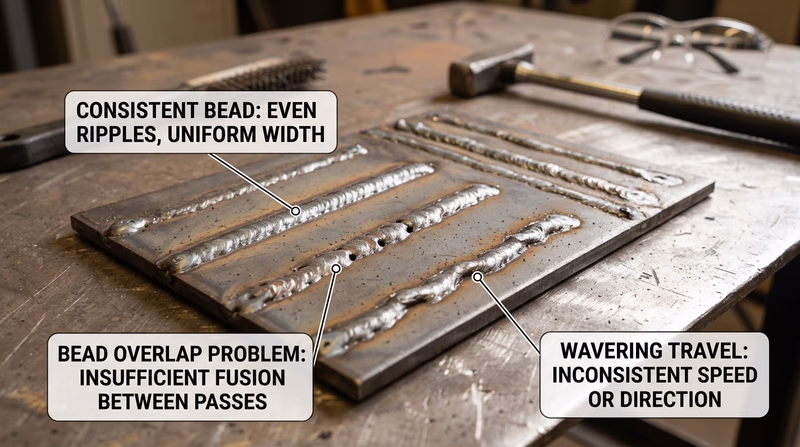
Requirement 6b
This is one of the classic beginner welding exercises because it teaches bead spacing, puddle control, and consistency. Each bead should sit next to the last one with a similar rhythm and appearance.
What to focus on when running beads
- Hold a steady travel speed.
- Watch the puddle, not just the arc.
- Keep your angle and distance consistent.
- Overlap beads neatly without leaving gaps or piling them up too high.
🎬 Video: The First Lesson of Welding | Learning to Run Beads (video) — https://youtu.be/g7qgPldYDuY?si=qzhUPLUcxtXtNABM
Requirement 6c
A tack weld is a small weld that holds the parts in alignment before the full weld is made. In a butt joint, the edges meet in the same plane. Your tacks should hold the plates square and keep the gap and alignment acceptable for the full weld.
What makes a good tack
- The parts are aligned before you tack.
- The tacks are strong enough to hold the joint.
- The plates stay square and do not pull badly out of position.
- The tack placement leaves room for the final weld.
🎬 Video: How to Weld a Butt Joint (video) — https://youtu.be/3-ebx3hWu0Q?si=kV-5_qfTM5SZ3BC7
Requirement 6d
Once the tack welds have locked the butt joint in place, you are ready to complete the joint. Welding both sides helps you practice controlling heat and penetration while keeping the joint from distorting too much.
What your counselor may inspect
- Whether the plates stayed aligned after welding
- Whether the bead ties into both sides of the joint
- Whether slag, spatter, or contamination was cleaned between passes when needed
- Whether the second side shows improved control from the first
🎬 Video: How to Weld a Butt Joint (video) — https://youtu.be/3-ebx3hWu0Q?si=kV-5_qfTM5SZ3BC7
Requirement 6e
A T joint places one piece against another at roughly a right angle. The weld that usually joins them is a fillet weld. This is a very common joint shape in fabrication because brackets, frames, and supports often meet this way.
Why the inspection happens before the full weld
The tack stage is where your counselor can still help you fix fit-up problems. If the pieces are not square or the root area is poor, the full weld will only lock those mistakes in place.
What to think about during the fillet weld
- Keep the work angle aimed to reach both members of the joint.
- Watch for equal fusion into both plates.
- Do not rush the corners or the ends.
🎬 Video: Helpful Tips for Tacking and MIG Welding Fillet Joints (video) — https://youtu.be/zFIdiTJxii4?si=5gysckooa-vsCXmT
Requirement 6f
In a lap joint, one plate overlaps another. This setup changes how heat moves through the metal, and beginners sometimes melt the edge of the top piece if they stay too long in one place.
What to focus on in a lap joint
- Make sure the overlap is consistent before tacking.
- Aim the weld so both pieces are fused, not just the top plate.
- Keep your speed steady so the thinner edge does not overheat.
🎬 Video: TIG Welding Basics: Lap Joints (video) — https://youtu.be/0AxiCSe-dCQ?si=uoHqPtfJj9LIGrue
What ties all six tasks together
Req 6 is really about control. Your counselor is not expecting production-shop speed. They are looking for safe setup, careful fit-up, coachable technique, and an understanding of what the weld is supposed to accomplish.
The next requirement zooms out and asks where these skills can lead in the real world — from career paths to the role of the American Welding Society.
Req 7 — Careers and the American Welding Society
This final requirement looks beyond the practice plate. Welding is not just a shop exercise for a merit badge. It is a huge field with career paths in construction, manufacturing, energy, transportation, maintenance, fabrication, and inspection. It also has professional organizations that help set standards and support training.
Requirement 7a
Here are three welding-related careers you could use for your discussion:
Structural welder
Structural welders work on buildings, bridges, towers, and large steel frameworks. They need strong blueprint-reading habits, safe field practices, and the ability to produce sound welds in demanding conditions.
Pipe welder
Pipe welders join pipes used in industries such as power generation, manufacturing, oil and gas, and chemical processing. This work often demands tight tolerances, excellent joint preparation, and strong position-welding skills.
Welding inspector
Welding inspectors may not do all the welding themselves, but they are experts in weld quality, codes, and standards. They examine joints, procedures, and test results to help make sure finished work is safe and compliant.
One career to research more deeply
If you pick welding inspector, for example, your discussion might include:
- Education and training: High school, trade school, community college, apprenticeship, military training, or on-the-job welding experience can all be part of the path.
- Experience required: Inspectors usually need real welding knowledge before they are trusted to evaluate other people’s work.
- Why it might interest you: It combines hands-on shop understanding with careful observation, standards, and problem-solving.
You could just as easily choose structural welding, pipe welding, robotic welding technician work, sheet-metal fabrication, underwater welding support paths, welding educator roles, or manufacturing maintenance.
Questions to answer for your chosen career
Use these when preparing for your counselor discussion- What does this person actually do each day?
- What training path gets someone started?
- What experience or certifications matter most?
- Why does this role fit my interests — travel, precision, field work, fabrication, inspection, or teaching?
🎬 Video: Should You Become a Welder?—Everything You Need to Know About The Welding Profession (video) — https://youtu.be/tVOvC_e9spA?si=twqMhlBcM9FL64iJ
Requirement 7b
The American Welding Society, usually called AWS, is one of the most important professional organizations in the welding world. Its role is much bigger than publishing a magazine or running meetings.
What AWS does
- Develops and supports welding codes, standards, and technical information
- Promotes welding education and career development
- Supports certifications and professional credentials
- Shares safety information and best practices
- Connects schools, industry, inspectors, engineers, and welders through conferences, sections, and publications
That matters because welding is used in situations where bad work can become dangerous fast. Bridges, pressure vessels, pipelines, buildings, and machinery all need reliable standards. AWS helps the profession speak a common language about quality and safety.
🎬 Video: What Does the American Welding Society Do For Welders? (video) — https://youtu.be/tZaEMO4bPHg?si=deNNIvCoSNCICh4S
Why this requirement belongs at the end of the badge
The first six requirements teach you how to think and work like a beginner welder. This last requirement reminds you that welding is part of a larger professional world. There are real careers here, real standards, and real opportunities to keep learning.
Extended Learning
Congratulations
You have finished a badge that mixes science, skilled hands, and serious safety habits. That combination is one reason welding matters so much in the real world. You did not just learn how to make sparks — you learned how preparation, process choice, and careful practice turn raw metal into useful structures.
Reading a Weld Like a Fabricator
Experienced welders do more than make a bead. They read the whole situation around it. They look at joint design, base metal thickness, fit-up, distortion risk, access angle, cleanup needs, and the service the finished piece must handle.
That is one reason two welders can use the same machine and get very different results. The stronger welder is often the one who notices more before welding starts. If you want to grow in this trade, practice asking questions like these:
- What load will this joint carry?
- Does the joint need strength, appearance, corrosion resistance, or all three?
- What process makes the most sense for this location and metal thickness?
- How can the part be clamped so it stays aligned as heat builds?
Those questions move you from beginner technique toward fabrication thinking.
Distortion, Shrinkage, and Heat Control
Metal expands when heated and shrinks when it cools. That sounds simple, but it explains why welded parts can pull, twist, bow, or go out of square. Learning to control distortion is one of the biggest steps from practice plate welding to useful fabrication.
Common strategies include:
- Tacking parts in smart locations before full welding
- Using alternating weld sequences instead of welding one long side all at once
- Clamping or fixturing parts carefully
- Using only as much heat and weld size as the job actually needs
If you ever weld a frame, bracket, or project with matching dimensions, heat control becomes just as important as bead appearance.
Welding and Modern Manufacturing
Welding today is not limited to one person and a booth. Many industries combine welders with CNC cutting, robotic welding cells, digital machine presets, inspection systems, and quality documentation. That does not make hand skills less important. It means strong welders now benefit from technical literacy too.
A future welding career might include:
- Programming or tending robotic welding systems
- Inspecting welds with visual and nondestructive testing methods
- Working with stainless steel, aluminum, or specialty alloys
- Building custom fabrication projects from drawings or CAD models
If you enjoy both tools and technology, welding can lead into a lot of directions.
Building a Practice Habit
One of the best ways to improve is to keep a simple welding notebook. After each session, record:
- Process used
- Material type and thickness
- Machine settings
- Joint type
- What went well
- What you want to change next time
That habit helps you spot patterns faster. It also gives you a practical record to discuss with an instructor, mentor, or counselor.
Real-World Experiences
Visit a local welding or fabrication shop
Attend a career or skilled-trades event
Build a small supervised metal project
Compare welds on everyday objects
Organizations
The leading U.S. professional organization for welding standards, education, certification, technical resources, and career development.
Organization: American Welding Society — https://www.aws.org/
A career and technical student organization that supports trade education and often includes welding competitions, leadership development, and workforce preparation.
Organization: SkillsUSA — https://www.skillsusa.org/
A key source for workplace safety rules and guidance, including information relevant to welding hazards, PPE, ventilation, and shop safety.
Organization: Occupational Safety and Health Administration — https://www.osha.gov/
An education-focused resource that supports welding instruction, career awareness, and training pathways across schools and technical programs.
Organization: National Center for Welding Education and Training — https://www.weld-ed.org/