Req 2 — Safety Gear, SDS, and Equipment Care
This requirement turns safety from an idea into a routine. You will learn how to read hazard information, dress correctly for the job, and care for your tools so the work area stays predictable and safe. The theme here is simple: good welding starts before the weld starts.
Requirement 2a
An SDS, or Safety Data Sheet, is one of the best examples of a named safety tool that welders actually use. It gives you practical information about a chemical or material: what the hazards are, how to handle it, how to store it, what PPE to use, and what first aid to give if exposure happens.
The Welding merit badge pamphlet explains that safety data sheets are available for filler materials you may be using and that they give proper procedures for working with, handling, storing, and disposing of materials. It also notes that an SDS can alert you to hazardous substances in a welding rod or hazards created during welding with that material.
Why the SDS matters
If someone hands you a welding rod, shielding gas, anti-spatter spray, solvent, or metal cleaner, the SDS helps answer questions like these:
- What is in this product?
- What hazards does it create while stored, handled, or heated?
- What PPE should I wear?
- What should I do if it gets in my eyes, on my skin, or into the air I am breathing?
- How should spills, leaks, or disposal be handled?
That makes the SDS important because it turns vague caution into specific action.
The key SDS sections you should know
The pamphlet notes that, by law, SDS documents use 16 sections. You do not need to memorize all of them word for word, but you should know the sections most useful in a welding setting:
- Identification — what the product is and who made it.
- Hazard identification — the main warning information.
- Composition/information on ingredients — what is in the product.
- First-aid measures — what to do first after exposure.
- Fire-fighting measures — how to respond if fire is involved.
- Accidental release measures — what to do for leaks or spills.
- Handling and storage — how to store and use it safely.
- Exposure controls/personal protection — ventilation limits and PPE guidance.
- Physical and chemical properties — how the product behaves.
- Stability and reactivity — what conditions or materials may trigger a bad reaction.
- Toxicological information — health effects.
- Other information — such as revision date.
How to use an SDS in a welding shop
Four questions to ask before using a material
- What are the hazards? Look for fumes, skin irritation, flammability, or toxic ingredients.
- How do I protect myself? Check the PPE and ventilation sections.
- What happens if something spills or splashes? Read the first-aid and accidental-release sections.
- How should it be stored? Confirm temperature, separation, and cylinder or chemical handling rules.
🎬 Video: Safety Data Sheets Training Video (video) — https://youtu.be/_yWF-w3CwmU?si=RygDv1LH-6pEBP-L
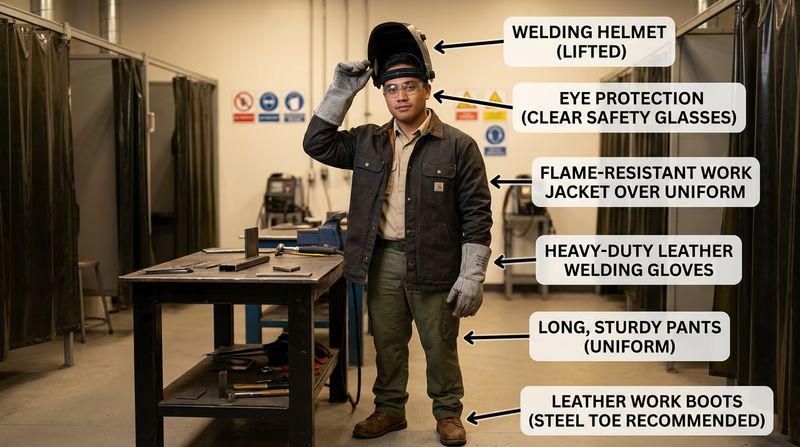
Requirement 2b
Dressing properly for welding is not about looking like a welder. It is about blocking sparks, arc rays, hot metal, and flying debris before they reach your skin or eyes. Each part of your clothing system has a job.
Head and eye protection
Your welding helmet protects your eyes and face from light, heat, and flying particles. Under the helmet, you still wear safety glasses. That way you stay protected when the helmet is raised and when you chip, brush, or grind slag.
Hands and upper body
Welding gloves should match the process and give enough protection without making you clumsy. Your shirt or jacket should be made from sturdy, nonmelting material and cover your arms fully. Sleeves should stay down. Synthetic fabrics can melt onto your skin, which is why cotton, leather, or purpose-built welding gear is preferred.
Legs and feet
Wear long pants without cuffs that can trap sparks. Leather work boots or other sturdy closed-toe footwear are standard. High tops help keep sparks and slag out. Sandals, sneakers with mesh, and anything open at the ankle are bad choices.
What “properly dressed” really means
A counselor is usually looking for a complete, practical setup:
- Helmet in good condition
- Safety glasses underneath
- Welding gloves
- Long sleeves
- Long pants
- Closed-toe leather footwear
- No loose jewelry, no dangling drawstrings, and no flammable clutter in pockets
🎬 Video: Welding Safety PPE Guide | Must-Have Essentials for Safe Welding Practices (video) — https://youtu.be/YsAmLFF03jI?si=llTGf61a3qyktawl
Requirement 2c
Taking care of equipment is part of safety, not just housekeeping. Cables that are frayed, helmets with cracked lenses, damp gloves, and regulators tossed into a drawer all increase the chance of injury or poor weld quality.
Care for welding equipment and tools
Inspect equipment before and after use. Look for damaged cords, loose connections, worn contact tips, dirty clamps, cracked hoses, and any sign that a tool has been overheated or dropped. Clean tools after use so spatter, dust, and metal filings do not build up.
Storage habits that prevent problems
Store equipment where it stays dry, protected, and easy to inspect. Coil cables neatly instead of twisting them sharply. Put helmets where the lens will not be scratched. Keep consumables organized so the right rod, wire, or filler material is easy to identify later. Store cylinders upright and secured according to shop rules.
PPE care matters too
Gloves, jackets, sleeves, and footwear do not protect well if they are soaked, torn, oil-covered, or packed with metal dust. Let PPE dry fully after use. Replace worn gear before it fails in the middle of a job.
🎬 Video: A DIY Guide to Maintaining and Storing your Welding Equipment (video) — https://youtu.be/roCt2U2ccaI?si=wpUZM8xiPDdeXA1H
🎬 Video: Safely Use and Care of PPE | ACSA Training | CSTS Clip (video) — https://youtu.be/HrjpCHfbYJE?si=NeeiVkfW-8XJlOKe
A good counselor conversation sounds practical
If your counselor asks how you care for equipment, do not stay abstract. Walk through the real sequence: inspect, clean, cool, coil, store, dry, and report. That shows you understand how safe welding habits continue even after the bead is finished.
In Req 1, you learned what can go wrong. In this requirement, you learned how to build a safer system before anything goes wrong at all.