Req 6 — Beads and Basic Joints
This is the practical heart of the badge. You are moving from setup and vocabulary into actual bead control and simple joint work. The goal is not perfection. The goal is to show your counselor that you can prepare the material, control the process, accept feedback, and improve from one weld to the next.
Requirement 6a
This exercise teaches control. Straight lines are useful, but curves and corners quickly reveal whether your travel speed, hand position, and arc control are consistent.
What this exercise is really testing
- Can you mark the metal clearly?
- Can you start and stop without wandering off the line?
- Can you keep the bead reasonably even while changing direction?
Use the scribe or soapstone mark as a path, not as a target to completely bury. You want your bead to follow the pattern in a controlled way.
🎬 Video: Welding letters and numbers for a casting form (video) — https://youtu.be/UBbdcviujmM?si=NwNeRUjFrwt8rFOU
Requirement 6b
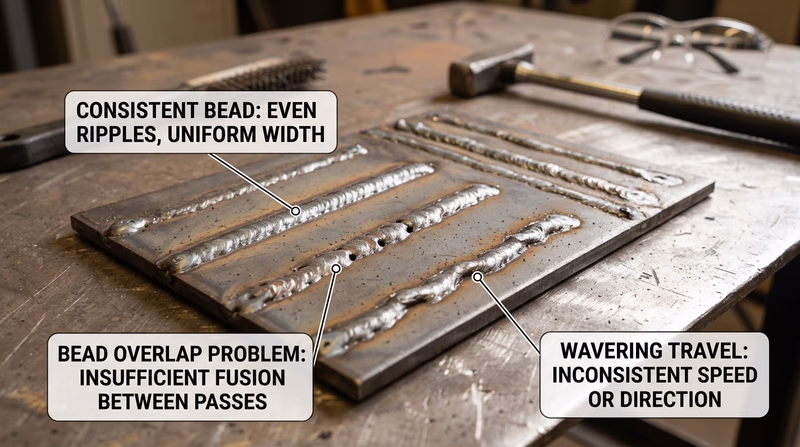
This is one of the classic beginner welding exercises because it teaches bead spacing, puddle control, and consistency. Each bead should sit next to the last one with a similar rhythm and appearance.
What to focus on when running beads
- Hold a steady travel speed.
- Watch the puddle, not just the arc.
- Keep your angle and distance consistent.
- Overlap beads neatly without leaving gaps or piling them up too high.
🎬 Video: The First Lesson of Welding | Learning to Run Beads (video) — https://youtu.be/g7qgPldYDuY?si=qzhUPLUcxtXtNABM
Requirement 6c
A tack weld is a small weld that holds the parts in alignment before the full weld is made. In a butt joint, the edges meet in the same plane. Your tacks should hold the plates square and keep the gap and alignment acceptable for the full weld.
What makes a good tack
- The parts are aligned before you tack.
- The tacks are strong enough to hold the joint.
- The plates stay square and do not pull badly out of position.
- The tack placement leaves room for the final weld.
🎬 Video: How to Weld a Butt Joint (video) — https://youtu.be/3-ebx3hWu0Q?si=kV-5_qfTM5SZ3BC7
Requirement 6d
Once the tack welds have locked the butt joint in place, you are ready to complete the joint. Welding both sides helps you practice controlling heat and penetration while keeping the joint from distorting too much.
What your counselor may inspect
- Whether the plates stayed aligned after welding
- Whether the bead ties into both sides of the joint
- Whether slag, spatter, or contamination was cleaned between passes when needed
- Whether the second side shows improved control from the first
🎬 Video: How to Weld a Butt Joint (video) — https://youtu.be/3-ebx3hWu0Q?si=kV-5_qfTM5SZ3BC7
Requirement 6e
A T joint places one piece against another at roughly a right angle. The weld that usually joins them is a fillet weld. This is a very common joint shape in fabrication because brackets, frames, and supports often meet this way.
Why the inspection happens before the full weld
The tack stage is where your counselor can still help you fix fit-up problems. If the pieces are not square or the root area is poor, the full weld will only lock those mistakes in place.
What to think about during the fillet weld
- Keep the work angle aimed to reach both members of the joint.
- Watch for equal fusion into both plates.
- Do not rush the corners or the ends.
🎬 Video: Helpful Tips for Tacking and MIG Welding Fillet Joints (video) — https://youtu.be/zFIdiTJxii4?si=5gysckooa-vsCXmT
Requirement 6f
In a lap joint, one plate overlaps another. This setup changes how heat moves through the metal, and beginners sometimes melt the edge of the top piece if they stay too long in one place.
What to focus on in a lap joint
- Make sure the overlap is consistent before tacking.
- Aim the weld so both pieces are fused, not just the top plate.
- Keep your speed steady so the thinner edge does not overheat.
🎬 Video: TIG Welding Basics: Lap Joints (video) — https://youtu.be/0AxiCSe-dCQ?si=uoHqPtfJj9LIGrue
What ties all six tasks together
Req 6 is really about control. Your counselor is not expecting production-shop speed. They are looking for safe setup, careful fit-up, coachable technique, and an understanding of what the weld is supposed to accomplish.
The next requirement zooms out and asks where these skills can lead in the real world — from career paths to the role of the American Welding Society.