Whitewater Merit Badge — Complete Digital Resource Guide
https://merit-badge.university/merit-badges/whitewater/guide/
Introduction & Overview
Whitewater is moving water with attitude. It can be playful, fast, loud, and unbelievably fun—but only if you understand what the river is doing and how to work with it instead of against it. This merit badge teaches you how to read current, paddle with control, communicate with your group, and make smart decisions before small problems become rescues.
Unlike flatwater paddling, whitewater keeps changing under you. The same river can feel friendly one day and serious the next because of rain, temperature, or how much water is flowing through the channel. That is why this badge is as much about judgment and teamwork as it is about strokes and maneuvering.
Then and Now
Then
People have run rivers for as long as they have needed to travel, trade, and explore. Indigenous peoples around the world learned how to read currents, avoid hazards, and build boats suited to local water long before modern recreation paddling existed. Early river travel was mostly about survival and transportation, not sport.
In the late 1800s and early 1900s, river running slowly became a recreation challenge. Explorers, log drivers, and expedition paddlers proved that rough water could be navigated with skill instead of simply feared. Boats were heavier, safety gear was more basic, and a mistake often had bigger consequences because rescue systems were limited.
Now
Modern whitewater paddling combines adventure with far better knowledge about safety, boat design, and rescue technique. Helmets, properly fitted life jackets, float bags, dry bags, throw ropes, and specialized hull shapes all help paddlers stay safer and more in control. River gauges, forecasts, and guidebooks also make trip planning smarter than it used to be.
Even with better gear, the river still demands respect. Cold water can drain strength fast. A lowhead dam can trap even strong swimmers. A simple missed signal can send the next boat into the wrong chute. Today’s paddlers have more tools than ever, but the best tool is still a calm mind backed by solid skills.
Get Ready!
This badge asks you to think like a paddler before you try to paddle like an expert. You will study hazards, practice calm-water control, read moving water, and plan real trips with other people depending on you. If that sounds exciting, good—it should.
Kinds of Whitewater
Intro Rivers
Class I rivers move quickly enough to teach you how current changes your boat without piling on too much risk. You will still find riffles, bends, and easy decision points, but self-rescue is usually straightforward. This is where beginners learn to feel how current pushes a hull.
Skill-Building Rapids
Class II rivers are where whitewater starts to look and feel like true whitewater. You may see clear tongues, small ledges, defined eddies, and waves that require real maneuvering. These rapids are still beginner-friendly when guided well, but they reward attention and punish sloppiness.
Technical Whitewater
As rivers move into higher classes, channels get narrower, waves get taller, hazards become less forgiving, and the number of good moves shrinks. Even though this badge focuses on Class I and Class II water, it is useful to know that whitewater exists on a spectrum. A Scout who respects that spectrum is far safer than one who assumes all moving water is basically the same.
Next Steps
Your first job is to understand hazards, injuries, and the safety systems that protect a group before anyone launches.
Req 1 — Safety Before the Splash
This requirement builds your safety foundation before you start reading rapids or practicing maneuvers. You need to know three things first: what can hurt you on a river, what injuries are most likely, and what safety rules guide the whole trip.
- Requirement 1a covers river hazards and how to avoid them.
- Requirement 1b covers injuries and illnesses common in whitewater.
- Requirement 1c covers the formal safety systems used in Scouting and by American Whitewater.
Requirement 1a
A whitewater river does not have just one kind of danger. Some hazards pin boats. Some drain body heat. Some make it hard to steer. Some turn a small mistake into a rescue. Good paddlers scan for trouble early so they still have choices.
Branches, Trees, and Strainers
A strainer is anything like branches, brush, or a fallen tree that lets water pass through but can trap a person or boat. That is why strainers are so dangerous. The current keeps pushing, but the object does not move.
To anticipate this hazard, watch shorelines, outside bends, and places where high water may have carried wood into the channel. Prevent problems by staying well away from wood piles and avoiding the habit of drifting too close to shore. If you cannot avoid a strainer, get out well upstream and portage.
If someone is being swept toward a strainer, the goal is to avoid going underneath. Swim aggressively and try to climb on top of the obstruction, not through it. In Req 11, you will build the rescue skills that support that response.
Rocks, Ledges, and Pinning Hazards
Rocks shape the river, but they also create wrap points, pinning hazards, and awkward lines. A boat that hits a rock sideways can broach, meaning the current presses the hull broadside against the obstacle. That can stop the boat cold and make escape harder.
To prevent rock problems, keep your eyes up and choose a line before you reach the rapid. Maintain boat angle and momentum instead of drifting sideways into obstacles. If you do hit a rock, stay calm, keep weight where your instructor or trained leader directs, and avoid jumping into moving current unless leaving the boat is clearly the safer choice.
Hydraulics, Holes, and Lowhead Dams
A hydraulic forms when water drops over a ledge and curls back on itself. In the right place, that recirculating water can surf a boat or hold a swimmer. Lowhead dams are especially deadly because they can create a strong, uniform hydraulic across the whole river.
Scout ledges and drops from shore when needed. If you cannot clearly see a safe route, do not guess. Portaging is not failure. It is good judgment.
Wind and Weather Exposure
Strong wind can push a light boat off line, especially on wider rivers or on the quiet pools above and below rapids. A headwind can also tire you out before the technical paddling begins.
Cold water and cold air are another major whitewater hazard because water steals body heat much faster than air. Even on a sunny day, snowmelt-fed rivers can be cold enough to create real danger after a capsize.
Thunderstorms and Lightning
Moving water and open paddles make a bad mix during a storm. Lightning can strike open water, exposed paddlers, or high points along the river corridor. Heavy rain can also raise water levels and change rapids quickly.
At the first sign of thunder or lightning, get off the river as soon as it is safe to do so. Follow the trip leader’s instructions, move away from the water’s edge, and wait until the storm has fully passed before resuming. The Whitewater pamphlet’s Safety Afloat guidance also reminds paddlers to wait at least 30 minutes after the last thunder or lightning before going back on the water.
Hazard Scan Before You Launch
Ask these questions before the first paddle stroke- What is in the current? Look for trees, brush, undercut rocks, and obvious strainers.
- What is the water level doing? Recent rain or dam release can change the run from familiar to serious.
- What is the temperature risk? Think about both air and water, not just whether the day feels warm.
- What is the weather trend? Wind and storms matter before you are committed to the river.
- Where is the exit? Know where you can scout, eddy out, or portage if the plan changes.
Requirement 1b
Whitewater first aid starts with prevention. Most river injuries happen because someone was cold, tired, sunburned, dehydrated, underdressed, or moving carelessly around slippery rocks and heavy gear.
Prevention for common river injuries
Dress for water temperature, not just air temperature. Wear sun protection even on cloudy days. Drink regularly before you feel thirsty. Carry boats with a team so one awkward lift does not become a shoulder injury. Keep feet protected with secure river shoes, and step carefully on wet rocks and shorelines.
Symptoms and signs to watch for
Cold-water shock can cause gasping and panic right after immersion. Hypothermia can start with shivering and clumsy movement, then progress to confusion and exhaustion. Heat illness may show up as headache, dizziness, nausea, heavy sweating, or later a hot, dry body and altered behavior. Head, neck, and back injuries can involve pain, numbness, weakness, or loss of normal movement after a hit or awkward fall.
For smaller injuries, learn the pattern: blisters begin as hot spots, cuts bleed and can get dirty fast, sprains and strains cause swelling and pain with movement, and a shoulder dislocation often looks obviously out of place and hurts severely.
First aid priorities on the river
Start with scene safety. You cannot help well if you are also in current, under a boat, or exposed to lightning. Once the scene is stable, handle life threats first—airway, breathing, and severe bleeding. Then protect the injured person from cold and continue assessment.
Requirement 1c
This part names two formal safety systems, so it helps to know what they actually say. Safety Afloat is Scouting America’s boating safety framework. The American Whitewater safety guidelines add whitewater-specific advice about swimming ability, river hazards, helmets, life jackets, and not paddling alone.
The nine points of Safety Afloat
From the Whitewater pamphlet, the nine points are:
- Qualified supervision
- Personal health review
- Swimming ability
- Life jackets
- Buddy system
- Skill proficiency
- Planning
- Equipment
- Discipline
Each one closes a different safety gap. Qualified supervision and skill proficiency make sure people are not attempting water beyond their ability. Planning and equipment prepare the group for weather, route changes, and emergencies. Discipline matters because rules only work when everyone follows them.
Key American Whitewater safety guidelines to know
The Whitewater pamphlet highlights these points from American Whitewater’s safety guidance:
- Be a competent swimmer.
- Wear a life jacket.
- Wear a solid, correctly fitted helmet.
- Do not boat out of control.
- Be aware of river hazards.
- Avoid broaching.
- Avoid boating alone.
Those guidelines are more specific to rapids. They focus on the reality that moving water adds rocks, holes, strainers, pinning hazards, and fast-changing conditions.
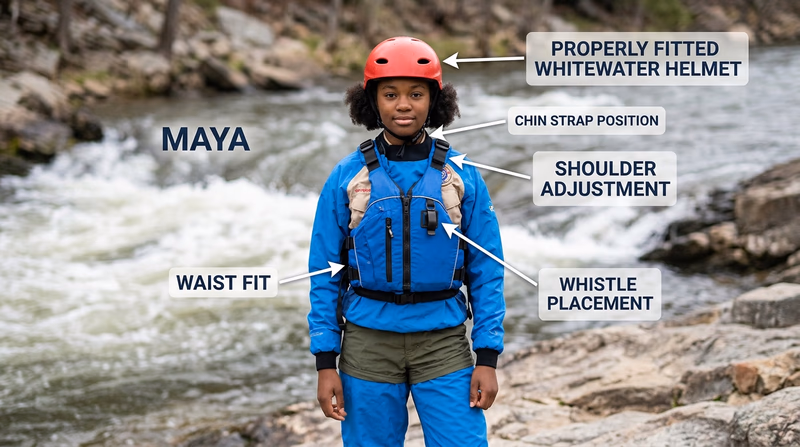
Why life jackets and helmets are non-negotiable
A life jacket does not just help weak swimmers. In whitewater, even a strong swimmer can get stunned, tired, cold, or separated from the boat. A properly fitted U.S. Coast Guard–approved life jacket keeps your airway higher and buys time for self-rescue or team rescue.
A helmet protects you from rocks, paddles, and the boat itself. The Whitewater pamphlet notes that properly fitted helmets must be worn when paddling rivers with Class II rapids or higher. That makes sense because even a simple flip can swing your head into something hard.
What your counselor wants to hear
Use these points when discussing Safety Afloat and river safety rules- Name the systems: Safety Afloat gives the overall framework; American Whitewater adds whitewater-specific guidance.
- Explain the purpose: These rules reduce predictable risks before the trip starts.
- Connect rules to real hazards: Buddy system, helmets, life jackets, and planning all matter because rivers change fast.
- Show judgment: Good paddlers follow the rules even when the rapid looks easy.
The rest of this guide keeps building on these ideas. In Req 2a, you will learn to recognize what the river surface is telling you before you commit to a line.
Req 2a — River Features at a Glance
Reading whitewater is like reading a moving map. The shapes on the surface tell you where the current accelerates, where it slows, where the bottom is shallow, and where the consequences get more serious. If you can sketch the flow lines correctly, you are proving that you understand what the water is doing before your boat reaches it.
Features that usually point to the safest route
An upstream V forms when water splits around an obstacle and then rejoins below it. The point of the V aims upstream, and the open part of the V points downstream. That usually marks a deeper tongue of water and often shows the cleaner line through a rapid.
An eddy is a calm or slower-moving pocket beside the main current, usually behind a rock or along the bank. The boundary between the main current and the eddy is the eddy line. That line matters because it can grab the bow or stern when you cross it.
A riffle is a shallow, broken section where small waves or ripples show that the bottom is rougher and the current is speeding up over rocks. Riffles are often easy to read, but they can still hint at where the channel is deeper.
Features that warn you to look harder
A downstream V points downstream and often signals a rock, hole, log, or other obstruction. Think of it as the opposite of the clean tongue. It tells you water is piling around something instead of opening into a safe lane.
A horizon line appears where the river seems to disappear. That means the water is dropping away from your sight line. Sometimes it is a mild ledge. Sometimes it hides a bigger rapid. Either way, a horizon line tells you that you may need to scout before continuing.
A ledge is a shelf-like drop in the riverbed. A drop is a more obvious descent where water loses elevation. These can create waves, hydraulics, or both below them.
A hydraulic forms when water curls back toward the drop after pouring over it. On the surface, it may look like a pile or a foamy line. Underneath, the current may be recirculating.
Features shaped by depth and channel shape
A river bend changes speed across the channel. The outside bend is often faster and deeper because the current scours the bank. The inside bend is often slower and shallower.
Shallows usually show themselves through smaller standing ripples, exposed rocks, lighter-colored bottom, or spread-out current. They are not automatically dangerous, but they can grab a hull, force you off line, or leave you scraping instead of paddling.
Current at different depths matters because surface water and deeper water do not always move at the same speed. Friction with the riverbed slows the lower water, while faster surface current can push your boat differently than your paddle expects. That is one reason edging and angle control matter so much.
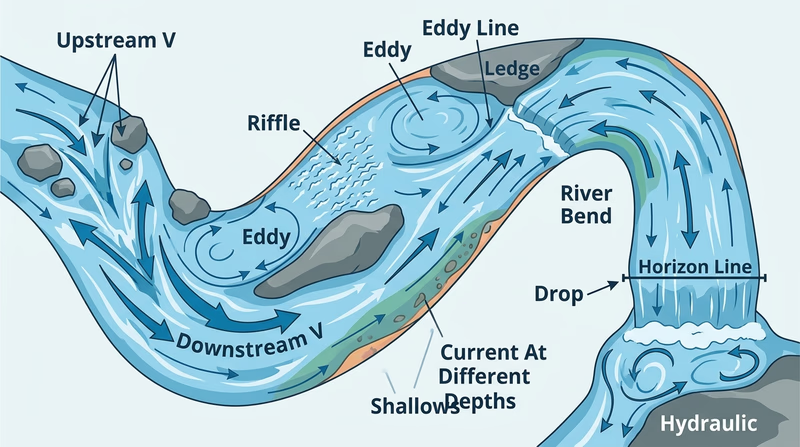
How to sketch a rapid
A simple order for drawing the current- Mark the main tongue first: Show the strongest current heading downstream.
- Add obstacles next: Rocks, bends, and ledges explain why the current changes shape.
- Show calm water pockets: Eddies belong behind sheltering obstacles or along slower margins.
- Indicate danger zones: Downstream Vs, hydraulics, and hidden drops should stand out.
- Check your logic: If your arrows do not match the shape of the riverbed, redraw them.
In Req 2b, you will zoom in on one of the river’s most recognizable features: whitewater waves.
Req 2b — How Whitewater Waves Form
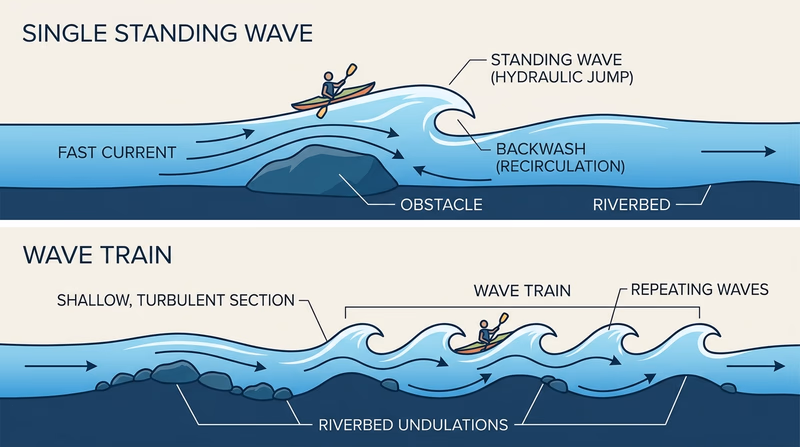
A whitewater wave forms when fast-moving water is forced to rise, pile up, and then fall again. Usually that happens because the current is being pushed over a shallow spot, squeezed between obstacles, or dropping over an uneven riverbed. The water wants to keep moving downstream, but the bottom and channel shape force it into a repeating shape you can see from the surface.
How standing waves form
A standing wave stays in one place even though the water itself is moving through it. That can sound strange at first. Think of it like a flag flapping in the wind: the flag stays attached in one spot, but the air keeps moving past it.
On a river, a standing wave often forms when current hits a rock shelf, a ledge, or a sudden rise in the bottom. The water piles up, crests, and drops. New water keeps replacing it, so the wave shape remains roughly fixed in the rapid.
Standing waves can be friendly or serious. Small ones may simply bounce the boat. Larger ones can slow you, turn your bow, fill an open canoe, or hide holes behind them.
How wave trains form
A wave train is a series of standing waves lined up one after another. This usually happens when the current stays fast over a longer stretch of uneven bottom. Instead of one rise and fall, the river repeats the pattern several times.
Wave trains matter because they can wear out a paddler’s balance and timing. A boat that enters crooked may get knocked more off line with each wave. A boat that enters with speed and the right angle often rides through much more cleanly.
What changes the size and shape of waves
Several factors affect what kind of waves you see:
- Current speed: Faster water usually builds steeper, more powerful waves.
- Depth: Shallower water often forces the surface to react more sharply to the bottom.
- Obstacle shape: Rounded rocks, shelves, and narrow channels all change the flow differently.
- Flow level: More water can wash out some features and make others bigger or more retentive.
That last point connects directly to Req 5, where you will think about how river level can change a run’s classification.
In Req 2c, you will connect river reading to boat control by learning how edging helps you cross current cleanly.
Req 2c — Edge Control in Current
Edging means tipping the boat while keeping your upper body balanced over the hull instead of flopping sideways with it. That one skill makes eddy turns cleaner, ferries smoother, and sudden catches less likely. In moving water, the current reacts to the shape of the hull, so a small change in boat angle can completely change what happens next.
Requirement 2c1
Boat edge when entering and exiting an eddy
When crossing an eddy line, edge the boat so the current meets the hull cleanly instead of grabbing the upstream edge and flipping you. In plain language, you want the downstream edge of the hull slightly raised when it might catch current.
Why edging matters at the eddy line
The eddy line is a seam between water moving in different directions or at different speeds. If your boat hits that seam flat, the current can shove the bow or stern unpredictably. If the wrong edge is buried, the current can catch it and roll the boat.
How to do it without leaning your body
Keep your head centered over the boat. Let the boat tilt under you by using your hips and knees, not by throwing your shoulders out over the water. Think “boat moves, body stays balanced.” That gives you more stability and makes it easier to keep paddling.
Requirement 2c2
Boat edge when ferrying downstream and upstream
A ferry is a controlled crossing from one side of the river to the other while the current carries you downstream to some degree. Your angle to the current and your hull edge work together. If either one is wrong, you lose the ferry.
Why edging matters during a ferry
During a ferry, current presses strongly against the side of the boat. The right edge helps the hull slice across the current instead of being shoved broadside. The wrong edge can catch and flip the boat faster than many beginners expect.
How to do it without leaning your body
Set your ferry angle first, then engage a modest edge using your hips. Keep your torso upright and active. Paddle with purpose, but do not over-muscle it. The goal is to let the hull work with the current rather than fighting every ounce of water by brute force.
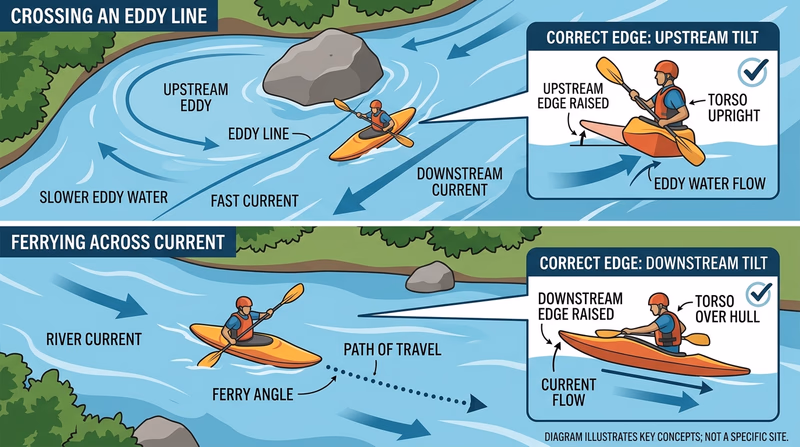
Body position for edging
What to remember when the water starts pushing back- Head over the boat: Stability starts at the top.
- Use hips and knees: They tilt the hull without collapsing your posture.
- Keep paddling: Momentum helps the boat finish the move.
- Look where you are going: Your body often follows your eyes.
If you want a clean eddy turn or ferry later in Req 10, this is one of the quiet fundamentals doing most of the work.
Req 2d — Scout, Portage, Decide
Good whitewater judgment is often simple: if you do not know what is around the bend, do not charge into it. Scouting means stopping to gather information before committing your boat to a rapid. Portaging means carrying your boat around a hazard instead of running it. Both are signs of skill, not fear.
When to scout from shore
Scout from shore when you cannot clearly see the whole rapid, when a horizon line hides what comes next, when a ledge or drop may create a dangerous hydraulic, when wood or other hazards are visible, or when the water level is different from what the group expected. Shore scouting lets you slow down, discuss lines, and identify backup options.
Ashore is also the best place to scout when the consequences of a mistake are high. If a bad line would send you into a strainer, undercut rock, lowhead dam, or long swim through multiple hazards, get out and look first.
When to read while on the river
Not every rapid needs a full shore scout. On familiar Class I or easy Class II water, paddlers often read features from the boat while staying in control. That means spotting tongues, eddies, downstream Vs, and horizon lines early enough to adjust.
Reading on the river works only if you still have room and time to change the plan. If you are too close to the move, it is no longer reading—it is reacting.
How to scout effectively
Start from a safe place where you can see as much of the rapid as possible. Trace the main flow. Identify the clean line, then the hazards, then the recovery options such as eddies or calm water below the move. Talk through where the group will go, who leads, what signals will be used, and where people should be positioned if a rescue becomes necessary.
What to look for while scouting
Focus on these questions before making the run- Where is the main current going? Find the tongue first.
- What could trap a swimmer or boat? Look for wood, rocks, holes, and pin points.
- What is the clean line? Choose a route, not just a general direction.
- What is Plan B? Identify eddies, alternate lines, or the portage path.
- How will the group communicate? Agree on signals before anyone launches.
When to portage
Portage when the rapid is beyond the skill level of the least-prepared paddler, when hazards are too severe for the group’s experience, when cold water or bad weather increases the consequences, when the line is unclear, or when the route includes a feature that should simply not be run, such as a lowhead dam.
How to portage well
Land early in a stable spot, well above the hazard. Secure loose gear before carrying the boat. Move as a team if the bank is steep, muddy, or cluttered. Choose a route that keeps people away from slippery edges and does not send them through thick brush where boats can snag.
The next requirement asks you to choose the boat type you will use for the rest of the badge. That choice matters because canoe and kayak skills build on different foundations.
Req 3 — Build on Your Paddling Base
You must choose exactly one option from this requirement. This is really a commitment point: pick the craft you will use for the badge, make sure you have already earned the matching flatwater badge, and then prove that your core strokes are ready for moving water.
Your Options
- Req 3a — Canoe Skills Check: Review canoe strokes and maneuvers from the Canoeing merit badge so your counselor can see that you already have dependable boat control. This path is for Scouts completing Whitewater in either a tandem or solo canoe.
- Req 3b — Kayak Skills Check: Review strokes and maneuvers from the Kayaking merit badge so you can build whitewater technique on a solid kayak foundation. This path is for Scouts completing Whitewater in a solo kayak.
How to Choose
Choosing your craft path
Think beyond what looks coolest in the photo- Previous training: Choose the path that matches the merit badge you have already earned—canoeing or kayaking.
- Boat feel: Canoes offer more open space and different paddle mechanics; kayaks offer closer body contact and quicker edging response.
- What you will gain: Canoe paths build teamwork or solo open-boat control; the kayak path sharpens fast hull response and decked-boat handling.
- What comes next: Your choice determines which calm-water strokes and braces you will practice in Req 4.
Once your craft path is set, the next pages help you sharpen the exact boat-control foundation your counselor expects.
Req 3a — Canoe Skills Check
Whitewater canoeing assumes you already know how to move the boat on purpose. Your counselor is not looking for fancy freestyle paddling here. They want to see that your flatwater and basic moving-water canoe foundation is solid enough that the rest of the badge can build on it safely.
Review the strokes that control direction, correction, and support. Make sure you can paddle forward cleanly, turn with intention, stop drift before it grows, and stay calm when the canoe tips or catches current. If you are shaky on the basics, whitewater makes those weak spots obvious fast.
What to polish before the demonstration
Focus on control, not speed- Forward and turning strokes: Make the canoe go where you choose without wandering.
- Correction strokes: Show that you can hold a straight line without wasted motion.
- Boat angle awareness: Know how the bow and stern react when current starts helping or resisting.
- Stability skills: Stay balanced and relaxed instead of stiff and panicky.
This requirement also sets up Req 4, where your canoe option asks for more specific whitewater control strokes on calm water.
Req 3b — Kayak Skills Check
A whitewater kayak gives you more contact with the boat than an open canoe, but that does not make the basics optional. Your counselor wants to see that you already understand forward power, turning, edging, support strokes, and safe recovery habits before you add rapids to the picture.
Because kayaks respond quickly, sloppy technique also shows up quickly. If your torso rotation is weak, your strokes will be short and ineffective. If your edging is off, the hull may skid or catch in ways you did not expect. This requirement is your chance to prove that your kayaking foundation is ready for moving water.
Kayak skills to review
Prepare before your counselor watches- Forward stroke efficiency: Use torso rotation, not just your arms.
- Turning and steering: Be able to place the bow and stern where you intend.
- Support strokes: Braces should feel like recovery tools, not desperate reactions.
- Wet-exit confidence: If you flip, you should know what to do without freezing.
Once you choose your craft and confirm your base skills, you are ready for the calm-water practice track in Req 4.
Req 4 — Pick Your Practice Track
You must choose exactly one option from this requirement. This is the last big calm-water checkpoint before the badge shifts fully into reading rapids, rescue, and real river travel. Each option builds the stroke habits you will need once current starts pushing on the hull.
Your Options
- Req 4a — Tandem Canoe Control: Practice bow strokes, stern strokes, and braces used by a two-person canoe team. You will learn how tandem partners divide jobs and keep the boat responsive.
- Req 4b — Solo Canoe Control: Practice a full set of solo open-canoe control strokes plus braces. This path strengthens precision because one paddler must create both power and correction.
- Req 4c — Solo Kayak Control: Practice draw, rudder, sculling draw, and braces in a kayak. This path sharpens edging, support, and fast directional control in a decked boat.
How to Choose
Choosing your practice track
Match the track to the craft you will actually use for the badge- Tandem canoe: Best if your whitewater work will happen in a two-person canoe where bow and stern jobs are different.
- Solo canoe: Best if you will paddle an open boat alone and need to combine steering, support, and power yourself.
- Solo kayak: Best if you will earn the badge in a kayak and want skills that match a lower, more connected hull.
- What you will gain: Each track teaches calm-water moves that become rescue-prevention skills once current is involved.
Req 4a — Tandem Canoe Control
Work through each child requirement below in order. A tandem canoe only feels smooth when bow and stern paddlers understand their separate jobs and communicate well.
What You’ll Complete
- Req 4a1 — Bow Strokes for Tandem Canoes: Learn the bow-side control strokes that help the front paddler set angle, reach across the canoe, and influence the line early.
- Req 4a2 — Stern Strokes for Tandem Canoes: Learn the stern-side correction and steering strokes that keep the canoe on course after the bow starts the move.
- Req 4a3 — Bracing a Tandem Canoe: Practice support strokes that stop a wobble from becoming a capsize.
Req 4a1 — Bow Strokes for Tandem Canoes
The bow paddler often makes the canoe’s first conversation with the water. These strokes help the front of the boat move sideways, set angle, or recover before the stern paddler finishes the correction.
Cross forward
The cross forward stroke reaches across the bow without switching hands. It gives quick power on the off side, which is useful when the canoe starts drifting the wrong way and there is no time for a slow correction.
Bow draw and cross bow draw
A bow draw pulls the bow sideways toward the paddle. A cross bow draw does the same thing on the opposite side. These strokes are excellent for pulling the front of the canoe into a tighter line or helping an eddy entry happen sooner.
Bow pry
A bow pry pushes the bow away from the paddle side. It is a smaller correction stroke, but it matters because not every move needs a big pull across the boat.
Sculling draw
A sculling draw is a continuous side-to-side blade motion that keeps drawing the canoe sideways with smooth, sustained control. It is especially helpful when you want steady adjustment instead of a single sharp change.
What your counselor is watching
Signs that your bow strokes are really working- Blade placement: The paddle enters cleanly where it can influence the bow.
- Torso rotation: You reach with your body, not just your arms.
- Balance: The canoe stays stable while you work across the hull.
- Result: The bow actually moves where the stroke says it should.
Req 4a2 — Stern Strokes for Tandem Canoes
The stern paddler is often the closer on a tandem team. These strokes help the back paddler steer, trim angle, and keep the canoe from wandering after the bow initiates the move.
Stern draw
A stern draw pulls the stern sideways toward the paddle. That changes the canoe’s angle and can help line the hull up for the next move.
Stern pry
A stern pry pushes the stern away from the paddle side. It is a key correction stroke when the canoe starts turning too much or drifting off the intended line.
Sculling draw
At the stern, a sculling draw gives sustained sideways correction without needing a series of abrupt strokes. It is useful when you want steady control and a smooth-feeling boat.
Forward with stern pry
This combines forward power with built-in correction. It is one of the most useful tandem habits because it helps the canoe keep moving while staying straight.
Good stern mechanics
What makes these strokes look controlled- Quiet corrections: Small changes work better than dramatic oversteering.
- Forward momentum: The canoe should not stall every time you correct.
- Partnership: Stern corrections should complement what the bow paddler is doing.
- Boat response: The stern should guide the hull, not wobble it.
Req 4a3 — Bracing a Tandem Canoe
Braces are recovery strokes. You use them when the canoe starts tipping farther than you want and you need quick support from the paddle. Practicing them on calm water helps you build reactions before current and waves add stress.
Low brace
A low brace uses the back face of the paddle close to the water surface. It is usually the safer, more common recovery because your elbows stay lower and your body position is stronger.
High brace
A high brace gives stronger support on the power face of the blade, but it must be done with good body position to protect your shoulders. Think torso rotation and hip snap, not muscling the paddle downward with your arms.
Righting pry
A righting pry uses the paddle and gunwale together to help recover balance. In a canoe, it can be a useful support move when the hull is tipping and you need leverage to bring it back under you.
These support skills show up again later in rescues and moving-water maneuvers. If you can stay calm during a wobble, you avoid many swims before they start.
Req 4b — Solo Canoe Control
Work through each child requirement below in order. Solo canoeing demands efficiency because there is no partner to fix a late stroke or add extra power.
What You’ll Complete
- Req 4b1 — Solo Canoe Precision Strokes: Practice the full stroke set needed to drive, correct, and place a solo canoe accurately.
- Req 4b2 — Bracing a Solo Canoe: Practice support strokes that keep the canoe upright when the hull gets knocked off balance.
Req 4b1 — Solo Canoe Precision Strokes
Solo canoeing asks one paddler to do everything a tandem team splits between two people. That is why this stroke set matters so much. You need strokes that create power, change direction, correct drift, and keep the canoe responsive without wasting energy.
The cross forward, bow draw, and cross bow draw help you move the front of the canoe where it needs to go. The stern draw, pry, and stern pry help finish the turn or correct the line. A sculling draw gives sustained sideways control. Forward with stern pry lets you travel and correct at the same time.
What ties these strokes together
All of these strokes work best when you place the blade deliberately and let the hull respond instead of yanking at the water. In a solo canoe, overcorrecting is one of the easiest mistakes to make. If you pile one big correction on top of another, the canoe starts snaking instead of tracking.
Practice goals for solo canoe strokes
What a controlled demonstration looks like- Early corrections: Do not wait until the canoe is far off line.
- Smooth transitions: Move from power to correction without losing balance.
- Reach with rotation: Good torso use makes every stroke stronger.
- Visible effect: Your canoe should change direction for a clear reason.
Req 4b2 — Bracing a Solo Canoe
A solo canoe can feel lively, which is part of the fun and part of the challenge. Braces let you recover when the hull starts tipping too far. On whitewater later, that can be the difference between a quick recovery and an unnecessary swim.
The low brace is usually your first line of defense because it keeps your body in a stronger, safer position. The high brace gives more support in some situations, but shoulder safety matters. The righting pry adds another recovery option using canoe leverage to bring the hull back under you.
What makes a good brace work
A brace is not a long push on the water. It is a quick support moment paired with strong hip action. The paddle helps, but the canoe comes upright because your body re-centers over the hull.
Req 4c — Solo Kayak Control
Work through each child requirement below in order. Kayaks reward subtle edging, torso rotation, and quick support strokes, so this branch is about building clean control before the river adds noise and pressure.
What You’ll Complete
- Req 4c1 — Kayak Directional Control: Practice draw, rudder, and sculling draw strokes that help a kayaker place the boat precisely.
- Req 4c2 — Bracing a Kayak: Practice high and low braces that keep the kayak upright when the hull gets knocked over.
Req 4c1 — Kayak Directional Control
These three strokes help a kayaker shape direction without simply paddling harder forward. They are about placement, control, and keeping the hull aligned with what the current—or future current—will demand.
Bow draw
A bow draw helps pull the front of the kayak sideways. It is useful for entering an eddy, tightening a turn, or moving the bow toward a better line.
Rudder
A rudder stroke helps the stern follow the path you want instead of swinging out. It is especially useful after the kayak has started moving in the correct direction and you want to hold that line.
Sculling draw
A sculling draw creates sustained sideways movement with a smooth, repeated blade motion. It can feel subtle, but it is a powerful control tool because it allows continuous adjustment instead of one big correction.
What makes these strokes effective
Habits to build on calm water- Torso rotation: Powerful, efficient strokes start in the core.
- Blade angle awareness: Small changes in blade angle change the stroke result.
- Upright balance: Let the kayak edge under you without collapsing your posture.
- Clean finish: End each stroke ready for the next move, not tangled up.
Req 4c2 — Bracing a Kayak
A kayak brace is a fast recovery move that uses the paddle to support you while your hips snap the boat back underneath your body. The low brace is the more common and more naturally protected option. The high brace offers stronger support in some situations, but it requires careful shoulder-safe mechanics.
Low brace
The low brace uses the back face of the paddle near the surface. It is quick, compact, and a great first recovery habit because it keeps your arms lower and your posture stronger.
High brace
The high brace uses the power face of the blade and can provide stronger support, but it should never become a wild slap at the water. Your torso and hips do the real recovery work.
You now have the calm-water control base for the rest of the badge. Next you will start classifying rivers and thinking more carefully about how water level changes risk.
Req 5 — Classifying the River
This requirement turns river reading into judgment. You are not just naming features anymore. You are deciding how difficult a real stretch of river is, explaining why, and recognizing how changing flow can raise or lower the challenge.
Requirement 5a
The Whitewater pamphlet describes the International Scale of River Difficulty as a standardized way to compare the difficulty and risks of rapids. It ranges from Class I through Class VI.
- Class I: Fast-moving water with riffles and small waves. Few or no obstructions. Risk to swimmers is slight; self-rescue is easy.
- Class II: Straightforward rapids with wide, clear channels. Some maneuvering may be required, but rocks and medium-size waves are usually easy for trained paddlers to avoid.
- Class III and above: More complex, more powerful, and increasingly serious.
For this badge, your counselor-approved river should fall in the beginner range you can handle safely, usually Class I or Class II. When you apply the scale, do not just guess based on whether the rapid looks exciting. Tie the class to visible features and consequences.
Requirement 5b
Your classification should come from evidence. Factors might include channel width, speed of current, wave size, how many rocks need to be avoided, whether there are clean recovery eddies, how technical the route choice is, and what happens if a paddler swims.
A straightforward Class II rapid usually has a clear line, moderate waves, and room to recover from small mistakes. A more serious rapid may demand precise moves, contain bigger holes or pinning hazards, or leave less margin for error.
Questions that help classify a rapid
Use these when talking through your approved river section- How obvious is the main line? Wide, clear channels usually lower the difficulty.
- How precise do the moves have to be? More technical maneuvering usually raises the class.
- What are the hazards? Rocks, hydraulics, wood, and pin points matter.
- What happens if someone swims? Easy self-rescue suggests lower difficulty than a complicated rescue scenario.
Requirement 5c
Flow level changes everything. The Whitewater pamphlet notes that cold or high water can raise a rapid’s difficulty by one or more levels. More water can make waves larger, holes stickier, and eddy lines sharper. It can also push current faster into rocks, undercut banks, or strainers.
Lower water creates different problems. It may expose more rocks, narrow the useful line, and turn a splashy rapid into a technical maze that demands sharper maneuvering. A section can become less pushy but more precise.
In the next requirement, you will study the signals paddlers use when talking is impossible over the noise of the river.
Req 6 — River Signals That Matter
On a noisy river, normal conversation disappears fast. Water drowns out voices, distance spreads the group out, and paddlers may need an answer right now, not after a long explanation. That is why whitewater groups use a small set of clear, universal signals.
The Whitewater pamphlet says to review river signals before every trip. That makes sense because a signal is only useful if everyone already agrees on what it means.
The key river signals
From the pamphlet’s river-signal section:
- Stop! Raise and lower a paddle horizontally over your head, or hold both arms out at right angles and wave them up and down.
- Help/emergency Give three long whistle blasts while waving your paddle, helmet, or throw rope over your head.
- Are you OK? Raise one arm over your head, bend the elbow outward, and tap your helmet with your fingertips. To answer that you are OK, return the same signal.
- All clear / Come ahead / Run down the center Hold your paddle vertically above your head with the blade flat for visibility.
- Run river left Face upstream after you have run the drop and point your paddle at about a 45-degree angle toward river left.
- Run river right Face upstream after you have run the drop and point your paddle at about a 45-degree angle toward river right.
Why the signals matter
These signals let the lead paddler warn the group, confirm a swimmer’s condition, or direct the next boat toward the safe route. A clean signal can prevent a second paddler from making the same mistake as the first. It can also speed up a rescue because nobody wastes time guessing what is being asked.
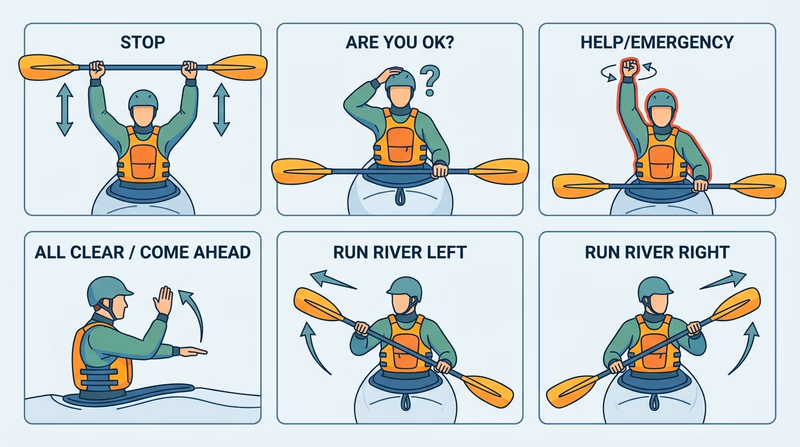
Good signal habits
How to make sure the group actually understands you- Review signals before launch: Do not assume everyone remembers them.
- Use big motions: Small gestures vanish against whitewater and distance.
- Confirm understanding: An OK return signal matters.
- Keep whistle accessible: A life-jacket-mounted whistle is only useful if you can reach it instantly.
The next requirement helps you understand how different boats are designed for moving water, which affects how they respond to all of these signals and river features.
Req 7 — Match the Boat to the Water
You must choose exactly one option from this requirement. Boat design matters because hull shape, outfitting, and materials all affect how a craft turns, resurfaces, carries gear, and handles hits from rocks.
Your Options
- Req 7a — Whitewater Canoe Designs: Learn how moving-water canoes vary in openness, rocker, hull shape, and intended use. This option helps canoe paddlers choose a boat that fits tandem or solo river travel.
- Req 7b — Whitewater Kayak Designs: Learn how kayaks vary by volume, length, maneuverability, and purpose. This option helps kayakers connect boat shape to river style and skill goals.
How to Choose
Choosing the right boat-design page
Pick the option that matches the craft you will actually paddle- Canoe path: Best if you are earning Whitewater in an open canoe and need to understand canoe-specific tradeoffs like tandem space, solo control, and flotation setup.
- Kayak path: Best if you are earning Whitewater in a decked kayak and need to understand how different whitewater kayak styles behave.
- What you will gain: You will be better at selecting appropriate equipment instead of assuming every boat works for every run.
Req 7a — Whitewater Canoe Designs
Whitewater canoes are built to turn, recover, and survive bumps better than typical flatwater canoes. Even so, not all moving-water canoes are meant for the same kind of river use.
Tandem versus solo whitewater canoes
A tandem whitewater canoe carries two paddlers and often more gear. It is useful for shared power, instruction, and trips where teamwork matters. A solo whitewater canoe is smaller and more responsive, but it asks one paddler to manage every correction.
Hull shape and rocker
Rocker means the amount the hull curves upward at the ends. More rocker makes a canoe easier to turn and pivot in current. Less rocker tracks straighter but can feel less nimble in technical water.
Whitewater canoes also tend to have fuller ends and more volume so they resurface well after waves and resist taking on too much water. The hull may be shaped to balance maneuverability with enough stability for learning.
Materials and durability
Whitewater boats need to handle impact. Tough plastics are common because they tolerate rock hits well. Composite materials can be lighter and efficient, but the tradeoff is often cost and how they handle repeated abuse. Material choice affects durability, weight, repairability, and performance.
Purpose-built outfitting
A moving-water canoe may include flotation bags, thigh straps, kneeling setups, and grab points or painters arranged for safety and control. These details are not decoration. They help the paddler stay connected to the canoe and help the canoe stay afloat after a capsize.
How canoe designs differ
Points worth mentioning to your counselor- Number of paddlers: Tandem and solo canoes serve different teamwork needs.
- Rocker and hull shape: More rocker usually means quicker turning.
- Materials: Tougher materials are often preferred for rocky rivers.
- Purpose: Some canoes are designed for river running, some for instruction, and some for more technical play.
Req 7b — Whitewater Kayak Designs
Whitewater kayaks come in several styles because river running is not just one activity. Some kayaks are built for learning and downriver travel. Others are built to surf waves, spin in holes, or handle steeper, more technical runs.
River runners and creek boats
A river runner is often a good all-around whitewater kayak. It balances speed, turning ability, and forgiveness. A creek boat usually has more volume and is designed to resurface well, stay predictable, and handle steeper or more technical water.
Playboats and shorter hulls
A playboat is shorter and built for maneuverability, tricks, surfing waves, and using river features as playgrounds. That makes it exciting, but it may carry less speed and forgiveness than a general-purpose river runner.
Design details that matter
Kayak length, volume, bow and stern shape, and hull profile all affect how the boat behaves. More volume helps the boat pop back up after drops or waves. Shorter hulls turn faster. Different bottom shapes affect edging feel, tracking, and how loose or grippy the kayak feels on the water.
Materials and outfitting
Like whitewater canoes, kayaks are often made from durable plastic because rivers are hard on boats. Whitewater kayaks also use close-fitting outfitting—seat, backband, thigh braces, and foot support—so the paddler can transfer movement directly into the hull.
How kayaks differ
Helpful talking points for your counselor discussion- Purpose: River runners, creek boats, and playboats are designed for different styles of paddling.
- Length and volume: These affect speed, maneuverability, and resurfacing.
- Hull feel: Different shapes change edging response and stability.
- Outfitting: A well-fitted kayak gives better control and safer boat contact.
Req 8 — Pack for a Safe Run
The Whitewater pamphlet gives useful equipment lists because river trips fail in very ordinary ways: people get cold, gear gets soaked, a paddle breaks, somebody scrapes up a hand, or the group has no easy way to help a swimmer. Good packing is really risk management.
Personal equipment
The pamphlet’s personal essentials list includes a life jacket with whistle, helmet, pocketknife, spare clothing, rain gear, water bottles, lunch or snacks, sun protection, map and compass, spare glasses if needed, and a first-aid kit.
Each item solves a real problem. The life jacket and helmet protect you in the water. Spare clothing and rain gear protect you from exposure. Food and water keep your judgment from sliding downhill. Sun protection matters because long days on reflective water can burn you faster than you expect.
Group equipment
The pamphlet also lists common group gear such as spare paddles, flotation, canoe bailers, bow and stern lines for open canoes, water treatment, throw rope, first-aid kit, waterproof fire-starting supplies, repair materials, and camping gear for overnight trips.
Group gear matters because a whitewater team is supposed to solve problems together. One paddler’s dry bag does not replace a shared rescue rope, and one spare snack does not replace a trip plan supported by real equipment.
Keeping gear dry and secure
The pamphlet recommends storing important items in waterproof containers such as dry bags, boxes, buckets, or barrels. It also reminds paddlers to secure gear so it will not fly out during a capsize—but not in ways that create entrapment hazards with loose rope or bad lashing.
Equipment categories to discuss with your counselor
Think in terms of function, not just object names- Wear it: Life jacket, helmet, river shoes, weather-appropriate clothing.
- Drink and eat: Water, treatment method, snacks, and lunch.
- Navigate and plan: Map, route notes, float plan, and communication tools.
- Rescue and repair: Throw rope, first-aid kit, spare paddle, duct tape, and repair items.
- Keep it dry: Dry bags or waterproof containers for critical gear.
In the next requirement, you will put all of that river-reading and equipment planning together by choosing a line through a real Class II section.
Req 9 — Choose Your Line
This requirement is where your earlier skills come together. You are reading surface clues, judging difficulty, spotting hazards, and deciding how the boat should move through the rapid—not after you are in trouble, but before you commit.
Find the main line first
Start by locating the tongue of current that looks deepest and cleanest. That is often the backbone of the run. Then look for the moves required along that line. Does the boat need to start center and move left? Enter an eddy before the next drop? Avoid a downstream V hiding a rock? A good line is more than a destination. It is a sequence.
Identify alternative lines
Class II water often offers more than one reasonable route. That does not mean all routes are equally smart for your group. One line may be faster but narrower. Another may be wider and calmer but require a ferry move earlier. Talking through alternatives shows your counselor that you are not staring at the river as if there is only one answer.
Use river features to your advantage
Eddies can give you a place to stop or reset. A clean tongue can carry you into the rapid’s easiest path. A standing wave may help lift the bow if you hit it straight, while a rock shoulder may help define where not to go. Reading a river well means seeing helpers, not just hazards.
Avoiding the bad spots
Look carefully for strainers near shore, rocks that create downstream Vs, holes below ledges, and places where a missed move would send the boat broadside. The goal is not just “avoid danger” in a vague sense. It is to know exactly where the danger is and how your line stays away from it.
How to explain a Class II line
A simple structure for your counselor discussion- Main line: State the preferred route through the rapid.
- Key moves: Describe where you need to turn, ferry, or hold angle.
- Backup options: Name at least one alternate route or recovery eddy.
- Hazards: Identify what you are avoiding and why.
- Feature use: Explain which current tongues, eddies, or waves help the run.
The next requirement asks you to perform the core moving-water maneuvers that make those line choices possible in the first place.
Req 10 — Core Moving-Water Maneuvers
This requirement is the heart of whitewater boat handling. Every move here shows up on real rivers, often in sequence. The current may be gentle enough for practice, but the habits you build need to be strong enough to survive noise, waves, and pressure later.
Requirement 10a
Launching and landing in moving water
A clean launch starts with the boat pointed and organized before it enters current. A clean landing ends with the boat under control before it hits shore or another paddler.
Why this matters
Bad launches drift sideways into trouble. Bad landings pin boats against shore, tangle paddles, or dump people into shallow moving water.
How to do it well
Choose a calm launch or landing spot when possible, communicate with partners, keep the bow aligned, and be ready with immediate strokes the moment the boat is afloat.
Requirement 10b
Forward control in moving water
Forward travel in current is not just about power. It is about staying on line while the river keeps trying to rotate or slide the boat.
Why this matters
If you cannot travel straight with purpose, every later move becomes harder because you are always starting from a crooked boat.
How to do it well
Use clean forward strokes, early corrections, and enough attention to boat angle that the current does not quietly steal your line.
Requirement 10c
Backpaddling in control
Backpaddling lets you slow down, avoid overshooting an eddy, or reposition without spinning wildly.
Why this matters
A boat that can move backward with control has more options when the first plan changes.
How to do it well
Keep the boat balanced, eyes up, and corrections small so the hull does not snake from side to side.
Requirement 10d
Ferrying upstream
An upstream ferry crosses current while holding a boat angle that gains position against the downstream push.
Why this matters
It helps you move across the river deliberately instead of simply drifting wherever the current chooses.
How to do it well
Set your angle, edge appropriately, keep paddling, and let the hull slice across the current instead of going broadside.
Requirement 10e
Ferrying downstream
A downstream ferry also crosses current, but the boat angle and feel are different because you are moving with more downstream energy.
Why this matters
This move helps set up lines, avoid hazards, and reposition for the next rapid feature.
How to do it well
Choose the angle early, stay balanced over the hull, and avoid flattening the boat right as the current starts pushing harder.
Requirement 10f
Eddy turns
An eddy turn moves the boat from the main current into calm water behind an obstacle or along a sheltered edge.
Why this matters
Eddies are your river parking spots. They let you stop, regroup, scout, or set safety.
How to do it well
Approach with angle, edge correctly as you cross the eddy line, and let the boat carve into the calm water instead of slamming flat into the seam.
Requirement 10g
Peel-outs
A peel-out is the reverse of an eddy turn. You leave calm water and enter the main current under control.
Why this matters
Every time you leave an eddy to continue downstream, you are trusting this move.
How to do it well
Build angle before crossing the seam, keep power on the blade, and edge the hull so the current joins the move instead of flipping or stalling the boat.
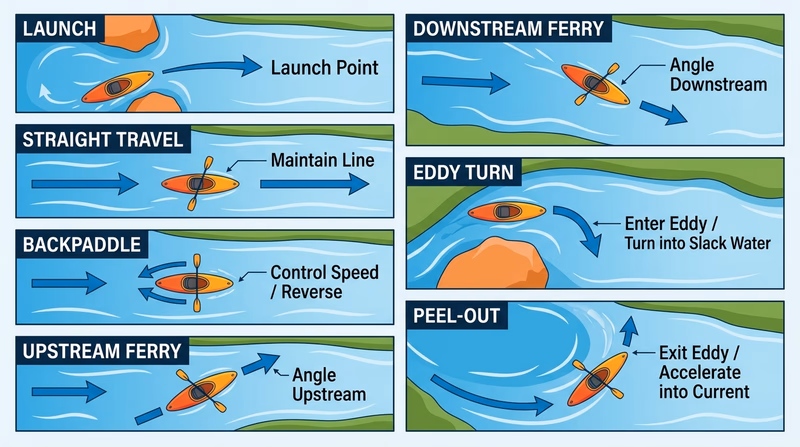
What connects all seven maneuvers
Core habits that make moving-water practice safer- Eyes up: Boats follow attention.
- Angle before speed: Good setup beats frantic correction.
- Edge with your hips: Do not lean your whole body out of balance.
- Keep paddling: Stopping at the seam is usually what creates trouble.
By now you can move a boat where you want it. The next requirement teaches what to do when the run still goes wrong and somebody ends up swimming.
Req 11 — Rescue and Recovery Skills
Rescue skills are what keep a bad moment from becoming a crisis. The Whitewater pamphlet emphasizes a simple priority: people first, gear second. Boats and paddles can be replaced. People cannot.
Requirement 11a
Self-rescue after a capsize
The pamphlet explains that when you capsize, you should make the safety of the people involved your top priority and practice until recovery reactions become automatic.
Procedures to follow
Key steps from the pamphlet include holding onto the boat when you can, staying upstream of it so you are not pinned between boat and rock, swimming aggressively for shore in certain situations, and floating on your back with feet high if you must ride out current before escaping.
Wet exit if necessary
If you are in a kayak or tightly connected solo canoe and must get out, a wet exit needs to be calm and practiced. Get free of the boat cleanly, keep hold of it when possible, and avoid standing in fast water above your knees because foot entrapment is a serious hazard.
Requirement 11b
Throw-rope rescue technique
The pamphlet describes a throw rope as a floating line stored in a throw bag. To use it, keep hold of the free end, get the swimmer’s attention by yelling “Rope!” or using a whistle blast, then throw the bag toward or slightly beyond the swimmer’s head.
Why technique matters
A throw rope only works if the rescuer stays anchored and the swimmer can grab the rope correctly. A wild throw or a tied-off rope can turn help into a new hazard.
Practice habits
The pamphlet specifically encourages practice. If your first accurate throw happens during a real rescue, you waited too long to train.
Requirement 11c
Receiving a throw rope as a swimmer
The swimmer should grab the rope, roll onto the back, hold the rope across the chest and over the shoulder, and let the rescuer bring them in or swing them toward shore.
Why body position matters
That body position helps the swimmer face upstream enough to deal with obstacles while avoiding being jerked into an awkward twist.
Critical safety rule
The pamphlet is clear: do not wrap the rope around a hand or tie it to your body. Just hold on. If you become entangled, a fixed connection is far more dangerous.
Requirement 11d
Where portaging is appropriate
Portage around hazards that exceed the group’s skill, around features with serious consequence, or anywhere the line is unclear and the risk is not worth it.
When to choose portaging
Choose it before the group drifts into the hazard, not after. Early decisions are safer than last-second scrambling.
How to portage well
Land in control above the hazard, organize gear, choose a safe walking route, and move as a team. This is the practical version of the judgment you already studied in Req 2d.
Requirement 11e
How the whitewater buddy system works
The Whitewater pamphlet’s Safety Afloat section says all participants are paired as buddies who stay aware of each other’s situation and are ready to sound an alarm and help immediately. On trips with several craft, each boat should also have a buddy boat.
Why at least three people and three craft matter
In whitewater, one paddler may become the rescuer and another may be the swimmer. A third paddler or craft adds support, carries extra gear, and helps the group avoid becoming a two-person emergency with no backup.
How to apply it on the river
Know who you are watching, who is watching you, and where the nearest support boat is. A buddy system only works when everyone treats it as an active responsibility.

Rescue mindset
A simple order for handling trouble on the river- Protect people first: Ignore loose gear until people are safe.
- Stabilize the scene: Catch eddies, get to shore, and control panic.
- Use practiced signals: Rescue begins with clear communication.
- Choose the safest help: Throw rope, self-rescue, or portage—not whatever looks dramatic.
The final requirement puts everything together in real trip planning and real river time.
Req 12 — Plan and Paddle a Real Trip
This final requirement is the real-world test of the badge. You are no longer practicing isolated pieces. You are planning, paddling, protecting gear, following safety systems, and then honestly evaluating how the trip went.
Requirement 12a
Building the written trip plan
The Whitewater pamphlet calls this a float plan. It should identify the route, put-in and takeout points, schedule, equipment, safety precautions, and emergency procedures.
Why the written plan matters
A float plan forces the group to think through the day before the first paddle stroke. If weather changes, a shuttle fails, or someone gets hurt, the plan gives the group something solid to work from.
How to make it useful
Be specific. “Meet in the morning and paddle downstream” is not a plan. Name times, landmarks, backups, and who is responsible for what.
Requirement 12b
Checking rules and permissions
The Whitewater pamphlet reminds paddlers that many rivers are governed by special rules and permits. Some access points cross private land. Others are controlled by park, state, or federal managers.
Why this matters
A trip can fail before launch if the group shows up where access is restricted, shuttle parking is prohibited, or landowners were never contacted.
How to do it well
Research access early, contact the right land managers, and confirm any permit or permission requirements before trip day.
Requirement 12c
This is where the formal safety systems become visible in the actual plan. You should be able to point to qualified supervision, swimmer ability, life jackets, buddy assignments, equipment checks, emergency planning, and how the group has respected whitewater-specific guidance about hazards, control, and not boating alone.
Requirement 12d
Dry gear is not just about comfort. Wet maps, soaked spare layers, and a drowned first-aid kit can quickly turn into safety problems. The Whitewater pamphlet recommends waterproof containers and thoughtful lashing that keeps gear secure without creating entrapment hazards.
Loading and securing
Put the heaviest gear where it keeps the boat balanced. Secure items so they do not shift or wash out, but avoid sloppy rope arrangements. Every strap and line should have a clear purpose.
Requirement 12e
Reflection matters because paddlers improve by reviewing real results, not by pretending the plan was perfect. Maybe the shuttle timing was too tight. Maybe the water level changed faster than expected. Maybe the gear list was strong but the lunch plan was weak. Honest review is part of becoming a safer trip planner.
Trip debrief questions
Good prompts for your discussion after the run- Did the schedule work? Where did the group gain or lose time?
- Did the access plan hold up? Were put-ins, takeouts, and permissions as expected?
- Did the equipment plan work? What stayed dry, what shifted, what was missing?
- Did the safety systems hold? Were communication, buddies, and rescue readiness actually effective?
- What would you change next time? Improvement is the whole point of the debrief.
After a Scout can plan and complete a real trip safely, the badge is doing what it was meant to do. The final page looks beyond the requirements and into the bigger world of whitewater learning.
Extended Learning
Congratulations
You now know much more than a list of paddle strokes. You know how to study a river, plan a trip, protect your group, and choose safety over ego when the water gets serious. That is the real achievement behind Whitewater merit badge.
If you keep paddling, you will discover that whitewater learning never really ends. Every river teaches something different: timing, humility, rescue habits, weather awareness, and how to trust a team under pressure.
River Stewardship Matters
Whitewater paddlers do not just use rivers—they depend on healthy rivers. Access issues, trash, bank erosion, invasive species, and bad behavior at put-ins can all damage the places paddlers love. Learning good river manners is part of becoming the kind of paddler other groups are glad to see.
A strong stewardship habit is simple: leave access points cleaner than you found them, stay on established paths, respect landowners, and report local rules accurately instead of relying on rumors. If your troop or crew adopts a river section, removes litter, or helps maintain access trails, that is real service to the paddling community.
Reading Water at a Higher Level
As you gain experience, you start seeing more than just obvious waves and rocks. You notice micro-eddies, subtle seams, how different water levels change familiar rapids, and how one calm tongue can set up the entire rest of a run. Advanced river reading is really advanced attention.
One good next step is to compare the same rapid at different levels. Visit when the river is lower, then come back after rain with a qualified adult leader or trained instructor. Ask how the line changes, which features become stronger, and whether the same move still makes sense.
Rescue Skills Beyond the Badge
The badge introduces rescue, but real rescue skill improves through repeated, supervised practice. Throw-rope accuracy, swimmer communication, wet exits, boat-emptying methods, and shore-based rescue positioning all get better when you rehearse them in controlled conditions.
If your council, camp, paddling club, or local instructor offers rescue-focused training, that can be one of the best next investments you make. Rescue practice also builds confidence in a healthy way: not “nothing can happen to us,” but “we know how to respond if something does.”
Planning Longer River Trips
A six-hour whitewater outing is a strong start, but longer trips add new planning layers. Overnight paddling means more gear management, more weather uncertainty, more shuttle complexity, and more attention to camp setup and river access. Multi-day river trips also make pacing more important. A line that feels fine in the first hour may feel very different after a long day of paddling.
If you want to stretch beyond the badge, try helping plan a river overnight with experienced adult leaders. Even if you are not in charge, watching how strong leaders handle shuttle plans, weather calls, and group energy is a great education.
Real-World Experiences
Join a supervised river cleanup
Watch a whitewater slalom or downriver event
Visit a local outfitter or paddlesports center
Practice rescue drills on calm water
Organizations
National organization focused on whitewater river conservation, access, safety, and recreation.
Organization: American Whitewater — https://www.americanwhitewater.org/
Paddlesports organization offering education, instructor development, and skill progression across canoeing and kayaking.
Organization: American Canoe Association — https://americancanoe.org/
Useful for river access rules, protected waterway information, and trip-planning details on many public lands.
Organization: National Park Service — https://www.nps.gov/
Outdoor ethics organization whose principles help paddlers protect river corridors, campsites, and access points.
Organization: Leave No Trace — https://lnt.org/