Wilderness Survival Merit Badge — Complete Digital Resource Guide
https://merit-badge.university/merit-badges/wilderness-survival/guide/
Introduction & Overview
Overview
Wilderness survival isn’t about thriving in the backcountry for months on end—it’s about making smart decisions and staying calm when things go wrong. Whether you’re stranded after a hiking accident, lost in unfamiliar terrain, or caught by sudden weather, survival comes down to three things: knowing what to do, having the right supplies, and keeping your wits about you. This merit badge teaches you the practical skills that can make the difference between a scary situation and a dangerous one.
History: Then and Now
Then: Early Survival Skills
Before GPS, satellite phones, and modern gear, wilderness travelers relied entirely on their own knowledge and preparation. Native peoples and early explorers developed sophisticated survival techniques over generations—reading weather patterns, building shelters from natural materials, finding clean water, starting fires without matches, and signaling rescuers with what little they had. Every Scout learning wilderness skills today builds on centuries of hard-won experience.
Now: Modern Survival Education
Today’s wilderness survival skills blend traditional knowledge with modern understanding. We know far more about hypothermia, dehydration, and first aid than our ancestors did. We have better materials, better understanding of what kills people fastest in the wilderness (usually panic and bad decisions), and better training methods. But the fundamentals haven’t changed: preparation, calmness, and practical know-how keep people alive.
Get Ready!
Earning the Wilderness Survival merit badge means you’ll go deeper into outdoor skills than most Scouts. You’ll learn how to recognize real dangers, build a shelter, treat injuries that could occur miles from help, and signal rescuers. You’ll handle real tools (fire-starting methods, water treatment techniques, first aid supplies) and put your skills into practice. By the end, you’ll understand what real wilderness readiness looks like—and you’ll be far more prepared for any backcountry adventure.
Kinds of Wilderness Situations
Survival situations come in many flavors, and the skills that matter most depend on where you are and what went wrong.
Cold & Snowy Environments
Winter wilderness demands protection from freezing temperatures and snow. Your body loses heat rapidly in cold weather, and hypothermia can set in faster than you’d expect. Survival here depends on building an insulated shelter, staying dry, and managing your body heat. Cold-weather survival also includes knowing how to move safely on snow and ice, and recognizing the signs of frostbite in yourself and others.
Hot & Dry Environments
Desert and arid regions present the opposite problem: heat exhaustion, dehydration, and sun exposure. Shade becomes a survival priority. Water is scarce, so finding or rationing it is critical. The temperature swings between blazing days and freezing nights mean you need skills for both extremes. Navigation can also be harder in featureless terrain.
Wet Environments
Rain, rivers, swamps, and coastlines bring unique challenges. Hypothermia can strike even in mild weather if you’re wet and exposed. Shelter-building materials may be limited or soggy. Water treatment becomes essential because water is everywhere but unsafe to drink. Flash flooding, tides, and swift currents add urgency and danger.
High-Altitude Environments
Mountains bring thin air, rapid weather changes, exposure to wind, and extreme cold at night. Altitude sickness can impair your judgment. Terrain is unforgiving, and help is far away. Shelter materials are scarce at high elevations, and fire-starting becomes harder with limited fuel and oxygen.
Water-Based Environments
Camping on or near water brings hazards like capsizing, hypothermia, and drowning. Survival here includes water rescue skills, staying afloat, and knowing how to signal from water. If stranded on an island or shore, you need shelter from wind and sun, access to fresh water, and a way to attract rescuers.
Transition to Requirements
You’re ready to dive into the skills. Start with understanding the hazards of backcountry travel and how to prevent them—then move through the priorities of survival, building shelters, signaling for rescue, and treating water. Each skill builds on what you learned before, and together they form a complete picture of wilderness readiness.
Req 1a — Backcountry Injuries & Conditions
Backcountry first aid is different from first aid at home. You’re miles from a hospital, cell service may not work, and you can’t just call 911. Your job as a first responder in the wilderness is to stabilize the patient, keep them comfortable, and get help to them—or get them to help. Prevention is even more important: many backcountry injuries are completely avoidable with the right preparation and awareness.
Below are the 13 injury and condition types you need to understand. Each one demands a different response, but they all follow the same principle: assess the situation, manage what you can with what you have, and prioritize getting medical help.
Dehydration
Dehydration creeps up on you. You might not feel thirsty until it’s too late, especially at high altitude or during intense activity. Your body needs water to regulate temperature, deliver oxygen, and keep your brain working—all critical in a survival situation.
Prevention: Drink water regularly, not just when you’re thirsty. Aim for small sips every 15-20 minutes during activity. Avoid alcohol and excessive caffeine, which dehydrate you faster. Wear light-colored clothing to reduce heat stress.
Recognition: Early signs include dark urine, dry mouth, fatigue, and difficulty concentrating. Advanced dehydration brings dizziness, confusion, rapid pulse, and cessation of sweating (ironically, a bad sign).
First Aid: Move the patient to shade and have them drink water slowly. If they can’t keep water down, let them sip small amounts or suck on ice. Cool their skin with water if they’re overheated. Severe dehydration may require IV fluids—get medical help.
🎬 Video: Dehydration: Hiking in the Desert — https://www.youtube.com/watch?v=X-N7fALUncM
Heatstroke
Heatstroke is a life-threatening emergency where your core body temperature rises above 104°F and your body’s cooling system fails. Unlike heat exhaustion, heatstroke damages your organs and can kill you in hours.
Prevention: Don’t push yourself in extreme heat. Take frequent breaks in shade. Wear light, breathable clothing. Drink water constantly—don’t wait until you’re thirsty. Know the early warning signs of heat exhaustion (heavy sweating, weakness, nausea) and back off activity immediately.
Recognition: Heatstroke victims may stop sweating (the body has given up trying to cool itself). They may be confused, aggressive, or unconscious. Their skin is hot to the touch.
First Aid: This is a medical emergency. Cool the patient aggressively—pour cold water over them, immerse them in a cool stream if available, or pack them in ice if you have it. Get emergency help immediately. Don’t assume they’ll recover on their own.
🎬 Video: Diagnosis and Treatment of Heat Stroke — https://www.youtube.com/watch?v=PpHM4DfPZQU
Hypothermia
Hypothermia—a core body temperature below 95°F—is silent and deadly. It can strike in mild weather if you’re wet and windy, and it clouds your judgment so you don’t realize how much danger you’re in.
Prevention: Layer your clothing so you can adjust as you heat up or cool down. Avoid cotton, which traps moisture. Stay dry—wet clothes rob your body heat 25 times faster than air alone. Eat regular meals to fuel your body’s heat production. Never stay in wet clothes.
Recognition: Early signs are shivering, confusion, and clumsiness. Advanced hypothermia brings paradoxical undressing (victims removing clothing despite being cold), slurred speech, slow pulse, and eventually unconsciousness. Shivering may stop, which is actually a very bad sign.
First Aid: Get the patient warm, but gently. Remove wet clothing and replace with dry layers. Wrap them in blankets or a sleeping bag. Warm them from the core outward—warm drinks help, but avoid alcohol. Severe hypothermia patients should be handled carefully (rough movement can trigger dangerous heart rhythms) and evacuated to a hospital.
🎬 Video: Recognize the "Umbles" and Avoid Hypothermia — https://www.youtube.com/watch?v=aDAqWLpHXXU
🎬 Video: Hypothermia — https://www.youtube.com/watch?v=my6JB41apTw
Shock
Shock is your body’s response to severe stress—blood loss, trauma, severe dehydration, or allergic reaction. Your blood pressure drops, organs don’t get enough oxygen, and the patient can die even if the original injury wasn’t fatal.
Prevention: Prevent severe injuries through careful hiking, using proper equipment, and staying aware of hazards. If injury occurs, manage it quickly—control bleeding, immobilize fractures, and keep the patient calm.
Recognition: Shock victims are pale, cold, clammy, and anxious. Their pulse is rapid and weak. They may be confused or unconscious. Breathing is shallow and fast.
First Aid: Lie the patient flat with legs elevated (unless head or spinal injury is suspected). Keep them warm with blankets. Control any bleeding. Keep them calm and reassured. Don’t give them food or drink (they may need surgery). Evacuate to medical help urgently.
🎬 Video: Shock — https://www.youtube.com/watch?v=BLfFYFr7sWY
🎬 Video: Shock and Bleeding — https://www.youtube.com/watch?v=V4R9GSah93g
Blisters
Blisters are fluid-filled pockets that form when skin is rubbed repeatedly. They’re painful and can become infected, making hiking impossible.
Prevention: Wear properly fitting boots that you’ve broken in. Wear moisture-wicking socks (wool or synthetic, not cotton). Change socks immediately if they get wet. Keep feet dry. If you feel a hot spot (early blister), stop and tape it before a full blister forms.
Recognition: A blister is a fluid-filled bubble on the skin, usually on heels, toes, or ball of the foot. It’s tender to the touch.
First Aid: Don’t pop the blister unless it’s so large it prevents walking. If you must drain it, use a sterilized needle, make a small hole, and press out fluid gently. Cover with antibiotic ointment and a bandage. Keep it clean to prevent infection.
How to Prevent and Treat Blisters Dermatological guidance on blister prevention and treatment. Link: How to Prevent and Treat Blisters — https://www.aad.org/public/everyday-care/injured-skin/burns/prevent-treat-blistersEye Injuries
A foreign object in your eye, a scratch to the cornea, or exposure to harmful substances can damage your vision—and in the backcountry, you can’t just pop into an eye clinic.
Prevention: Wear sunglasses or a hat with a brim. Be careful around campfire smoke. Wash hands before touching your eyes.
Recognition: Pain, redness, tearing, light sensitivity, and blurred vision all indicate eye injury. Something may be visibly stuck in the eye.
First Aid: For a foreign object, rinse the eye gently with clean water or saline solution. Blink repeatedly to help flush it out. Don’t rub. If the object won’t come out, cover the eye loosely and evacuate. For chemical exposure, flush with water for at least 15 minutes. For a scratched cornea, cover the eye and seek medical help.
5 Ways To Safely Remove Something Stuck In Your Eye Video demonstrating safe techniques for removing foreign objects from your eye. Link: 5 Ways To Safely Remove Something Stuck In Your Eye — https://www.youtube.com/watch?v=uJFZPFsHcCEAnkle and Knee Sprains
A twisted ankle on a trail miles from the trailhead can turn a day hike into an evacuation. Sprains range from minor (hurts but you can walk) to severe (torn ligaments, can’t put weight on it).
Prevention: Wear boots with ankle support. Watch where you’re stepping. Stay aware of trail conditions. Strengthen your ankles with balance exercises at home.
Recognition: Sprains cause sudden pain, swelling, and bruising. The joint feels unstable. Severe sprains make weight-bearing impossible.
First Aid: RICE protocol: Rest, Ice (if available), Compression (wrap with elastic bandage), Elevation. Take over-the-counter pain relievers if you have them. Immobilize the joint to prevent further damage. If the person can’t walk out, you may need to call for rescue or fashion a stretcher.
🎬 Video: First Aid for Ankle Sprains — https://www.youtube.com/watch?v=yrvqNh2q6Tc
Bug Bites: Chiggers, Ticks, Mosquitoes, and Biting Gnats
Tiny bugs cause outsized misery. Chiggers and ticks burrow into skin; mosquitoes carry disease; biting gnats swarm in clouds. Understanding each helps you prevent and treat their bites.
Chiggers
Chiggers are larvae of mites that burrow into skin and feed on skin cells, causing intense itching. They’re most active in warm months in grassy, brushy areas.
Prevention: Tuck pants into socks. Use insect repellent on exposed skin and clothing. Shower after hiking and wash clothes in hot water.
First Aid: Don’t scratch (infection risk). Apply hydrocortisone cream and antihistamine. Nail polish or sulfur powder smothers them, but they’ve usually already burrowed deep. Itching lasts weeks—you just have to wait it out.
🎬 Video: Chiggers 101 — https://www.youtube.com/watch?v=d6hneOG2RLA
Ticks
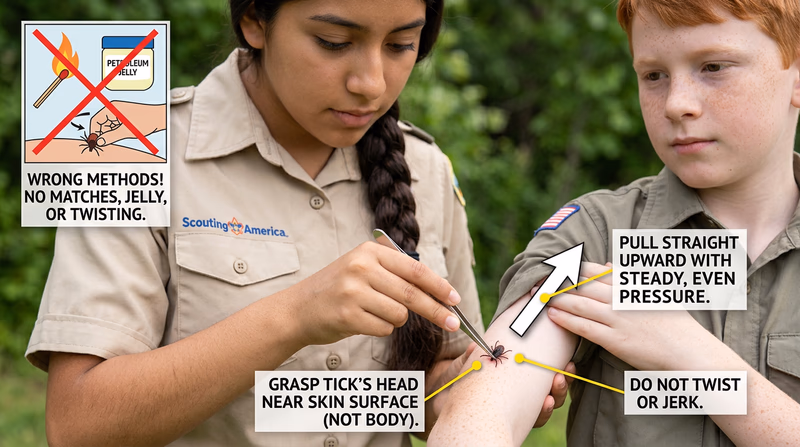
Ticks attach to skin and feed on blood. Some carry Lyme disease or other infections. Removal is crucial—ticks must be removed carefully to avoid leaving mouth parts in the skin.
Prevention: Wear long sleeves and pants. Tuck pants into socks. Check yourself and others for ticks after hiking. Use repellents rated for ticks.
First Aid: Grasp the tick with tweezers as close to the skin as possible and pull straight out steadily. Don’t twist or jerk. Don’t use fire, petroleum jelly, or nail polish—these can make the tick regurgitate infected material into the wound. Save the tick in a plastic bag for identification if the person develops symptoms later.
Mosquitoes
Mosquitoes transmit diseases like West Nile Virus and dengue fever. Avoid them if possible; treat bites if not.
Prevention: Use insect repellent with DEET (20-30% for adults). Wear long sleeves and pants, especially at dawn and dusk when mosquitoes are most active. Camp away from standing water.
First Aid: Avoid scratching. Apply hydrocortisone cream or calamine lotion for itching. Antihistamine tablets help if bites are severe.
Preventing and Treating Mosquito Bites Prevention strategies and itch relief for mosquito bites. Link: Preventing and Treating Mosquito Bites — https://www.aad.org/public/everyday-care/injured-skin/bites/prevent-treat-bug-bitesBiting Gnats
Biting gnats (no-see-ums) are tiny and hard to see, but their bites itch intensely. They swarm near water, especially at dawn and dusk.
Prevention: Insect repellent helps, but they’re persistent. Head nets and fine-mesh clothing offer the best protection. Smoke from a campfire can repel them.
First Aid: Same as mosquitoes—avoid scratching, use hydrocortisone cream or antihistamine. The itching is intense but temporary.
🎬 Video: Biting Gnats — https://www.youtube.com/watch?v=QazaIwbtZHs
Bee Stings
Most bee stings are just painful annoyances, but for allergic individuals, they’re life-threatening emergencies.
Prevention: Don’t swat at bees. Wear neutral colors (bees are attracted to bright colors). Don’t use perfumed soaps or lotions. Avoid wearing flowers or floral patterns. If you encounter a hive, back away slowly and quietly.
Recognition: Normal sting: sharp pain, redness, swelling. Allergic reaction: difficulty breathing, swelling of lips/throat, hives, dizziness. Anaphylaxis is a medical emergency.
First Aid: Remove the stinger by scraping (don’t squeeze tweezers, which can inject more venom). Wash the area. Apply ice and take antihistamine or pain reliever. For allergic reactions, use an epinephrine auto-injector (EpiPen) if available and call for emergency help immediately.
🎬 Video: How to Treat a Bee Sting — https://www.youtube.com/watch?v=01Po5RTNfhs
Spider Bites
Most spiders are harmless, but two North American spiders are medically significant: black widows (shiny black with red hourglass marking) and brown recluse (brown with violin-shaped marking on back).
Prevention: Shake out sleeping bags and shoes before use. Wear gloves when moving logs or rocks. Don’t reach into dark spaces without looking first.
Recognition: Most spider bites cause mild redness and itching. Black widow bites cause severe muscle pain, cramping, and sometimes numbness. Brown recluse bites cause tissue damage—the bite site blackens as flesh dies.
First Aid: Clean the bite. Apply ice. For severe bites or unknown spiders, evacuate to medical help. There are antivenins for black widow and brown recluse bites if available at a hospital.
🎬 Video: Black Widow and Brown Recluse Spider Bites — https://www.youtube.com/watch?v=fiV2bYzWH-o
🎬 Video: Black Widow vs. Brown Recluse Spider Bites — https://www.youtube.com/watch?v=cfh7XOc_hgc
Scorpion Stings
Scorpions are found in warm, dry regions of the southwestern United States. Most stings are painful but not dangerous; a few species have venom that causes serious symptoms.
Prevention: Wear shoes and gloves. Shake out sleeping bags and clothing before use. Check boots before putting them on. Be careful when moving rocks or firewood.
Recognition: Local reaction: pain, redness, swelling at the sting site. Systemic reaction: numbness around the mouth, difficulty swallowing, muscle twitches, or respiratory distress (rare but serious).
First Aid: Wash the sting site. Apply ice. Take pain relievers as needed. If the sting causes numbness, swelling of the throat, or difficulty breathing, evacuate to medical help.
Scorpion Stings—Symptoms and Causes Medical overview of scorpion sting severity and treatment. Link: Scorpion Stings—Symptoms and Causes — https://www.mayoclinic.org/diseases-conditions/scorpion-stings/symptoms-causes/syc-20353859Wild Mammal Bites
Rabies is the main concern with wild mammal bites. Raccoons, bats, and foxes are common rabies vectors in North America.
Prevention: Don’t approach or feed wild animals. Store food securely to avoid attracting animals to camp. Don’t reach into spaces where animals might hide.
Recognition: Bite wounds vary widely depending on the animal. Rabies symptoms appear weeks or months after infection and are nearly always fatal once symptoms appear.
First Aid: Wash the wound thoroughly with soap and water for at least 5 minutes. Apply antibiotic ointment. Cover with a bandage. Get medical help immediately—rabies post-exposure prophylaxis (shots) is effective only if given before symptoms appear. Document what animal bit you, if possible.
🎬 Video: Treatment of Animal and Human Bites — https://www.youtube.com/watch?v=RSJzuk226RI
Venomous Snake Bites
Only a handful of venomous snakes live in North America (rattlesnakes, cottonmouths, copperheads, and coral snakes). Most bites happen when people try to catch or kill the snake.
Prevention: Watch where you step and place your hands. Wear boots and long pants. Make noise while hiking—snakes usually flee if they hear you coming. Never approach a snake.
Recognition: Fang marks, pain, swelling, discoloration, and tissue damage indicate a bite. Some bites are “dry” (no venom injected), but assume all snake bites are venomous until proven otherwise.
First Aid: Keep the limb immobilized and at heart level. Remove jewelry (swelling will trap it). Clean the wound gently. Get emergency medical help immediately—antivenom is the only effective treatment and must be given within hours. Don’t apply tourniquets, cut the wound, or try to suck out venom.
Venomous Snake Bites Red Cross guidance on snake bite first aid and prevention. Link: Venomous Snake Bites — https://www.redcross.org/take-a-class/resources/learn-first-aid/venomous-snake-bitesReq 1b — Scout Essentials & Survival Kits
The Scout Essentials are 10 pieces of gear that every Scout should carry on every outing, from day hikes to multi-day camps. They’re not fancy or expensive—they’re the foundation of outdoor safety. Each one addresses a real hazard you might face, and together they dramatically improve your chances of surviving a bad situation.
The 10 Scout Essentials
1. Appropriate Clothing
Cold kills faster than hunger or thirst. Hypothermia can strike even in mild weather if you’re wet and exposed. Appropriate clothing means layers you can adjust, moisture-wicking fabrics (wool or synthetic, not cotton), and a rain jacket to stay dry.
How it addresses survival: Keeps your core temperature stable. Protects against heat loss and sun exposure. Gives you options for any weather change.
2. Sun Protection
Sunburn isn’t just uncomfortable—severe sunburn is a medical emergency. Sun exposure also accelerates dehydration. Sunscreen, a hat, and sunglasses protect your skin and eyes.
How it addresses survival: Prevents sunburn, skin cancer, and eye damage. Reduces heat stress and dehydration.
3. First Aid Kit
A personal first aid kit should include bandages, antibiotic ointment, pain relievers, antihistamine, hydrocortisone cream, tweezers (for splinters and ticks), and any personal medications. It doesn’t need to be huge—a small plastic bag works fine.
How it addresses survival: Treats cuts, blisters, sprains, insect bites, and other minor injuries. Prevents infection. Provides pain relief and allergy management.
4. Knife or Multi-Tool
A sharp knife or multi-tool is incredibly useful. You use it for food prep, gear repair, fire-building, shelter-building, and first aid.
How it addresses survival: Enables you to build shelter, prepare firewood, create tools, repair gear, and manage camp tasks. A knife is one of the most versatile survival tools.
5. Light (Flashlight or Headlamp)
Darkness falls suddenly in the wilderness. Without light, you can’t find your way, treat injuries, or navigate after dark. A headlamp is better than a flashlight because it keeps your hands free.
How it addresses survival: Lets you navigate in darkness. Makes it possible to treat injuries or build shelter after sunset. Useful for signaling rescuers.
6. Fire-Starting Supplies
Matches, a lighter, or a fire steel gives you the ability to start a fire. Fire provides warmth, allows you to cook and purify water, and boosts morale.
How it addresses survival: Enables you to stay warm. Makes water safe to drink. Provides psychological comfort and helps rescuers locate you at night.
7. Repair Kit and Tools
Duct tape, cord, and a needle and thread let you repair gear in the field. A broken tent, torn backpack, or snapped bootlace can become a major problem if you can’t fix it.
How it addresses survival: Keeps gear functional. Lets you create improvised tools or repairs. Can save a trip from becoming a disaster.
8. Nutrition
Energy bars, nuts, or jerky give you calories when you need them. Even a day hike can take longer than expected; you need fuel to keep going.
How it addresses survival: Maintains your energy and mental function. Prevents hunger-related fatigue and poor decision-making. Boosts morale.
9. Hydration (Water and Water Treatment)
Carrying water and a way to treat water (tablets, filter, or knowledge of boiling) ensures you can stay hydrated and avoid waterborne illness.
How it addresses survival: Prevents dehydration, which clouds judgment and weakens you. Ensures you can treat water found in the wilderness.
10. Navigation (Map and Compass)
A map and compass (and knowledge of how to use them) let you navigate if you get lost. GPS is useful but batteries die; map and compass don’t.
How it addresses survival: Prevents getting lost in the first place. Helps you navigate if you do get lost. Allows you to signal your location to rescuers.
Building Your Personal Survival Kit
A survival kit goes beyond the Scout Essentials. It’s tailored to the environment and the length of your trip. A summer day hike in the mountains needs a different kit than a winter overnight camp.
Core Items (Every Trip)
- Scout Essentials (all 10)
- Extra water or water treatment supplies
- Extra food (at least 1-2 days beyond planned trip)
- Whistle (for signaling)
- Emergency shelter (space blanket, emergency bivvy, or plastic sheeting)
- Paracord or cord (30-50 feet)
Cold Weather Addition
- Extra insulation (wool hat, gloves, extra socks)
- Hand/foot warmers if available
- Emergency sleeping bag or thick blanket
Hot/Dry Environment Addition
- Extra water (at least 1-2 liters more than normal)
- Sun-protective clothing (long sleeves, wide-brimmed hat)
- Extra electrolyte drink mix (to replace salts lost through sweating)
Wet Environment Addition
- Waterproof bag or stuff sack
- Extra dry clothes
- Quick-dry towel or cloth
Personal Survival Kit Checklist
Customize for your environment and trip length- All 10 Scout Essentials
- Extra water and/or water treatment
- Extra food
- Whistle or signaling device
- Emergency shelter (space blanket or emergency bivvy)
- 30-50 feet of paracord
- Mirror for signaling
- Headlamp with extra batteries
- Weatherproof container to keep items dry
- Personal medications or allergies documented
- Emergency contact information
- Any environment-specific items (for cold, hot, or wet conditions)
Organizing Your Kit
Keep your survival kit in a small, waterproof container (a ziplock bag works fine). Distribute it so some items stay in your pack at all times, and other items stay in your camp. If you get separated from your pack, you want survival items on your person—a whistle, a knife, matches, and a space blanket in your pockets can be lifesaving.
Scout Essentials Official Scout Essentials checklist and detailed information. Link: Scout Essentials — https://scoutlife.org/outdoors/outdoorarticles/6976/scout-outdoor-essentials-checklist/ Checklist for a Wilderness Survival Kit Official Scouting wilderness survival kit checklist (PDF). Link: Checklist for a Wilderness Survival Kit — https://filestore.scouting.org/filestore/Merit_Badge_ReqandRes/Requirement%20Resources/Wilderness%20Survival/Checklist%20for%20a%20Wilderness%20Survival%20Kit.pdfReq 1c — Trip Planning & Prevention
A trip plan is your insurance policy against getting lost or stranded. It tells someone where you’re going, when you’ll be back, and what to do if you don’t return on time. It also forces you to think through your route, check weather, and ensure you have the right gear. Most wilderness emergencies are preventable with good planning.
What a Trip Plan Includes
Route and Destination
Write down exactly where you’re going. Not “the mountains”—specific trailheads, peaks, campsites, or landmarks. Include the total distance and estimated hiking time. Mark your planned route on a map and keep a copy with your trip plan.
Why it matters: Rescuers need to know where to look. A specific route helps them search efficiently instead of combing hundreds of square miles.
Participants
List everyone going: full names, ages, experience level, and emergency contact information for each person. Note any medical conditions or allergies.
Why it matters: Rescuers know how many people to look for and can contact families immediately. Medical information helps them provide appropriate care.
Timeline
Plan your departure and return times. Include estimated arrival at major checkpoints (if hiking a long distance, note where you’ll be at midday). Be realistic about pace—it’s better to plan for slow hiking and arrive early than the reverse.
Why it matters: If you’re not back by a specific time, someone will know to alert rescuers. Checkpoints help rescuers narrow down your location if you’re overdue.
Vehicle and Communications
Note what vehicle you’re taking, its license plate, and where it will be parked. Include a phone number to call (yours or a family member’s). Note whether you’ll have cell service and any communication devices you’re bringing (satellite messenger, PLB).
Why it matters: Rescuers can locate your vehicle and know how to contact you or your emergency contact.
Equipment and Supplies
List major gear items and supplies you’re bringing—especially shelter, water treatment, food, first aid, and navigation tools. Note the condition of gear (new, tested, any known issues).
Why it matters: Rescuers know what resources you have. If you’re found, they know what gear to expect you to have.
Weather Plan
Check the forecast and note expected conditions. Include a plan for what you’ll do if weather deteriorates (turn back, hunker down, etc.).
Why it matters: Rescuers know what conditions you’re facing and can anticipate what problems might arise.
How a Trip Plan Prevents Emergencies
Accountability
Someone knows where you are. If you don’t return by a certain time, rescuers are alerted quickly instead of you being missing for days before anyone notices.
Route Awareness
Planning your route forces you to study maps, check distances, and identify hazards. You might discover you’ve chosen a route that’s too difficult or crosses avalanche terrain. Better to find out before you go.
Supplies Check
Writing down what you’re bringing reminds you to pack everything. It’s easy to forget items until you see a detailed checklist.
Mental Preparation
Thinking through the trip helps you mentally prepare. You anticipate challenges and plan how to handle them. This calm, deliberate thinking prevents panic if problems arise.
Bailout Options
A good trip plan identifies bailout points—places where you can turn back if things aren’t going well. Knowing you can safely abandon the trip if needed takes pressure off and helps you make good decisions.
Creating Your Trip Plan
Your trip plan doesn’t need to be fancy. A simple form works fine — use the printable worksheet below to get started. The key is covering all the bases: who’s going, where, when, what you’re bringing, and what to do if things go wrong.
Trip Plan Worksheet Resource: Trip Plan Worksheet — /merit-badges/wilderness-survival/guide/trip-plan/Leave the completed form with a responsible adult who will contact rescuers if you don’t return by your planned time. Give them a specific time after which they should alert authorities (e.g., “If we’re not back by 6 PM, call the ranger station”).
🎬 Video: How to Plan an Adventure | Plan a Camping Trip — https://www.youtube.com/watch?v=79WYqkiExZU
Special Considerations
Winter Trips
Include avalanche danger assessment, snowfall forecast, and any special winter skills required. Note where you’ll shelter if an avalanche occurs or weather forces you to stop.
Solo Trips
Never go alone into the wilderness. If you absolutely must, leave an extremely detailed trip plan and call your contact person as soon as you return. Solo trips carry much higher risk—rescuers won’t know where to look until you’re overdue, and by then, a bad situation may be critical.
Technical Trips
If you’re rock climbing, mountaineering, or backcountry skiing, include specific hazards (crevasse fields, steep terrain, water crossings). Note climbing routes, estimated time on each pitch, and where you’ll bivy if you’re stuck overnight.
Extended Trips
The longer your trip, the more detailed your plan should be. Multi-day trips should include daily itineraries, camping locations, and daily check-in times if possible.
Req 2 — Seven Priorities of Survival
The seven priorities of survival are a framework for decision-making when everything has gone wrong. They tell you what to focus on first, second, and so on—in order. They’re ranked by how quickly each threat can kill you. In a true wilderness emergency, these priorities might save your life because they keep you from wasting energy on less urgent problems.
The Rule of Threes
Before diving into the seven priorities, understand the Rule of Threes: you can survive approximately three weeks without food, three days without water, but only three hours without shelter in harsh conditions—and only three minutes without a good decision. What kills people fastest in wilderness emergencies isn’t starvation or thirst. It’s panic, bad decisions, and exposure.
Priority 1: Shelter & Protection from Elements
Survival time without it: 3 hours (in harsh conditions)
Hypothermia, heatstroke, and sun exposure kill fastest. Your first priority is getting out of the weather. This means protection from wind, rain, cold, or extreme heat—whatever conditions you’re facing.
Why It’s First
Your body is constantly losing heat (or gaining it, in hot environments). In cold, wet, windy conditions, hypothermia can set in in hours. Even in moderate weather, exposure kills. A shelter—even a simple one—dramatically extends your survival time.
What Counts as Shelter
Shelter can be as simple as:
- Getting behind a windbreak (fallen log, rock outcropping)
- Putting on additional clothing layers
- Building a lean-to or debris shelter
- Huddling in a cave or under dense trees
- Using a space blanket or emergency bivvy
You don’t need a fancy tent. You need protection from wind, and insulation from the ground if it’s cold.
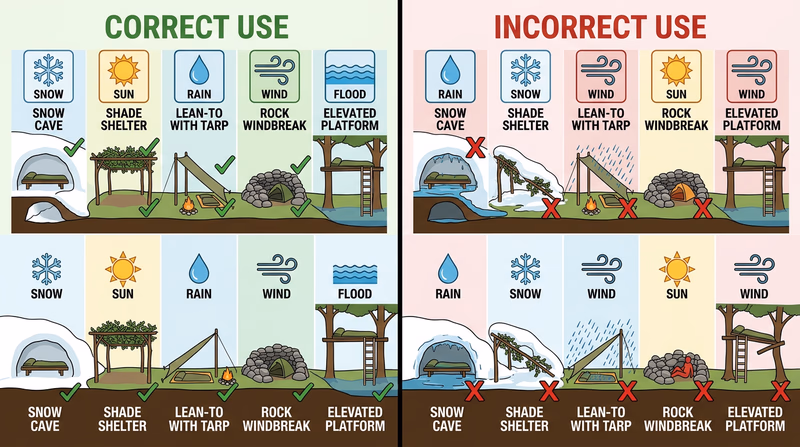
Shelter in Different Conditions
Cold: Insulation from ground is critical. Build a thick bed of pine needles, leaves, or branches. Get out of wind. Layers of clothing matter more than a fire.
Hot: Shade is your shelter. Reflect heat away by wearing light colors. Avoid the ground in extreme heat—use rocks as a platform to sleep on.
Wet: Waterproof shelter is essential. Even light rain in cool weather leads to hypothermia. Keep dry clothes dry.
Windy: Wind is deadly. Break the wind with a shelter, terrain feature, or dense trees.
🎬 Video: Seven Priorities of Survival — https://www.youtube.com/watch?v=eckfD4gfgj0
Priority 2: Signaling & Rescue
Survival time without it: Variable (hours to days)
Once you’re sheltered, your next priority is getting help. Signaling rescuers to find you beats trying to hike out in an emergency situation. Most lost people are found within the first 24 hours if someone knows they’re missing.
Why It’s Second
Without signaling, rescuers don’t know where to look. Even if you’re adequately sheltered and hydrated, being lost for days causes stress and poor decision-making. Getting found quickly relieves those pressures.
What Counts as Signaling
- Whistle (three blasts is universal distress)
- Signal mirror (visible for miles on a clear day)
- Bright clothing or cloth tied to a visible location
- Fire with green branches to create smoke
- Ground-to-air signals (large X, SOS, or arrow made with rocks or logs)
- Staying put where rescuers expect you (your trip plan location)
How to Signal Effectively
Stay put. Don’t wander. Your trip plan tells rescuers where to start looking. If you leave that area, it’s harder to find you.
Make noise and light. Blow your whistle every 10 minutes. Build a signal fire at night. Wear bright colors or hold something reflective.
Use a mirror or reflective object. On a clear day, a signal mirror is visible for miles. No mirror? Use a phone, watch face, or any shiny object.
Priority 3: Assessing Injuries & First Aid
Survival time without it: Hours to days (depending on injury)
Once you’re sheltered and signaling, assess your injuries. Treat life-threatening wounds, stop bleeding, and immobilize fractures. Infection and bleeding can kill you if not managed.
Why It’s Third
You can survive hours or days with moderate injuries if they’re properly treated. But untreated wounds become infected, and severe bleeding is rapidly fatal. Attend to serious injuries before you attempt other survival tasks.
Critical Injuries That Need Immediate Treatment
- Heavy bleeding (apply pressure, elevate, use a tourniquet if necessary)
- Airway obstruction (clear the airway, position on side to prevent choking)
- Severe fractures (immobilize to prevent further damage)
- Shock (lie flat with legs elevated, keep warm)
Infection Prevention
Keep wounds clean. Wash with water if available, apply antibiotic ointment, and cover with a bandage to keep dirt out. In the wilderness, infection is often more dangerous than the original wound.
Priority 4: Water
Survival time without it: 3 days (less in hot conditions)
Dehydration clouds judgment, weakens you, and kills. Once you have shelter, are signaling, and have addressed injuries, focus on water. You need clean drinking water.
Why It’s Fourth
You can last weeks without food but only days without water. Dehydration impairs decision-making and physical performance. A Scout who’s mildly dehydrated makes poor choices; severe dehydration is fatal.
Finding Water
- Streams, springs, and lakes are obvious but need treatment
- Morning dew collected on cloth
- Rainwater (collect in a container)
- Digging in dry stream beds often finds water
- Trees and plants with water-filled leaves
Treating Water
Boil it for 1 minute (3 minutes above 6,500 feet). Or use water purification tablets, a filter, or bleach (8-16 drops per gallon). Even questionable-looking water treated properly is better than no water.
Rationing Water
In a survival situation, don’t ration water too much (which leads to severe dehydration). Drink when thirsty, but also drink consistently. Sipping regularly is better than binge-drinking later.
Priority 5: Fire
Survival time without it: Hours to days (in harsh conditions)
Fire provides warmth, comfort, and psychological relief. It also purifies water and signals rescuers at night. Once water is handled, focus on fire.
Why It’s Fifth
Fire matters more in cold conditions than hot ones. In extreme cold, it’s life-saving. In moderate conditions, it’s helpful for morale and water treatment. In hot environments, skip the fire and focus on shade.
Fire’s Multiple Roles
- Warmth (critical in cold conditions)
- Water purification (boiling)
- Signaling (smoke by day, light by night)
- Psychological comfort (humans feel safer near fire)
- Cooking and food preparation
Fire-Starting Methods
Without matches, you need alternatives:
- Flint and steel (produce sparks)
- Ferro rod (produces sparks)
- Bow drill or hand drill (friction)
- Magnifying glass and sunlight (creates focus point)
Tinder (dry grass, bark, leaves) catches sparks. Kindling (small twigs) builds heat. Fuel (larger wood) keeps the fire going.
Priority 6: Food
Survival time without it: 3 weeks
Once you have shelter, signaling, first aid, water, and fire, you can finally think about food. Most wilderness survival situations last less than three weeks, so food is a lower priority than the others. However, you need calories to maintain strength and mental clarity.
Why It’s Sixth
Food is important, but you can survive weeks without it. In a short-term emergency (1-3 days), food is a lower priority. In a longer situation, calories become more important.
Food in Survival Situations
- Nuts and seeds (if you can identify safe ones)
- Insects (protein-rich, found everywhere)
- Fish and small animals (if you have tools to trap or catch them)
- Edible plants (only if you’re certain of identification)
- Any emergency rations you brought with you
Avoiding Food Poisoning
Don’t eat anything unless you’re absolutely certain it’s safe. Many plants and fungi are poisonous. Contaminated food causes illness, which you can’t afford in a survival situation. Mild hunger for a few days is far better than severe food poisoning.
Priority 7: Hygiene & Morale
Survival time without it: Days to weeks (in terms of morale and infection risk)
The final priority is maintaining hygiene and mental health. Keeping clean prevents infection. Maintaining morale keeps you focused and reduces panic.
Why It’s Seventh
Long-term survival depends on morale. Someone who loses hope makes reckless decisions. Someone who doesn’t wash wounds risks infection. These matter after immediate survival needs are met.
Hygiene Practices
- Wash hands before eating or handling food
- Clean wounds daily
- Use the bathroom away from water sources and camp
- Keep your living area clean (reduces insects and disease)
- Change out of wet clothes
Maintaining Morale
- Keep a routine (helps maintain mental structure)
- Remind yourself that rescuers are looking
- Engage in simple activities (whittling, organizing camp)
- Stay focused on the priorities—don’t worry about things outside your control
- Talk to other survivors (isolation is psychologically damaging)
Putting the Priorities Into Action
Here’s how they work in practice:
Scenario: You’re hiking and take a bad fall. You’re injured, it’s getting dark, and you’re miles from the trailhead.
- Shelter first: Find shelter before dark. Build something waterproof and insulated. Don’t waste energy hiking further.
- Signal: Make noise. Blow your whistle. Build a signal fire if you can.
- First aid: Treat your injuries. Wash wounds, apply ointment, immobilize any fractures.
- Water: Find water nearby. Boil or treat it.
- Fire: Build a fire for warmth and signaling if weather is cold.
- Food: You brought emergency rations—eat them sparingly.
- Hygiene/morale: Clean your wounds daily. Stay organized and focused.
By morning, rescuers find you. You survived because you followed the priorities, not because you got lucky.
Req 3 — Avoiding Panic & Maintaining Morale
Panic kills faster than cold, thirst, or hunger. A panicked person makes reckless decisions—they wander deeper into the wilderness instead of staying put, they waste energy on activities that don’t help, they become unable to think clearly. Survivors of wilderness emergencies consistently credit staying calm and maintaining morale as the reason they made it out alive.
Why Panic Is Dangerous
Panic triggers your fight-or-flight response. Your heart races, breathing becomes rapid and shallow, and rational thinking shuts down. In the wilderness, where every decision matters, panic is deadly.
Panic’s Consequences
Poor decisions: A panicked person might hike off-trail in darkness, get more lost. They might abandon shelter to “get help,” wandering until exhausted.
Wasted energy: Panic burns calories and causes dehydration. You’re using up resources on fear instead of survival.
Injury: In panic, people trip, fall, and hurt themselves. Reckless movement causes accidents.
Giving up: Panic can flip to despair. Someone who was panicked may suddenly give up hope entirely.
Recognizing Your Own Panic
Panic doesn’t always look like screaming or thrashing. Early signs are subtle:
- Difficulty focusing (racing thoughts, can’t concentrate)
- Rapid heartbeat or breathing
- Feeling detached or unrealistic (“this isn’t really happening”)
- Intense fear disproportionate to actual danger
- Urge to do something right now, even if it makes no sense
- Inability to make decisions
Techniques to Avoid Panic
1. Stop, Sit Down, and Breathe
The first step is literally stopping. Sit down. Close your eyes if it helps.
Box breathing is a technique used by military personnel and first responders:
- Breathe in for 4 counts
- Hold for 4 counts
- Breathe out for 4 counts
- Hold for 4 counts
- Repeat 5-10 times
This slows your heart rate and activates your parasympathetic nervous system (the calm-down system). It works. Practice it at home so it’s automatic when you need it.
🎬 Video: Box Breathing | The Breathing Exercise Used By Navy SEALs — https://www.youtube.com/watch?v=UC6HUrneIWI
2. Accept What Happened
You’re lost. That’s the reality. Fighting against it (“this can’t be happening,” “I shouldn’t be here”) wastes mental energy. Accept it, then move forward.
The STOP method:
- Stop moving
- Think clearly (take a moment)
- Observe your situation (what do you have? what are your options?)
- Plan your actions (follow the seven priorities)
3. Focus on What You Can Control
You can’t control being lost. You can control:
- Whether you stay calm
- Whether you build shelter
- Whether you signal rescuers
- Whether you drink water
- Whether you maintain hygiene
Focus on these. Ignore things you can’t control (whether rescuers arrive today or tomorrow, whether the weather changes, etc.).
4. Use the Seven Priorities as an Action Plan
Action combats panic. Instead of thinking “I’m lost and going to die,” think “I need to build a shelter. I’ll gather branches for 2 hours, then work on a fire.”
Having a concrete plan—and following it—keeps you grounded and reduces panic.
5. Talk to Yourself
Positive self-talk sounds silly, but it works. Instead of “I’m going to die,” think “I’m prepared for this. Rescuers know where to look. I can do this.”
Repeat affirmations:
- “I am calm and focused”
- “Rescuers are looking for me”
- “I can handle this”
- “One step at a time”
6. Maintain Routines
Create structure in your survival situation. Routine is comforting and keeps your mind occupied:
- Wake at a set time
- Drink water at regular intervals
- Check your shelter
- Maintain your signal
- Eat at “meal times”
- Sleep at a set time
Routine keeps you from dwelling on fear.
🎬 Video: Lost? Stop Panic & Think Clearly — https://www.youtube.com/watch?v=_mt0BtDDImU
Maintaining High Morale
Morale isn’t about being happy—it’s about staying focused and hopeful despite difficult circumstances. High morale keeps you making good decisions.
Factors That Improve Morale
Hope: Remind yourself that rescuers are looking. Your trip plan ensures they’ll find you. You’ve survived the first 24 hours, which means help is likely coming soon.
Control: Every action you take (building shelter, signaling, collecting water) is under your control. Each action improves your situation and builds confidence.
Purpose: You have concrete goals—build shelter, signal rescuers, treat water. Working toward goals feels productive and reduces despair.
Psychological comfort: Small comforts matter. Cleaning up your camp, organizing your gear, or creating a comfortable sleeping area feels good and improves morale.
Social connection: If you’re with others, talk. Share your fears. Support each other. Isolation is psychologically damaging.
The Morale Cycle
High morale → better decisions → improved situation → higher morale (positive cycle)
Low morale → poor decisions → worsening situation → lower morale (negative cycle)
Breaking the negative cycle starts with one good decision. Build shelter. Signal rescuers. Treat water. One success leads to another.
Avoiding Despair
Despair happens when someone stops trying. Prevention is the antidote:
Don’t catastrophize: Your mind wants to imagine worst-case scenarios. Recognize this and redirect: “I’m in a challenging situation, but I have skills and a plan.”
Celebrate small wins: Built a shelter? That’s a win. Found clean water? Win. Survived another night? Big win.
Don’t dwell on time: Don’t count hours or days obsessively. Focus on the present moment and what needs doing now.
Keep perspective: You’re uncomfortable, but you’re not in mortal danger if you follow the priorities. Most wilderness emergencies resolve within 24-72 hours.
Group Dynamics and Morale
If you’re in a group, morale is a shared responsibility:
Assign roles: Give each person a specific task (building shelter, collecting water, maintaining fire, signaling). Responsibility keeps people engaged.
Check on each other: Regularly ask how others are doing. Isolation breeds despair.
Make decisions together: Involve the group in planning. People support decisions they helped make.
Manage the pessimist: Every group has someone who’s convinced things will go badly. Don’t dismiss them, but don’t let their negativity dominate. Acknowledge their concerns and refocus on the plan.
Celebrate together: Meal time, completing a shelter, spotting a potential rescuer—celebrate these moments together.
Lost? Stop Panic & Think Clearly (video) Practical guidance on staying calm when lost. Link: Lost? Stop Panic & Think Clearly (video) — https://www.youtube.com/watch?v=_mt0BtDDImUReq 4 — First Aid & Survival Kits
A first aid kit and a survival kit are different. A first aid kit treats injuries. A survival kit keeps you alive when you’re stranded. Both need to be built, organized, and—most importantly—actually carried with you on every outing.
Building a Personal First Aid Kit
Your first aid kit should be small enough to fit in a pocket or backpack pouch, but comprehensive enough to handle common injuries.
Essential Items
Bandages & Wound Care:
- Adhesive bandages (various sizes)
- Sterile gauze pads (2x2" and 4x4")
- Medical tape
- Antibiotic ointment (small tube)
- Antiseptic wipes or alcohol prep pads
- Tweezers (splinters, ticks)
Pain & Inflammation:
- Pain reliever (ibuprofen or acetaminophen)
- Antihistamine (for allergies, insect bites)
- Hydrocortisone cream (1%) for itch
Specialized Items:
- Elastic bandage (for sprains)
- Triangular bandage (sling or securing large wound)
- Moleskin or blister treatment
- Nail clippers (small)
Personal Medications:
- Any prescription medications you take
- EpiPen (if you have severe allergies)
Organization Tips
- Keep everything in a waterproof pouch or bag
- Label items clearly
- Check expiration dates periodically
- Replace used items after each trip
- Keep a simple instruction card (basic first aid steps)
Building a Personal Survival Kit
Your survival kit is tailored to your environment and trip length. It includes items beyond the Scout Essentials that specifically address survival needs.
Core Items (Every Trip)
- Emergency shelter: Space blanket or emergency bivvy
- Paracord: 30-50 feet (1000 uses in the wilderness)
- Signaling mirror: More visible than a whistle alone
- Whistle: Backup to your voice
- Fire starters: Extra matches, lighter, ferro rod in waterproof pouch
- Water treatment: Purification tablets, water filter, or iodine
- Extra food: Energy bars, nuts, jerky beyond planned meals
- Headlamp: With extra batteries
- Navigation: Backup map and compass
Environment-Specific Additions
Cold weather:
- Wool hat and gloves
- Emergency sleeping bag or thick blanket
- Hand/foot warmers
Hot/dry:
- Extra water containers
- Sunscreen
- Electrolyte drink mix
- Wide-brimmed hat
Wet conditions:
- Waterproof bag or dry sack
- Extra socks
- Quick-dry towel
Demonstrating Kit Usage
When you show your counselor your kits, explain the purpose of each item and how you’d use it:
First aid kit example: “This antihistamine treats allergic reactions from insect bites. I’d give it to someone swelling from a bee sting. This elastic bandage immobilizes a sprained ankle. This tweezers removes ticks or splinters.”
Survival kit example: “This space blanket reflects body heat and weighs almost nothing. If I got separated from my tent, I’d use it as emergency shelter. This paracord has 1000 uses—I could build a shelter, secure gear, or create a litter to evacuate an injured person. This signal mirror is visible for miles on a clear day—far more visible than a whistle.”
Personal Family Troop First Aid Kit Checklist Official Scouting first aid kit checklist (PDF). Link: Personal Family Troop First Aid Kit Checklist — https://filestore.scouting.org/filestore/Merit_Badge_ReqandRes/Requirement%20Resources/Wilderness%20Survival/Personal%20Family%20Troop%20First%20Aid%20Kit%20Checklist.pdf First Aid Kit Buying Guide ScoutLife article on choosing and building first aid kits. Link: First Aid Kit Buying Guide — https://scoutlife.org/video-audio/4937/first-aid-kit-buying-guide/ Scout Essentials for Wilderness Survival Official Scouting guide to wilderness survival essentials. Link: Scout Essentials for Wilderness Survival — https://troopleader.scouting.org/program-features/wilderness-survival/information/ Survival Kit List Comprehensive survival kit checklist (PDF). Link: Survival Kit List — https://assets.kalkomey.com/hunter/pdfs/maine-survival-kit.pdfPractice Using Your Kit
Don’t wait until an emergency to learn how to use your kit. Practice at home:
- Wrap a sprained ankle with the elastic bandage
- Use tweezers to remove a splinter
- Apply a bandage to a minor cut
- Assemble a fire using your fire starter
- Use your headlamp in darkness
- Purify water using your treatment method
- Use your signal mirror in sunlight
Familiarity breeds confidence. You want your items to be second nature when you really need them.
Req 5a — Exposure Conditions
Survival in different exposure conditions requires understanding what kills you fastest in each environment and planning accordingly. The principles are the same (shelter, water, fire), but the strategies differ dramatically.
Cold and Snowy Conditions
Killer: Hypothermia (core temperature drops below 95°F)
Survival Strategy
Insulation is everything. Your body loses heat 25 times faster to snow and cold than to air at the same temperature. You need insulation from the ground and protection from wind.
Build a shelter:
- Find a windbreak (dense trees, rock outcropping, or natural depression)
- Create a bed of pine needles, leaves, or branches (at least 6-12 inches thick)
- Build a simple lean-to: prop branches against trees or rocks, cover with bark or foliage
- In deep snow, dig a snow cave—snow is excellent insulation
Stay dry: Wet clothing kills you faster than cold. Remove wet layers. Keep dry clothes dry by using a waterproof barrier.
Layer clothing: Wear multiple thin layers that you can adjust. Remove layers before sweating; add layers before shivering.
Build a fire: In cold conditions, fire is life-saving. Focus on warmth, not cooking.
🎬 Video: Cold Weather Survival Skills — https://www.youtube.com/watch?v=EsoobhiExJY
Wet Conditions
Killer: Hypothermia (water cools you 25-30 times faster than air)
Survival Strategy
Stay dry: The wet itself isn’t the killer—it’s the evaporative cooling. Get out of water, get out of wet clothes, get dry.
Build a waterproof shelter: Your shelter must shed water. A lean-to covered with bark, branches, and leaves works if tilted to shed rain. A cave or overhanging rock is ideal.
Build a fire: Wet wood burns if you find dry tinder and kindling first. Look for wood protected under larger logs or rocks.
Key steps:
- Get out of wet clothes or at least wring them out
- Build a shelter that keeps rain off
- Build a fire for warmth and drying
- Stay put once sheltered (wandering in rain causes exhaustion)
🎬 Video: Building Fire in the Rain — https://www.youtube.com/watch?v=MmHkiHeoI3U
Hot and Dry Conditions
Killer: Dehydration and heat exhaustion
Survival Strategy
Shade is your shelter. In extreme heat, a covered area is more important than a traditional shelter. Any source of shade—overhanging rocks, dense trees, a lean-to—reduces heat stress.
Reduce activity: Don’t hike during peak heat (10 AM - 4 PM). Move during early morning and evening.
Conserve water: Don’t ration excessively, but don’t waste it either. Sipping regularly is better than binge-drinking.
Find water: Look for water sources—seeps in rocks, water-filled plants, digging in dry creek beds. Without water, you’ll die in days.
Key steps:
- Find or create shade
- Rest during heat of day
- Move during cooler hours
- Find water as absolute priority
- Wear light colors to reflect heat
🎬 Video: 10 Desert Survival Tips — https://www.youtube.com/watch?v=lIHczx_QlH8
Windy Conditions
Killer: Wind chill (wind increases heat loss dramatically)
Survival Strategy
Break the wind. Wind magnifies cold. A 30°F day with 20 mph wind feels like -10°F (wind chill). You need shelter that breaks the wind.
Find or create windbreak:
- Dense trees block wind
- Rock outcroppings shelter you
- Build a shelter with a strong windward side
- Bury shelter partially in earth for added protection
Layer clothing: Wind can find gaps in single layers. Multiple layers trap dead air (the actual insulation).
Keep humidity down: Wind evaporates moisture, including from your skin and breath. This increases heat loss.
Key steps:
- Identify wind direction
- Build shelter on the downwind (protected) side of terrain or trees
- Create windbreak using packed snow, logs, or branches
- Layer clothing
- Limit exposed skin
🎬 Video: Danger of Wind Chill — https://www.youtube.com/watch?v=f4VC0fNMaQc
Water Conditions (On or At Water)
Killer: Hypothermia, drowning
Survival Strategy
Assume water rescue isn’t coming immediately. Your priority is staying afloat, staying warm, and signaling rescuers.
If in water:
- Tread water or float to conserve energy
- Assume a Heat Escape Lessening Posture (HELP): curl into a ball to minimize heat loss
- If in a group, huddle together for warmth
- Wear bright clothing (helps rescuers spot you)
If capsized:
- Stay with your boat if possible (easier for rescuers to spot)
- Move toward shallower water or shore
- Help other swimmers if possible
If stranded on shore/island:
- Find freshwater source (often inland from shore)
- Build shelter and fire visible to rescuers
- Build signal mirror or use bright cloth
- Don’t attempt to swim to shore unless certain you can make it
Req 5b — Outdoor Clothing
Your clothing is your first line of defense against the environment. A Scout in the right gear can hike comfortably all day; the same Scout in wrong clothes will be miserable in minutes. Clothing systems work by trapping air layers next to your skin—the more you understand about how to layer, the more you control your survival.
The Layering System
The key to outdoor clothing is layering—wearing multiple thin layers you can add and remove based on conditions. This gives you precise control over your body temperature and lets you adapt to changing weather.
Layer 1: Base Layer (Moisture Management)
The base layer sits against your skin. Its job is to pull sweat away from your body (called wicking) so you stay dry, not to insulate you.
Best materials:
- Synthetic (polyester, nylon): Excellent at wicking sweat away. Dries quickly. Best choice for most outdoor activities.
- Merino wool: Naturally wicks moisture, regulates temperature, and resists odor. Expensive but durable.
- Avoid cotton: Cotton absorbs water and holds it against your skin. In cold weather, this leads to hypothermia. Cotton is never appropriate for serious outdoor activities.
When to wear it: Always. Even in hot weather, a good base layer keeps you dry.
Layer 2: Insulating Layer (Warmth)
The insulating layer traps dead air and creates warmth. This is where you feel the difference between cold and comfortable.
Best materials in different conditions:
Cold weather:
- Fleece: Lightweight, warm, dries quickly. Excellent all-around choice.
- Wool: Warm even when wet. Heavier than fleece but doesn’t compress.
- Down: Incredibly warm for its weight. Only works in dry conditions—loses all insulation when wet.
Wet/humid conditions:
- Wool or synthetic fleece: Don’t lose insulation when wet (unlike down).
- Avoid down: Water destroys its insulation properties.
Hot weather:
- Skip this layer or use a thin, breathable option.
How to choose: In dry cold, down is unbeatable. In wet or unpredictable weather, fleece or wool are more reliable.
Layer 3: Shell Layer (Wind & Water Protection)
The shell is your armor against wind and rain. A good shell is breathable so sweat can escape while blocking external moisture.
Best materials:
- Hardshell (Gore-Tex or similar): Waterproof and breathable. Best choice if you expect heavy rain. Heavier but nearly invincible.
- Softshell: Breathable and stretchy, sheds light rain. Less waterproof than hardshell but more comfortable for active movement.
- Lightweight rain jacket: Good for Scouts who want minimal bulk. Works for light to moderate rain.
Wind protection: A shell that’s water-resistant also blocks wind. Wind can increase heat loss 25x, so a shell is critical in windy conditions even if rain isn’t expected.
Clothing for Extremely Cold Weather
When temperatures drop below 30°F, proper clothing is the difference between a fun hike and a life-threatening situation.
The Cold Weather System
- Base layer: Synthetic or merino wool (never cotton)
- Insulating layer: Thick fleece or wool. Consider wearing two layers if temperature is below 0°F.
- Shell layer: Wind-resistant jacket and pants. Any breeze will kill you faster than still-air cold.
Additional Cold Weather Gear
- Hat and gloves: You lose disproportionate heat from your head. A wool or synthetic hat is essential. Gloves (or mittens, which are warmer) keep your fingers functional.
- Wool socks: Wear at least two pairs. Keep your toes warm and you’ll keep moving.
- Neck gaiter or balaclava: Protects your face and neck from wind. Critical in extreme cold.
- Gaiters: Wrap around your ankle where boot meets pants to keep snow out.
Cold Weather Mistakes to Avoid
Don’t overdress. Overdressing makes you sweat. Wet layers are death. Wear just enough that you’re cool at the start—you’ll warm up as you move.
Don’t ignore shivering. Shivering means your body is trying to generate heat. Stop and add a layer before shivering becomes uncontrollable.
Don’t wear jeans. Denim absorbs water, dries slowly, and loses insulation when wet. Wear synthetic or wool pants.
Clothing for Hot and Dry Weather
In extreme heat, your enemy is sun exposure and dehydration. Clothing serves to protect you from the sun, not to warm you.
The Hot Weather System
- Base layer: Synthetic or merino wool. Light colors reflect heat; dark colors absorb it. Wear light-colored, moisture-wicking shirts.
- Insulating layer: Skip it. You want air exposure, not insulation.
- Shell layer: A light, breathable shell or lightweight long sleeves. Seems counterintuitive, but long sleeves protect your arms from sun damage and reflect some heat.
Additional Hot Weather Gear
- Wide-brimmed hat: Protects your face and neck. A cap isn’t enough—the brim needs to shade your face and ears.
- Light-colored, loose clothing: Loose fit lets air circulate. Tight clothing traps heat.
- Sunglasses: Protects your eyes from UV damage and reduces glare-related strain.
- Lightweight long pants: Protects legs from sun. Better than shorts in desert conditions.
Hot Weather Mistakes to Avoid
Don’t go shirtless. You’ll get severe sunburn and lose fluids through burned skin.
Don’t wear dark colors. They absorb heat. Light colors (white, tan, pale yellow) reflect it.
Don’t restrict airflow. Tight clothing traps heat. Wear loose, breathable garments.
Don’t rely on shade alone. Reflective surfaces (sand, rock, water) bounce heat and UV rays. Wear sun-protective clothing even in shade.
Clothing and Sun Protection American Academy of Dermatology guide to sun-protective clothing. Link: Clothing and Sun Protection — https://www.aad.org/public/everyday-care/sun-protection/sunscreen/spfClothing for Wet Conditions
Wet weather requires waterproof protection without trapping moisture that leads to hypothermia.
The Wet Weather System
- Base layer: Synthetic (merino wool works too). Cotton is forbidden—it absorbs water.
- Insulating layer: Fleece or wool if it’s cool. Thin or skip if it’s warm and rainy.
- Shell layer: Waterproof jacket and pants. “Water-resistant” isn’t enough—true waterproofing keeps rain out.
Additional Wet Weather Gear
- Rain hat: A brim protects your eyes. A baseball cap is better than no hat, but a full brim is better.
- Waterproof gloves: Regular gloves stay clammy when wet. Waterproof neoprene gloves keep hands functional.
- Gaiters: Keep water out of boot tops.
- Extra socks: Carry multiple pairs. Wet socks cause blisters and foot problems. Swap them frequently.
Wet Weather Mistakes to Avoid
Don’t use a cotton rain jacket. It might block surface water but still absorbs moisture and doesn’t dry quickly. Use synthetic waterproof shell.
Don’t overheat in heavy rain gear. Modern shells are breathable. If you’re overheating and sweating inside the jacket, you’re moving too fast. Slow down and let sweat escape.
Don’t ignore damp conditions. Rain plus cool temperatures equals hypothermia risk. Dress for wet weather even if it’s just “maybe” raining.
Don’t go barefoot or in sandals. Wet feet in cold weather is dangerous. Proper footwear is non-negotiable.
Footwear for Outdoor Conditions
Your feet are your foundation. Bad footwear ruins hikes and creates survival situations.
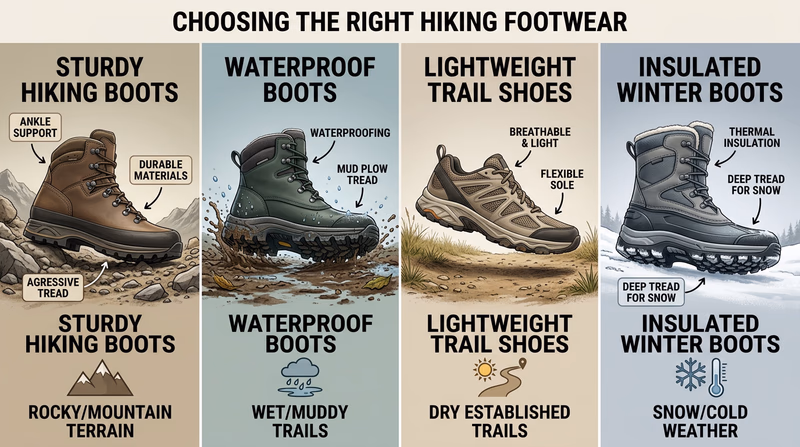
Cold Weather Boots
- Insulation: Look for 200-400 grams of synthetic insulation or equivalent wool. Your feet are furthest from your core—they get cold fast.
- Waterproofing: Leather or synthetic waterproof material. Avoid wet feet at all costs.
- Traction: Good grip on snow and ice. Test on ice before depending on it.
- Fit: Boots should be snug (not tight) with room for thick socks. Tight boots restrict circulation and cause cold feet.
Hot Weather Footwear
- Light-colored: Reflects heat. Dark shoes absorb it and get painfully hot.
- Breathable: Mesh or quick-drying synthetic. Keeps feet cool and dry.
- Supportive: Hiking boots, not casual shoes. Support matters on uneven terrain.
- Gaiters optional: Prevent dust/sand intrusion.
Wet Weather Footwear
- Waterproof: Leather or treated synthetic. Check that the insole/sole is waterproof, not just the upper.
- Quick-drying: Avoid leather if possible—it stays wet. Synthetic dries faster.
- Good drainage: Holes or mesh that lets water escape. Boots filled with water are nearly unusable.
Clothing Checklist by Condition
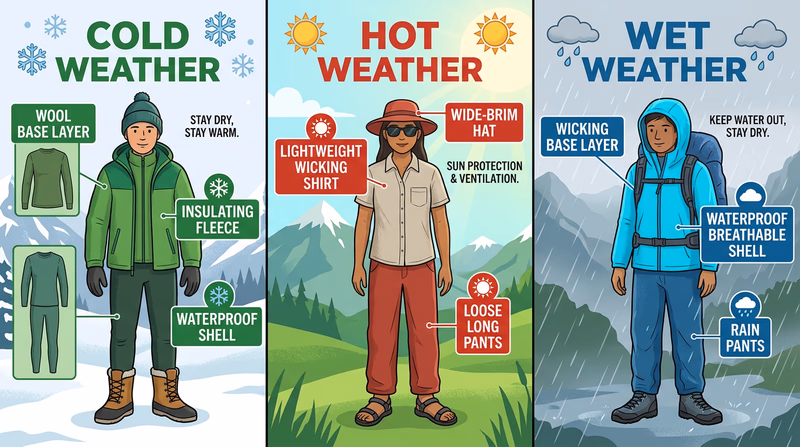
Cold Weather (Below 30°F):
- Synthetic or merino wool base layer
- Thick insulating layer (fleece or wool)
- Wind-resistant shell
- Hat, gloves, neck protection
- Two pairs of wool socks
- Gaiters
Hot Weather (Above 85°F):
- Light-colored, moisture-wicking shirt
- Light-colored, long pants or shorts
- Wide-brimmed hat
- Sunglasses
- Light shell (optional)
Wet Conditions:
- Synthetic base layer
- Thin insulating layer (if cool)
- Waterproof shell
- Waterproof gloves
- Extra socks
- Rain hat
Req 5c — Wildlife Protection
Most Scout camping trips won’t encounter bears or raccoons, but many will. Both are smart, food-motivated animals that can cause serious problems for unprepared campers. Understanding their behavior and knowing how to manage your camp prevents dangerous situations.
Understanding Bear Behavior
Bears are not aggressive predators looking for humans to attack. They are intelligent animals motivated by food. A bear that visits your camp is looking for an easy meal, not a fight. The vast majority of dangerous bear encounters happen because campers mismanaged food or surprised a bear.
What Bears Want
Bears are calorie-seeking machines. In spring and fall, they actively forage to build fat reserves. A campsite with accessible food is an irresistible opportunity. Once a bear learns your camp has food, it will return—and each visit becomes more dangerous as the bear becomes bolder.
Bears are attracted to:
- Garbage and food scraps
- Cooking smells and grease
- Unattended meals
- Scented personal items (sunscreen, deodorant, soap)
- Pet food
- Bird seed
Types of Bear Encounters
Surprise encounters: You encounter a bear on the trail and startle it. These are rare and usually harmless if you react correctly.
Camp raids: A bear smells food and investigates. This is preventable through proper food storage.
Habituation: A bear has learned that camps = food and is no longer afraid. These bears are dangerous and often need to be relocated or destroyed.
Preventing Bear Problems
Food Storage is Priority One
Every Bear Country regulation starts with the same rule: store food so bears can’t access it.
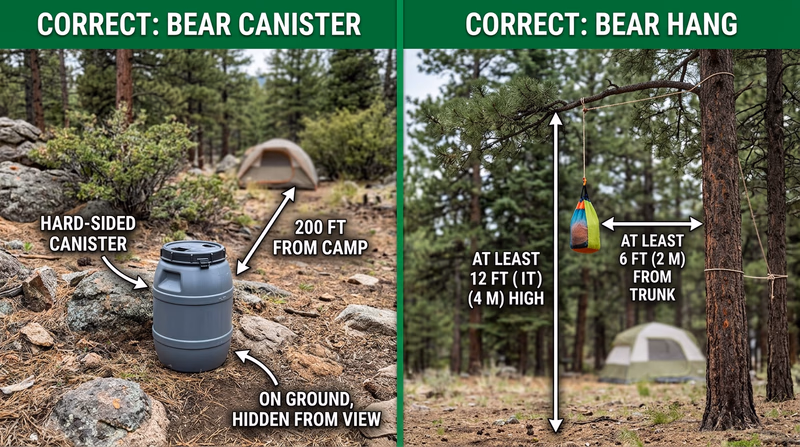
Bear canister or bear bag:
- Use a bear canister (hard, lockable container) if available. Bears cannot break into them.
- If no canister, hang a bear bag from a rope between two trees, at least 12 feet high and 6 feet from each tree trunk.
- Never store food in your tent. Not ever.
What to hang:
- All food and food packaging
- Garbage
- Cookware and utensils (they retain food smells)
- Toiletries (sunscreen, toothpaste, deodorant, soap)
- Trash and recycling
- Pet food
Hang it high: The rope should be at least 12 feet above ground. A bear can stand on hind legs and reach higher than you’d think.
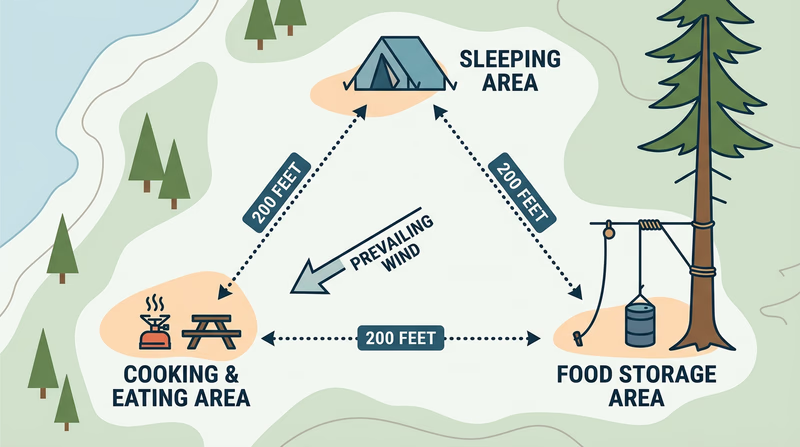
Distance matters: The bag should be at least 100 feet from your sleeping area. If a bear finds it, you want distance between yourself and the problem.
Camp Management
Cook away from camp:
- Set up a cooking area at least 100 feet downwind from your sleeping site.
- Cook your meals before dark.
- Clean up immediately after eating.
Clean up thoroughly:
- Wash dishes right away. Use a small amount of water and scatter the dishwater at least 100 feet from camp.
- Wipe down tables and cooking surfaces.
- Never leave food scraps on the ground.
- Store cooking pots and utensils with food.
Garbage is food to bears:
- Pack out all trash. If you can’t carry it out, hang it.
- Burn only wood in fires, not trash with food residue.
- Never bury garbage—bears will dig it up.
While Hiking
Make noise: Bears want to avoid you. Most bear encounters happen when Scouts surprise bears on the trail. Make noise—talk, use a bear bell, or clap occasionally. A startled bear is more likely to be aggressive.
Stay alert: Keep your eyes and ears open. If you see fresh bear signs (scat, claw marks, overturned logs), you’re in active bear territory. Make extra noise and consider turning back if there are cubs.
Never approach bears: Even from a distance, never approach a bear for a photo or to watch it. Maintain 100+ yards distance. If a bear notices you, leave calmly and quickly.
🎬 Video: Preventing and Managing Bear Encounters — https://youtu.be/SHZ-prhA7E0
If You Encounter a Bear
Surprise encounter (bear on trail):
- Stay calm. Most bears will leave if given the opportunity.
- Don’t run. Running triggers chase response. Walk backward slowly.
- Make yourself look big. Raise your arms, stand tall.
- Make noise: Speak in a calm, firm voice. Let the bear know you’re human.
- Give the bear an escape route. Move off the trail slowly.
- Use bear spray if it approaches. Only after it’s clear the bear is aggressive.
Bear at camp:
- Don’t run toward it. Calmly move inside or to a vehicle.
- Make noise. Yell, clap, use an air horn.
- Let it take the food. A food-motivated bear that’s undeterred by noise is after the food, not you. Let it have it and leave.
- Report it. Tell park rangers immediately. A habituated bear is a danger to other Scouts.
Bear spray:
- Only use bear spray if the bear is acting aggressively and approaching.
- Know how to use it before you need it (practice at home with a training spray).
- Spray downwind when the bear is 20-30 feet away.
- Bear spray is 90% effective at stopping an aggressive bear.
Understanding Raccoon Behavior
Raccoons are smarter and bolder than most people realize. They have excellent problem-solving skills and incredible dexterity. A raccoon can open latches, unlock containers, and undo zippers. They are also less afraid of humans than bears and will raid camps at night when Scouts are sleeping.
What Raccoons Want
Raccoons are opportunistic feeders. They eat almost anything and are especially attracted to:
- Garbage
- Pet food
- Unattended food
- Bird seed
- Eggs and small animals
Unlike bears, raccoons often visit in groups. A raccoon raid can be chaos—trash scattered everywhere, food destroyed, your camp destroyed.
Preventing Raccoon Problems
Trash management:
- Never leave trash on the ground or in an open container.
- Store trash in a sealed bin or hang it like food (though raccoons are excellent climbers, so hanging is harder).
- Raccoons have incredible dexterity—a bungee cord won’t stop them. Use a sealed, lockable container.
Food storage:
- Raccoons are nocturnal. Store all food in a sealed container before dark.
- A bear canister works against raccoons too (and is easier to secure against them).
- Never leave food in a tent.
Campsite management:
- Don’t leave pots, pans, or dishes out overnight.
- Remove dog/pet food before dark.
- Clean up spills immediately.
- If cooking at night (not recommended), clean up immediately.
Keep distance:
- Store food and garbage at least 100 feet from your sleeping area.
- Raccoons are emboldened by close food sources and will raid right next to tents.
If Raccoons Raid Your Camp
During a raid:
- Make noise. Yell, clap, blow a whistle.
- Use a flashlight. Shine it at the raccoons.
- Don’t approach. Stand your ground but don’t move toward them.
- Let them leave. Raccoons are not aggressive toward humans—they want food. Let them take it if necessary.
After a raid:
- Assess damage. Check what was destroyed or stolen.
- Secure remaining food. Put everything in sealed containers or hang it properly.
- Clean up. Don’t leave scattered trash for the next night.
- Report it. If raccoons are habitually raiding camps, park rangers need to know.
🎬 Video: Keeping Raccoons Away from Your Campsite — https://youtu.be/SO1Ax9sBU6I
Regional Differences
Bear and raccoon behavior vary by region. Research before you go:
Black bears (most common): Found in forests across the US. Shy, generally non-aggressive. Food storage is critical.
Grizzly bears (high-altitude West): More aggressive than black bears. Encounter protocols are different (don’t run, use bear spray, play dead if attacked). Only encountered at elevation above 8,000 feet in specific areas.
Raccoons (everywhere): Present in most US habitats. Same prevention strategies everywhere.
Know your region: Before any trip, ask park rangers what wildlife is active and what precautions are needed.
Bear and Raccoon Prevention Checklist
Before Your Trip:
- Research what bears/raccoons live in your area
- Get current information from park rangers
- Bring bear spray if in grizzly country
Setting Up Camp:
- Identify a food storage location 100+ feet from tents
- Hang food in bear canister or bear bag
- Scatter cookware and utensils in food hang
- Set up cooking area away from sleeping area
Daily Management:
- Cook during daylight
- Clean up immediately after meals
- Don’t leave food unattended
- Bring all food inside before dark
- Take out trash immediately
If Wildlife Visits:
- Make noise (yelling, air horn, etc.)
- Don’t run or corner the animal
- Give animals an escape route
- Let them leave without confrontation
- Report habituated wildlife to rangers
Req 5d — Survival Shelters
A survival shelter is built from whatever materials the environment provides. You won’t have nails, saws, or a tent—only branches, leaves, snow, and your hands. Understanding how to improvise shelter in a forest or snow conditions means understanding what materials work and why they work.
The Forest Environment
A forest provides abundant materials: branches, leaves, bark, saplings, and logs. Your shelter’s goal is to trap body heat and block wind and rain.
Finding the Best Location
Before building, scout the area:
High ground: Avoid low areas where water collects during rain. Water flows downhill—position yourself above where it flows.
Natural windbreaks: Look for dense stands of trees, rocky outcroppings, or hillsides that block wind naturally. Building in the open requires much more work.
Dry materials nearby: Branches, leaves, and bark should be close. Carrying heavy materials long distances is exhausting.
Water source: Ideally within sight or short distance. You’ll need water before building, during, and after.
Avoid hazards: Don’t shelter under dead branches (widow makers), in gullies prone to flash flooding, or on exposed ridges that attract lightning.
Basic Forest Shelters
Lean-To Shelter
The simplest and fastest shelter to build.
Structure:
- Find two trees 6-8 feet apart or set up two branches as uprights (secured with stones or dug into the ground)
- Place a strong branch horizontally between them as a crossbeam at waist height
- Lean branches at an angle against the crossbeam to form a slanted roof
- Pile leaves and branches on the slanted roof for insulation
- Stuff leaves and branches inside for a bed and insulation from the ground
Time to build: 1-2 hours
Protection: Blocks wind from one direction. Not fully enclosed. Best for dry or light rain conditions. In heavy rain, the open front lets water blow in.
Insulation: The layers of leaves and branches trap dead air. Make it thick (6-12 inches minimum on the roof).
Debris Shelter (A-Frame)
More enclosed than a lean-to and excellent for cold conditions.
Structure:
- Find a long fallen log or place a strong branch between two trees at waist height
- Lean branches on both sides of this ridgeline to create an A-frame shape
- Layer leaves and branches thickly over the frame
- Stuff the interior with leaves and branches for bedding and insulation
- Leave one end open slightly for an entrance
Time to build: 2-3 hours
Protection: Fully enclosed on three sides and the roof. Open entrance is the only potential leak point. Excellent for rain and wind.
Insulation: The thick leaf/branch covering and interior stuffing create excellent insulation. This is a better choice than lean-to for cold weather.
Natural Shelter with Enhancement
Nature often provides partial shelters:
Rock overhangs or caves: Provide instant roof and wind protection. Collect branches and leaves to:
- Create a windbreak across the open side
- Insulate the floor with leaves
- Build a small fire for warmth (if ventilation allows)
Fallen trees: A large fallen tree creates a natural windbreak. Lean branches against it and cover with leaves to create shelter.
Dense evergreen trees: Branches form a natural shelter. Clear space beneath, add leaves for insulation, and you have a quick shelter.
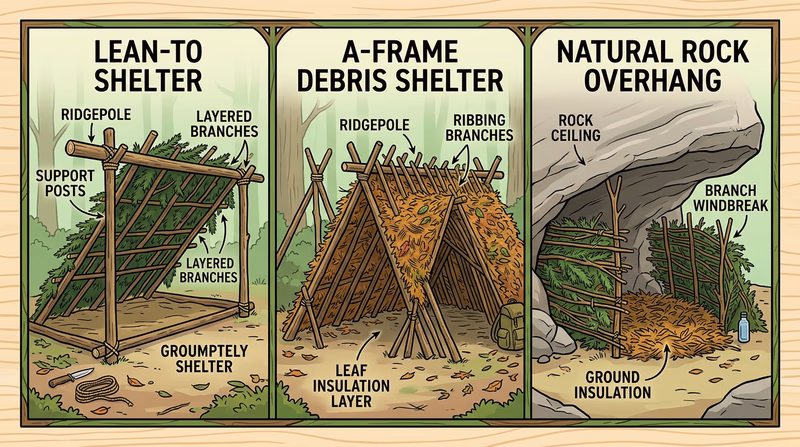
Building Materials and Methods
Ridgepole (main branch): Must be strong enough to support weight. Test it before committing branches to it. Thicker is better than thin.
Leaning branches: Collect branches 6-10 feet long and 2-4 inches diameter. They don’t need to be perfectly straight.
Insulation (leaves, needles, bark): The thicker the better. Aim for 6-12 inches of material on the roof. Leaves compress over time, so add extra.
Bedding (leaves, pine needles): Create a layer at least 12 inches deep. Ground is cold—insulation under you is as important as insulation over you.
Securing materials: For lashing, use:
- Paracord (if available)
- Strips of bark
- Vines
- Clothing or rope improvised from plant fibers
🎬 Video: A Quick Shelter under a Tree — https://youtu.be/x6M8HHRWRTk
The Snow Environment
Snow is an excellent insulator (it’s actually mostly air), but it requires different shelter techniques than a forest.
Understanding Snow
Snow insulates because it’s mostly air pockets. 10 inches of snow provides roughly the same insulation as fiberglass in a wall. Your shelter uses this natural insulation.
Key principle: Minimize air exposure and maximize snow’s insulation. A snow shelter is warmer than being exposed to wind, even at the same temperature.
Snow Cave
The easiest and most effective snow shelter.
Requirements:
- Stable snow banks at least 8 feet high
- Wet snow that bonds together (not dry powder)
- A location away from avalanche terrain
Building steps:
- Find the location: Look for a hillside with stable snow. Avoid slopes steeper than 30 degrees (avalanche risk).
- Dig the entrance low: Create a horizontal tunnel about 4 feet long, staying low to reduce heat loss. This becomes an air lock.
- Expand the main chamber: Dig upward and back to create a sleeping cavity larger than the entrance. The floor should be 2-3 feet higher than the entrance.
- Maximize insulation: The raised floor uses gravity—warm air rises, cold air sinks into the entrance. This creates natural stratification.
- Smooth the roof: Smooth the interior ceiling so dripping water rolls down the walls instead of dripping on you.
- Create ventilation: A small hole in the roof allows air exchange without heat loss.
- Insulation from the ground: Use tree branches or pine boughs as a bed layer.
Time to build: 1-3 hours depending on snow conditions
Protection: Excellent insulation. The snow blocks wind completely. Interior temperature stays around 32°F even in extreme cold outside.
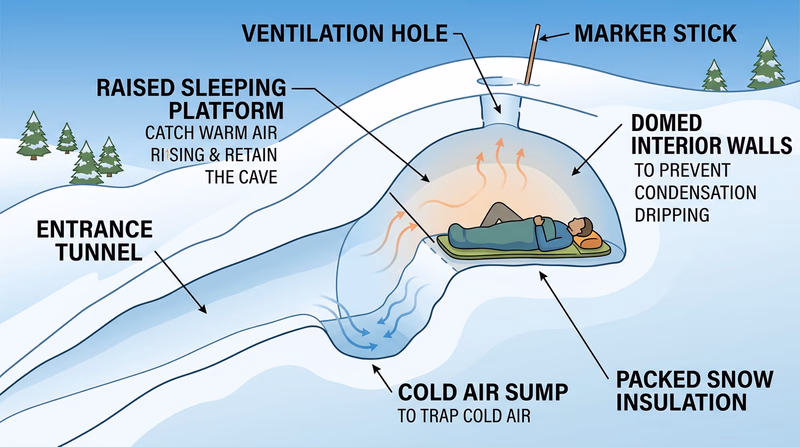
🎬 Video: Tree Well Shelter — https://youtu.be/mQL4luClk_I
Snow Trench
Simpler than a cave, slower to build, but effective.
Building steps:
- Dig a trench: Dig down into the snow 2-3 feet deep, making the trench long enough to lie down in.
- Create insulation underneath: Line the bottom with pine branches or clothing to insulate from the ground.
- Build a roof: Lay branches over the top of the trench and pile snow on them to create a roof.
- Create openings: Make an entrance/exit at one end and a small vent at the other.
Time to build: 1-2 hours
Protection: Good insulation. More vulnerable to wind than a cave because the roof is less solid.
Snow Bivy
The fastest shelter when time is critical.
Building steps:
- Dig a shallow pit: Create a depression in the snow just deep enough for your body.
- Insulate the bottom: Use pine boughs or branches.
- Create a windbreak: Build a small wall on the windward side using snow blocks or branches.
- Use available materials: Drape your jacket or an emergency shelter material over the top for minimal protection.
Time to build: 15-30 minutes
Protection: Minimal. Provides some wind protection and insulation from the ground. Best as a last resort when time is critical.
Materials and Mistakes
Snow selection: Wet snow bonds and compacts well. Dry powder doesn’t bond—shelters in dry powder are weak and prone to collapse.
Roof thickness: The roof should be at least 18 inches thick for insulation and structural strength.
Ventilation: Without a vent hole, CO2 builds and oxygen depletes. Always include ventilation.
Entrance height: Keep the entrance low. This prevents wind from entering and keeps warm air from escaping.
Avoid avalanche terrain: Never dig a cave or trench on a slope that could avalanche. Stick to flat or gentle terrain.
Key Principles for Any Survival Shelter
Location matters most. A great shelter in a bad location is worse than a poor shelter in a good location. High ground, natural windbreaks, near water, and away from hazards matter more than construction quality.
Insulation is critical. Insulation under you (bed) and over you (roof) matter equally. Many survival shelters fail because Scouts insulate the roof but sleep on cold ground.
Airflow is necessary. Your shelter needs ventilation. Too tight and you suffocate or get wet from condensation. Proper ventilation with a small entrance/vent is the balance.
Speed matters in emergencies. A simple shelter you can build in an hour is better than the perfect shelter you can’t finish before dark.
Test it before depending on it. If possible, test a shelter design before relying on it in a real emergency. Know what works in your environment.
Shelter Building Checklist
Before You Start:
- Location is high ground
- Windbreak or natural protection
- Water source nearby
- Away from hazards (dead trees, flood zones, avalanche terrain)
Forest Shelter:
- Ridgepole is strong and secure
- Roof insulation is 6+ inches thick
- Bedding is 12+ inches deep
- Entrance faces away from prevailing wind
- Interior is cramped but cozy (small space = less to heat)
Snow Shelter:
- Terrain is safe (not avalanche slope)
- Entrance is low and narrow
- Sleeping area is elevated above entrance
- Ventilation hole is open
- Roof is smooth (drips roll down walls)
- Bedding insulates from snow floor
Req 5e — Building & Testing a Shelter
Describing how to build a shelter is one thing. Actually building one from scratch, sleeping in it, and discovering what works (and what doesn’t) is something entirely different. This requirement combines all your shelter knowledge with real-world testing.
Planning Your Shelter Project
Choose Your Location and Season
Scout familiar territory. Don’t attempt this in a remote wilderness. Choose a location you know where help is nearby if needed—a Scout camp property, a park with ranger stations, or family land.
Pick the right season. Summer or early fall is ideal for a first shelter test. Cold, wet, or snowy conditions add difficulty—build a warm-weather shelter first.
Check permissions. Get explicit permission from the property owner or land manager. Some places prohibit shelter building; others have restrictions on where and how to build.
Scout the site. Before committing to building, explore the area. Find high ground, identify water sources, locate natural windbreaks, and note any hazards.
Choose Your Shelter Type
For beginners: A debris shelter (A-frame) is more forgiving than a lean-to. It provides better insulation and weather protection.
If it’s summer: A simple lean-to works fine. Full enclosure matters less in warm weather.
If windy or cool: A debris shelter or enhanced natural shelter provides better protection.
Avoid: Don’t attempt a snow cave unless you’re in a location with appropriate snow and experience building them. Start with a forest shelter.
Building Your Shelter
Gathering Materials
Time needed: 2-4 hours of daylight remaining before you need to shelter
Ridgepole (main support branch):
- Target: 8-12 feet long, 3-4 inches diameter (arm-thick)
- Test it by pushing down hard—it should support significant pressure without cracking
- You can use a fallen log or two sturdy branches lashed together
- Avoid branches that are cracked, partially split, or wet-rotted
Leaning branches:
- Collect 15-20 branches, each 6-10 feet long and 1-2 inches diameter
- Look for fallen branches first—don’t break living branches
- Create a pile organized by size (consistency matters for building)
Insulation (leaves, pine needles, bark):
- This is bulky. Plan to gather more than you think you need—leaves compress.
- A contractor’s wheelbarrow or large bin of leaves compresses to fill a 4x8 foot shelter
- Target: 8-12 inches of material on the roof
- Strip bark from fallen logs (don’t peel living trees)
- Collect leaves by the armful
Bedding:
- Gather a separate pile for floor insulation
- Target: 12-18 inches deep
- More is better—cold rises from the ground
Lashing materials (if needed):
- Paracord (ideal but not always available)
- Bark strips
- Vines or plant material
Building Steps
1. Position the ridgepole
- Lay it on top of two rocks, logs, or lashed between two trees at waist height
- Test stability by pressing down hard
- Height matters—6-8 feet is ideal (too low is cramped, too high loses insulation value)
2. Lean the framework
- Place branches at a steep angle (60-70 degrees) against the ridgepole
- Space them 1-2 feet apart
- They should form a tight A-frame shape
- If branches are uneven, use rocks or lashing to hold them in place
3. Create the roof layer
- Layer sticks or thinner branches horizontally across the leaning framework
- This holds the insulation material in place
4. Add insulation
- Pile leaves and needles on the roof framework, 6-12 inches thick
- Pack it down slightly as you add it
- The weight of leaves helps insulate—don’t pack too hard or you lose air pockets
- Angle it so water runs off, not into the shelter
5. Create the entrance
- One end should be open (leave 1-2 feet open)
- Ideally, the entrance faces away from the prevailing wind
- You can create a windbreak across the entrance with branches and leaves if needed
6. Insulate the interior floor
- Pile leaves and pine needles 12-18 inches deep
- This is your bed—comfort matters
- Compress it down slightly so it’s supportive, not mushy
7. Test integrity
- Get inside and move around
- Check for gaps where rain/wind could leak
- Add more insulation to weak spots
- Make sure it’s cozy, not spacious
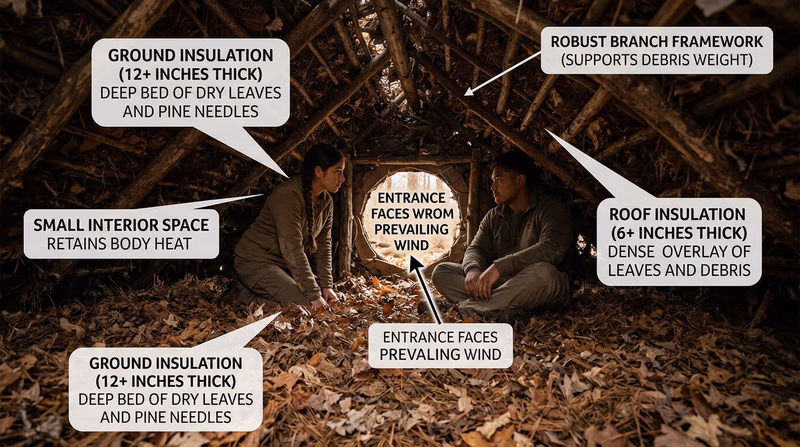
Environmental Responsibility
Leave no trace:
- Use fallen materials. Never cut living branches.
- Don’t peel bark from living trees.
- Don’t strip bark that damages the tree.
- Don’t cut small trees or saplings.
- After your night, disassemble or abandon the shelter gracefully—don’t leave a mess.
Minimize impact:
- Use an existing clearing or area already disturbed
- Don’t clear vegetation or dig out the site
- Keep the footprint small
Fire safety:
- Don’t build a fire inside the shelter—carbon monoxide is deadly
- If you want warmth, build a small fire outside the shelter entrance (if weather allows)
- Keep fire at least 6 feet away from shelter materials
Spending the Night
Before Dark
- Gather extra materials. Collect extra leaves and branches. You’ll likely need to adjust the shelter after dark.
- Prepare for bathroom breaks. Decide where your bathroom area is (at least 100 feet from shelter and water).
- Organize your items. Keep a flashlight, water, and extra clothing accessible.
- Test the entrance. Make sure you can get in and out easily.
During the Night
First hour (before sleep):
- Get inside and test comfort level.
- Adjust insulation if there are drafts or cold spots.
- Your body heat will warm the shelter—it may feel cool at first.
- Wear appropriate sleep clothing (layers so you can adjust).
Middle of night:
- You’ll likely wake up. This is normal.
- Assess comfort: too cold? Add insulation. Too warm? Remove layers.
- Check for leaks or water intrusion.
- Note what works and what doesn’t.
Toward dawn:
- Most shelters are coldest around dawn as body heat has dissipated.
- If you’ve planned well, you should be warm enough to sleep.
- If you’re cold, get up and move around to generate heat.
What to Expect
Success looks like:
- Staying warm enough to sleep
- No water intrusion during the night
- Waking up rested (or at least not miserable)
- No panic or emergency-exit situation
Failure looks like:
- Water pouring in during rain
- Being so cold you can’t sleep
- The shelter collapsing or shifting dangerously
- Realizing your design was fundamentally flawed
Both are learning experiences. You learn more from a failed shelter (what didn’t work) than a perfect one. That’s the whole point of this requirement.
Discussing Your Experience with the Counselor
When you meet with your merit badge counselor, be ready to explain:
What you built:
- Shelter type (lean-to, debris shelter, etc.)
- Location and why you chose it
- Materials used and how you gathered them
- How long it took to build
How you tested it:
- Weather conditions that night (temperature, wind, rain, etc.)
- What worked well
- What didn’t work
- Changes you’d make next time
What you learned:
- How insulation actually keeps you warm
- How location affects shelter comfort
- Why certain materials and designs work better than others
- How you’d approach building a shelter in different conditions (snow, extreme heat, etc.)
Environmental responsibility:
- How you minimized impact
- What you did with materials afterward
- How someone could rebuild a shelter in your location without seeing evidence
Variations for Different Conditions
Hot weather shelter: If you’re building in summer, your shelter needs shade more than insulation. A lean-to with thick roof coverage is perfect. You might be outside the shelter during the day but testing how well it blocks sun and provides cooling shade.
Cool or cold weather: A debris shelter (A-frame) provides better insulation. Make sure the bedding is especially thick—cold from the ground is more dangerous than cold from the air.
Wet conditions: If there’s any chance of rain, a well-sealed shelter is critical. Test your roof design before the night—stand outside the shelter during a test rain and see where water flows.
Multiple night option: Some Scouts prefer to build, sleep, adjust, and sleep a second night. This is allowed and gives you more feedback on improvements.
Req 6 — Fire Building
Fire is ancient technology, but it’s one of the most important survival skills. In the wilderness, fire provides warmth, purifies water, signals rescuers, and boosts morale. The challenge: you won’t always have matches. This requirement teaches you three reliable methods to build fire without them.
Understanding Fire’s Needs
Before you build a fire, understand what it requires:
Tinder (catches sparks or flame easily):
- Dry grass, bark, leaves
- Wood shavings or sawdust
- Lint from pocket dryer
- Char cloth (cotton cloth burned in low oxygen)
- Pine pitch
- Magnifying glass-focused sunlight
- Electrical spark or friction heat
Kindling (small wood that catches tinder flame):
- Small twigs (pencil-sized or thinner)
- Thin bark strips
- Small branches split lengthwise
- Dead leaves or dry grass
Fuel (larger wood that burns hot and long):
- Branches (wrist-sized or thicker)
- Logs (shoulder-sized and larger)
- Well-seasoned hardwood burns longer than softwood
Oxygen: Fire needs air. The arrangement of tinder, kindling, and fuel must allow airflow through the fire.
The process: Tinder catches a spark or flame → ignites kindling → kindling heats fuel → fuel catches and sustains the fire.
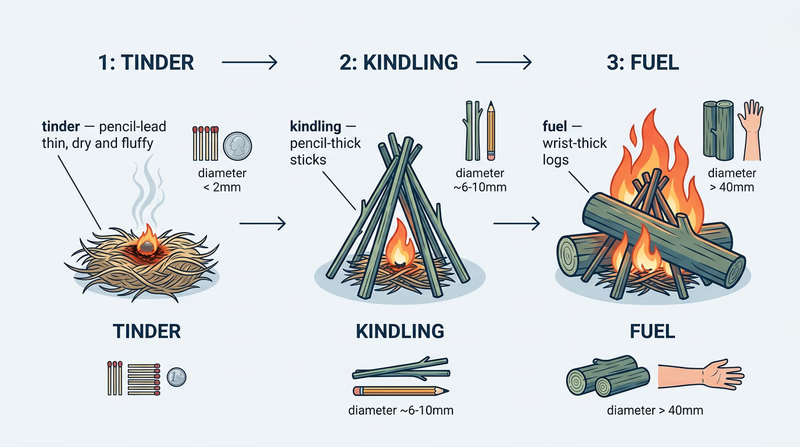
Method 1: Ferro Rod (Flint and Steel)
A ferro rod is a small metal stick that produces sparks when scraped with steel. It works when wet and is incredibly reliable.
How a Ferro Rod Works
The rod contains ferrocerium, a rare-earth metal alloy that sparks at 3,000°F when struck. These sparks ignite tinder.
Advantages:
- Works when wet
- Thousands of strikes per rod
- Lightweight and compact
- Works at high altitudes
- No chemical degradation
- Cheap (often $5-10)
Disadvantages:
- Requires dry tinder
- Learning curve—takes practice to get consistent sparks
- Sparks are hot but brief—timing matters
Building a Fire with a Ferro Rod
1. Prepare tinder
- Gather dry material: bark, pine needles, lint, dry grass
- Fluff it up—loose tinder catches sparks better than packed tinder
- Create a bundle roughly the size of a bird’s nest
2. Create a spark catcher
- Hold the ferro rod at a 45-degree angle over the tinder bundle
- Scrape a knife, steel, or hard rock along the rod toward yourself
- Sparks shower down onto the tinder
3. Light the tinder
- It takes several sparks, sometimes many. Don’t get discouraged.
- Good sparks land in the tinder and create a small glow
- Blow gently on the glow to encourage flames (don’t blow so hard you scatter the tinder)
- When flames appear, you have ignition
4. Transition to kindling
- Carefully place pencil-thin kindling around the burning tinder
- Gently keep blowing to feed oxygen to the fire
- Once kindling is catching, add more kindling, gradually increasing size
5. Build to fuel wood
- As kindling burns hotter, add wrist-sized branches
- Eventually transition to larger fuel logs
- Once the fire is established, you can stop nursing it
Pro tip: Practice with a ferro rod at home before relying on it in the wilderness. The feeling of good sparks and the timing of ignition are learned skills.
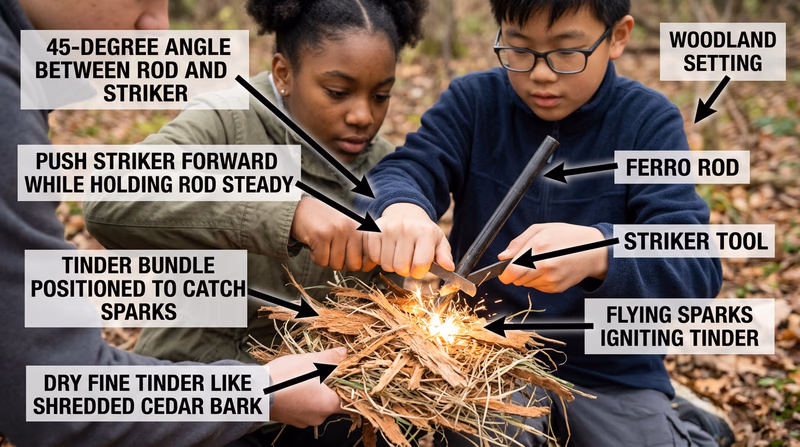
🎬 Video: 4 Emergency Fire Starters — https://youtu.be/bPMKS0qzzSQ
Method 2: Bow Drill (Friction Fire)
A bow drill creates fire through friction. Two pieces of wood rubbed together generate heat—enough heat to ignite tinder. This is ancient technology (humans used it for thousands of years) and it works, but it requires significant effort and practice.
How Bow Drill Works
A wooden bow, string, spindle, and fireboard create friction between two wooden surfaces. The heat from friction creates dust that’s hot enough to ignite tinder.
Building a Bow Drill Kit
Spindle (vertical stick):
- 3/4" diameter, 12-18 inches long
- Straight grained softwood (cedar, poplar, cottonwood)
- Shaped to a slight point at the bottom end
Fireboard (base that the spindle spins on):
- 1-1.5" thick, 3-4 inches wide, 12+ inches long
- Same wood as spindle (matching wood matters)
- Flat surface
Bow (provides pressure and speed):
- Flexible branch 3-4 feet long, bent into an arc
- String or cord linking the ends (leather, plant fiber, or paracord)
- Spindle fits into the string so the string wraps around it
Hearth board (catches the ember):
- Flat board under the fireboard to catch hot dust
- A piece of bark or thin wood works
How it works:
- Wrap the spindle with the bow string
- Apply downward pressure on the spindle’s top with a hand grip
- Saw the bow back and forth
- Friction heats the spindle and fireboard
- Hot dust collects on the hearth board
- The dust reaches ignition temperature and glows
- Transfer the hot ember to tinder and blow to flame
Challenges:
- Requires the right wood pairing (matching wood is important)
- Requires sustained effort (sawing is tiring)
- Needs technique—too much or too little pressure ruins it
- Takes 5-20 minutes depending on conditions and skill
This is a backup method. Bow drill is impressive and valuable if you’re truly stranded without other fire sources, but it’s not practical for quick fire-starting. Learn it for the requirement and survival knowledge, but rely on easier methods in practice.
Method 3: Hand Drill (or Other Friction Method)
Hand drill is simpler than bow drill but harder to execute. It uses the same friction principle with just a spindle and board.
Hand Drill Method
Components:
- Spindle (same as bow drill)
- Fireboard (same as bow drill)
- No bow—your hands provide the friction
How it works:
- Place the spindle on the fireboard
- Wrap your hands around the spindle (like rolling a stick between your palms)
- Apply downward pressure
- Roll the spindle quickly between your palms
- As the spindle spins down, move your hands downward, then quickly reposition at the top and repeat
Challenges:
- Very difficult to maintain pressure and speed simultaneously
- Your palms get hot and hurt
- Takes even longer than bow drill
- High failure rate for beginners
Alternative friction methods:
- Fire plow: Rub a stick back and forth along a groove in a board
- Fire saw: Saw bamboo or a flexible wood with a stick
- Pump drill: A vertical spindle with a weighted disc that spins from pumping up and down
All friction methods share the same principle: create heat through sustained friction until dust ignites.
Preparation and Practice
Gathering Tinder
Before you attempt a fire start, gather tinder:
In forest:
- Dead bark (birch bark is excellent)
- Pine needles or dead grass
- Dead leaves (if completely dry)
- Rotten wood (dry rotten wood is excellent tinder)
- Cattail fluff or milkweed pods (if available)
From supplies (always bring):
- Char cloth (create it by burning cotton scraps in a low-oxygen environment, like a tin with holes)
- Cotton lint from laundry
- Jute twine
- Petroleum jelly on cotton balls (burns long and hot)
Preparation matters: Tinder should be loose and fluffy, not compressed. More surface area = easier ignition.
Practicing Before You Need It
Critical: Practice at home or in a controlled setting before relying on these methods in the wilderness.
For each method:
- Gather materials
- Attempt to build the fire
- Note what works and what fails
- Adjust technique and try again
Common failures:
- Ferro rod: Weak sparks, tinder too damp, not enough tinder
- Bow drill: Wrong wood pairing, spindle slipping, not enough pressure
- Hand drill: Spindle slipping, hands too hot to continue, insufficient pressure
Troubleshooting: Each method has technique elements. YouTube has countless tutorials. Watch several, practice, and develop muscle memory.
Building Your Three Fires
When demonstrating for your merit badge counselor:
Fire 1 (Method 1 - e.g., Ferro Rod):
- Gather tinder (show your materials)
- Create a tinder bundle
- Create kindling pile
- Prepare fuel wood
- Use your method to create ignition
- Build fire up to a healthy size
- Let it burn safely
Fire 2 (Method 2 - e.g., Bow Drill):
- Show you’ve constructed proper equipment
- Follow the same fire-building process
- Be patient—friction fires take longer
- Once ignition happens, transition to kindling and fuel
Fire 3 (Method 3 - e.g., Hand Drill):
- Repeat the process with a different method
Safety during demonstration:
- Clear area of dry material (to prevent spread)
- Have water or extinguishing method nearby
- Don’t let fires burn large—you’re demonstrating technique, not building campfires
- Fully extinguish each fire before leaving
What Your Counselor Expects
- Three successful fires using three different methods
- Ability to explain the process for each method
- Understanding of tinder, kindling, and fuel
- Safe fire handling and extinguishing
- Genuine attempt and practice (not just one-shot perfection)
If a fire fails, that’s okay—you can try again. The requirement is demonstrating three successful fires, so you’ll have opportunity to restart.
Req 8 — Water Treatment
You can survive weeks without food but only days without water. Finding water in the wilderness is often easy—streams, lakes, and springs are common. The problem: untreated water contains parasites, bacteria, and viruses that cause dangerous illnesses. You must treat water before drinking it. This requirement teaches you three reliable treatment methods.
Why Water Treatment Matters
Common Waterborne Pathogens
Bacteria (Giardia, E. coli, Campylobacter):
- Cause severe diarrhea, cramps, nausea
- Can last 2-3 weeks even with treatment
- Dehydration from diarrhea becomes a survival threat
- Common in wild water, especially downstream from wildlife
Viruses (Hepatitis A, Rotavirus, Norovirus):
- Less common in wilderness than bacteria
- Cause severe gastrointestinal illness
- Most dangerous at higher elevations or near human settlements
- Require specific treatment methods
Parasites (Cryptosporidium):
- Highly resistant to many treatment methods
- Cause severe diarrhea lasting weeks to months
- Particularly dangerous for children and immunocompromised people
- Present in most natural water sources
The “Danger” — Untreated Water
Even clear, cold-looking water can be contaminated. A stream fed by mountain snow looks pure but can be teeming with Giardia from beaver or muskrat upstream.
Rule: Treat all water. No exceptions. Clear water is not safe water.
Method 1: Boiling
Boiling is the most reliable treatment method. Heat kills all pathogens.
How Boiling Works
High heat denatures proteins in pathogens’ cells, destroying them. Boiling also removes some volatile chemicals.
Effectiveness:
- Kills bacteria: ✓
- Kills viruses: ✓
- Kills parasites: ✓
- Removes chemical contaminants: Partial (some volatiles evaporate, but dissolved minerals remain)
Boiling Protocol
In normal conditions:
- Bring water to a rolling boil (100°C / 212°F)
- Boil for at least 1 minute
- Let it cool before drinking
At high altitude (above 6,500 feet):
- Boil for at least 3 minutes
- Water boils at lower temperatures at elevation, so longer boiling is needed
With unclear water (cloudy, discolored):
- Filter first (remove sediment)
- Then boil
- Sediment can harbor pathogens—pre-filtering helps
Advantages
- No equipment needed (just heat and a container)
- No filters to carry or maintain
- Most reliable method (nearly 100% effective)
- Works in any weather
Disadvantages
- Requires fuel (fire or stove)
- Takes time (boiling + cooling)
- Hot water is uncomfortable in hot weather
- Doesn’t remove minerals or taste issues
- Heavy fuel load if treating large quantities
Demonstration
When showing boiling to your merit badge counselor:
- Collect untreated water from a natural source (stream, pond, etc.)
- Heat it to a rolling boil (not just hot—actual bubbles)
- Maintain boil for the required time (1 minute normal, 3 minutes at elevation)
- Let it cool
- Describe what you’ve done and why it’s effective
🎬 Video: Purifying Water — https://youtu.be/tD-Ya2SQk3k
Method 2: Water Purification Tablets
Chemical tablets (Iodine or Chlorine Dioxide) kill pathogens chemically. They’re lightweight, reliable, and easy to use.
How Chemical Purification Works
Iodine or chlorine dioxide oxidizes pathogens’ cellular structures, destroying them.
Effectiveness:
- Kills bacteria: ✓
- Kills viruses: ✓
- Kills parasites: Partial (Iodine is weak against Cryptosporidium; Chlorine Dioxide is better)
- Removes chemical contaminants: No
Iodine Tablets
How to use:
- Fill a container with untreated water
- Drop one tablet per liter/quart
- Wait 30 minutes (or longer in cold water)
- Water is ready to drink
Contact time matters:
- Warm water: 30 minutes
- Cold water: 1-2 hours
- Very cold water: Several hours
Taste: Iodine gives water a metallic, slightly bitter taste. Some people don’t mind it; others find it unpleasant.
Downsides:
- Metallic taste
- Not ideal for long-term use (iodine can affect thyroid in people taking it for months)
- Weak against Cryptosporidium
Chlorine Dioxide Tablets
How to use:
- Fill a container with untreated water
- Drop one tablet per liter/quart (follow package directions)
- Wait 30 minutes
- Water is ready to drink
Advantages over Iodine:
- Better taste (less metallic)
- More effective against Cryptosporidium
- Better for extended use
Downsides:
- More expensive than iodine
- Still takes 30 minutes to work
Advantages of Tablets
- Ultra-lightweight (a month’s supply weighs ounces)
- Cheap ($10-20 for hundreds of treatments)
- No equipment needed
- Long shelf life (stable for years)
- Works in any weather, any temperature
Disadvantages
- Chemical taste/odor
- Takes 30 minutes to work
- Doesn’t remove sediment
- Not ideal for large quantities
- Some people can’t use iodine tablets
Demonstration
When showing tablet purification:
- Fill a container with untreated water
- Add a tablet following package directions
- Set timer for the required wait time
- Once complete, drink it and describe the process
- Note the taste and explain why tablets work
Method 3: Water Filtration
Filters remove particles and can kill/trap some pathogens. Common types: pump filters, gravity filters, straw filters.
How Filters Work
Mechanical filtration:
- Water passes through a porous membrane
- Particles and some pathogens get trapped in the pores
- Works against bacteria and parasites
- Less effective against viruses (viruses are very small)
Absorption filters (activated charcoal):
- Charcoal absorbs some chemicals and improves taste
- Primarily addresses chemical contaminants
- Not primary pathogen treatment
Common Filter Types
Gravity filters (like LifeStraw bags):
- Hang a bag of untreated water
- Water drips through a filter
- Takes 30 minutes to several hours
- No effort required once filled
- Portable and lightweight
Pump filters (like Katadyn):
- Push/pull to force water through a filter
- Fast (fills bottle in 1-2 minutes)
- Effective against bacteria and some parasites
- Requires maintenance and cleaning
- More durable for extended trips
Straw filters (like LifeStraw):
- Drink directly from the water source through a straw
- Instant purification as you drink
- Lightweight and cheap
- Only works for immediate drinking (can’t store treated water)
- Less effective than pump or gravity filters
Effectiveness
- Kills bacteria: ✓
- Kills viruses: Partial (some viruses pass through)
- Kills parasites: ✓
- Removes sediment: ✓
- Removes chemicals: Partial (charcoal helps)
Advantages
- No wait time (gravity filter) or fast (pump filter)
- No chemical taste
- Improves water appearance and taste
- Reusable (good long-term investment)
- Some filter multiple liters before needing replacement
Disadvantages
- Heavy or bulky (compared to tablets)
- Requires maintenance (cleaning, replacing filters)
- Doesn’t remove all viruses (when used alone)
- Filters clog in silty water
- Broken filter = no water treatment
Demonstration
When showing filtration:
- Collect untreated water from a natural source (prefer silty or murky water to show the filter works)
- Use your filter according to type:
- Gravity filter: Fill bag and let it drip into container
- Pump filter: Pump water into container
- Straw filter: Drink directly from water source
- Show the difference between untreated and filtered water (color, clarity)
- Explain how the filter works and what it removes
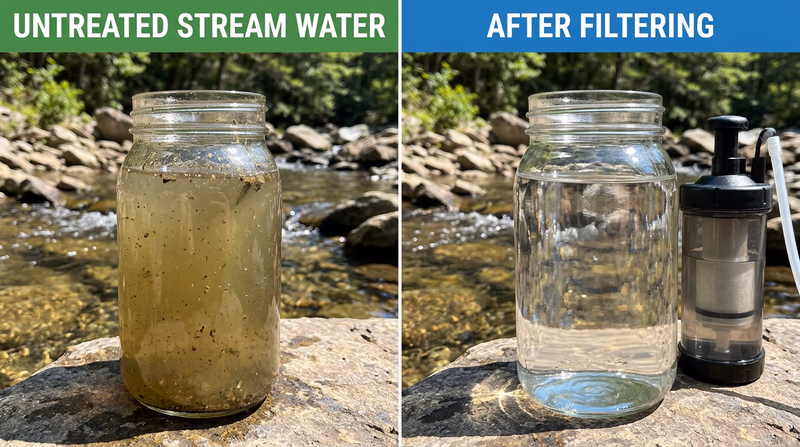
Combining Methods for Maximum Safety
One method is good. Two methods are better. Some Scouts combine methods:
Boiling + Filter: Filter removes sediment, boiling ensures all pathogens die (most reliable combo)
Filter + Tablets: Filter removes sediment, tablets kill any pathogens the filter missed (good backup)
Boiling + Tablets: Redundancy—boiling should have killed everything, but tablets ensure any survivors are eliminated
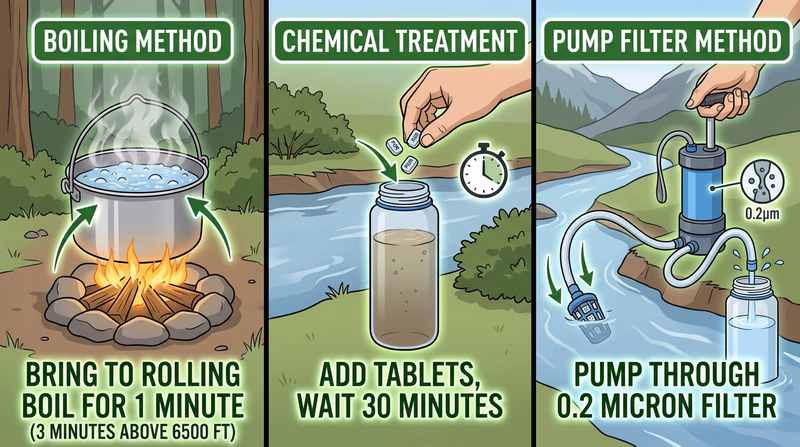
In a real survival situation with questionable water, combining methods isn’t overkill—it’s smart.
Sediment and Taste Issues
Dealing with Silty or Cloudy Water
Pre-filter:
- Pass water through cloth to remove large particles
- Cloth doesn’t kill pathogens but removes sediment
- Makes water clearer before treatment
- Improves tablet/filter effectiveness
Fine sediment:
- Let water sit 12+ hours; sediment settles to the bottom
- Carefully pour from the top, leaving sediment behind
- Then treat
Improving Taste
Boiled water: Let it cool, aerate it (pour between containers), or add a pinch of salt
Iodine taste:
- Vitamin C (ascorbic acid) removes iodine taste after purification is complete
- Add a small amount of powdered drink mix to mask taste
- Wait 24 hours—iodine taste fades
Chlorine taste:
- Aerate the water (pour back and forth between containers)
- Vitamin C reduces chlorine taste
Demonstration Requirements
To fulfill this requirement, demonstrate three different methods. You need to:
- Show understanding: Explain what each method does and why it works
- Demonstrate the process: Walk through the actual steps for each method
- Use real water: Use untreated water from a natural source, not purified water from the tap
- Show the result: If possible, show the difference before and after treatment
Special Situations
Melting Snow for Water
Snow is typically safer than liquid water (fewer pathogens) but still needs treatment:
- Melt snow by adding it to boiling water (never eat snow—it lowers core temperature)
- Treat as normal water using one of the three methods
- Boiling during the melt process counts as treatment
Treating Large Quantities
If you need to treat a lot of water:
- Boiling: Most fuel-efficient method, but slow
- Tablets: Fast and lightweight if you have plenty of time to wait
- Filters: Most practical for large quantities (gravity filters work while you do other things)
Req 9 — Edible Plants
In a survival situation, food is a lower priority than shelter, water, or rescue. You can survive three weeks without eating. However, knowing which plants are safe to eat prevents starvation in extended situations and boosts morale. The challenge: many plants are poisonous, and misidentification can be deadly.
The Fundamental Rule
Only eat plants you can identify with absolute certainty. Don’t guess. A single toxic plant can kill you or cause severe illness. When in doubt, don’t eat it.
Finding Edible Plants in Your Area
Research Before You Go
- Learn your local flora: What plants grow in your region? What’s edible?
- Field guide: Carry a region-specific plant guide or use your phone
- Expert consultation: Ask a local botanist, Master Naturalist, or park ranger what grows in your area
- Seasons matter: Different plants are edible in different seasons (acorns in fall, shoots in spring)
Safe Identification
Plant identification requires noting:
- Leaves: Shape, edge texture (smooth, serrated, lobed), arrangement (opposite, alternate), color
- Stem: Color, texture (smooth, hairy), growth pattern
- Flowers/Seeds: Color, shape, number of petals
- Root system: If applicable
- Smell: Some plants have distinctive odors
- Growth habitat: Where it grows (near water, in forest, on rocks)
Cross-check with a guide: Find the plant in your field guide and match every detail. One match isn’t enough—match multiple characteristics.
Common Edible Plants (Examples from Typical Regions)
Note: These examples are common in North America. Your region will have different plants. Research YOUR area’s plants specifically.
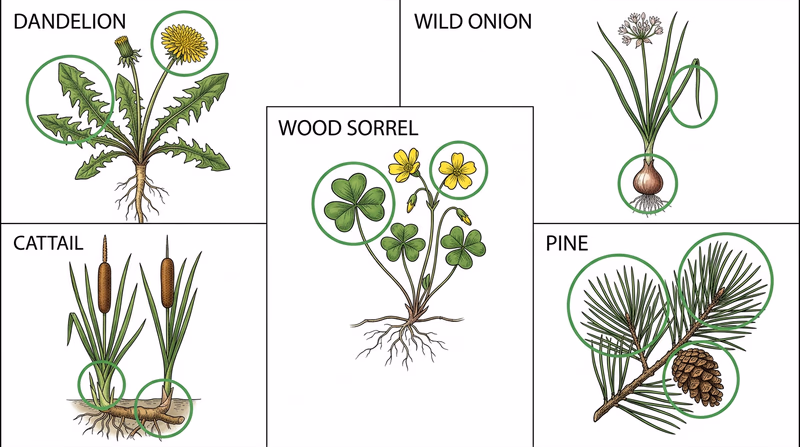
Plant 1: Dandelion (Taraxacum officinale)
Identification:
- Bright yellow flowers (ball-shaped, multiple petals)
- Deeply lobed leaves (resembling teeth—“dent de lion” = lion’s tooth)
- Milky sap when stem is broken
- Grows in lawns, fields, roadsides
Edible parts:
- Young leaves (bitter, nutritious)
- Flowers (sweet)
- Roots (can be roasted like coffee or eaten boiled)
Preparation:
- Leaves: Boil to reduce bitterness, or eat raw if young and tender
- Flowers: Can be eaten raw, made into wine, or fried
- Roots: Dig up, clean, roast in oven until dark, then grind for coffee substitute
Nutrients: High in vitamins A, C, K; minerals like iron and calcium
Season: Spring (young leaves are best); flowers in spring/early summer; roots fall/winter
Plant 2: Wild Onions/Garlic (Allium species)
Identification:
- Grass-like leaves
- Distinctive onion or garlic smell (the key identifier)
- Small white, pink, or purple flowers in clusters
- Bulbs underground
Edible parts:
- Leaves (raw or cooked)
- Bulbs (raw or cooked)
- Flowers (raw or cooked)
Preparation:
- Raw: Slice leaves or bulbs into salads
- Cooked: Boil, roast, or fry like domestic onions
Safety note: The smell is the most reliable identifier. If it doesn’t smell like onion/garlic, it’s not a wild allium.
Season: Spring (leaves), summer (flowers), fall (bulbs)
Plant 3: Wood Sorrel (Oxalis species)
Identification:
- Heart-shaped or three-lobed leaves (clover-like)
- Yellow, pink, or white flowers
- Slightly tangy/sour taste when chewed (contains oxalic acid)
- Delicate, low-growing plant
Edible parts:
- Leaves (raw or cooked)
- Flowers (edible and pretty)
- Seed pods (edible)
Preparation:
- Raw: Leaves in salads (tart, lemony flavor)
- Cooked: Boil or steam
- Seed pods: Can be eaten raw or pickled
Safety note: Contains oxalic acid. Safe in moderation but don’t eat large quantities regularly.
Season: Spring through fall
Plant 4: Cattails (Typha species)
Identification:
- Grows near water (marshes, ponds, streams)
- Long, blade-like leaves
- Brown, fuzzy flower head (looks like a corn dog on a stick)
- Thick rhizomes (underground stems) in mud
Edible parts:
- Young shoots (like asparagus)
- Inner core of shoots (raw or cooked)
- Immature flower heads (like corn on the cob)
- Rhizomes (starchy, potato-like)
Preparation:
- Shoots: Boil or roast
- Flower heads: Boil, then butter like corn
- Rhizomes: Dig up, clean, boil or roast
Safety note: Ensure no pesticides have been used on the water source.
Season: Spring (shoots), summer (flower heads), fall/winter (rhizomes)

Plant 5: Pine Nuts and Pine Needles (Pinus species)
Identification:
- Evergreen tree with needle-like leaves
- Distinctive cones (various sizes/shapes depending on species)
- Some species produce large nuts in cones
Edible parts:
- Pine nuts (from inside cones)
- Needles (tea)
- Inner bark (emergency food)
Preparation:
- Nuts: Crack open cones, extract nuts, eat raw or roast
- Needles: Boil or steep in hot water to make vitamin C-rich tea
- Inner bark: Scrape from tree, cook, or eat raw (emergency food)
Safety note: Avoid Ponderosa Pine and Norfolk Island Pine (toxic). Most pine species are edible.
Season: Nuts depend on species (fall for many); needles year-round; bark year-round (emergency)
Plants to Avoid
Poisonous Look-Alikes
Many edible plants have dangerous poisonous cousins:
Poison Hemlock vs. Wild Carrot/Parsnip:
- Poison hemlock has purple/red blotches on the stem and a foul smell
- All parts are deadly (causes severe skin burns and organ failure)
- When in doubt, don’t eat ANY wild carrot/parsnip
Deadly Nightshade (Belladonna) vs. Wild Berries:
- Nightshade has distinctive flowers (tubular, purple/black berries)
- All parts are deadly (causes paralysis, death)
- Never eat wild berries unless 100% certain of ID
Death Camas vs. Wild Onion:
- Death camas has NO onion/garlic smell (this is the key difference)
- All parts are deadly
- If it doesn’t smell like onion, don’t eat it
The Rule
If you’re not absolutely certain, don’t eat it. Food poisoning can be deadly in a survival situation. Mild hunger for a few days is far better than severe poisoning.
Preparation Methods
Boiling
Most wild plants benefit from boiling:
- Removes bitterness
- Softens tough leaves
- Reduces toxins in some plants (like acorns)
- Cook in water, discard the water if the plant is known to be slightly bitter
Roasting
Good for:
- Seeds and nuts
- Root vegetables
- Inner bark
- Roast on rocks near a fire or in a makeshift oven
Raw
Safe for:
- Young leaves (tender, less bitter)
- Fruits and berries (if identified as safe)
- Some roots and tubers (though tougher than cooked)
- Flowers
Fermentation
Can make some plants more digestible and preserve them:
- Sauerkraut method (salt + time) works for certain greens
- Reduces digestive upset from some plants
Signs of Poisoning (If You Eat Something Unsafe)
Seek medical help immediately for:
- Severe burning in mouth or throat
- Uncontrollable vomiting or diarrhea
- Difficulty breathing
- Seizures
- Severe abdominal pain
- Altered vision or hallucinations
Treatment:
- Rinse mouth with water
- If available, induce vomiting (unless specifically told not to)
- Seek medical care immediately
- Bring the plant or a photo if possible (helps doctors identify poison)
Researching Your Area
Getting Started
- Find a field guide for your region (check library, outdoor stores)
- Take a class from a local naturalist or university extension
- Join a foraging group to learn from experienced people
- Visit parks with educational signs identifying plants
- Use iNaturalist app to identify plants and verify with community
Resources for Research
- Regional field guides (get specific to your state/region)
- University extension programs (often free, plant identification)
- Local botanical gardens
- Master Naturalist programs
- Online plant identification forums (with caution—verify information)
Practical Exercise: Describing Five Plants for Your Counselor
When preparing for your counselor meeting:
- Choose five plants that actually grow in your area
- Research each thoroughly:
- What does it look like? (detailed description)
- When does it grow? (season)
- How is it prepared? (cooking method, safety precautions)
- What parts are edible? (leaves, roots, flowers, seeds)
- Create a simple reference card with:
- Plant name
- Identification characteristics
- How to prepare it
- Season
- If possible, show samples or bring photos
- Practice explaining each plant clearly
Additional Food Sources
Beyond plants, remember:
Insects: Crickets, grasshoppers, termites, ants are edible and high in protein (but only if safe to eat—some have toxic defenses)
Fish: If you can catch them, fish are excellent nutrition
Small animals: Rabbits, squirrels, mice—if you can trap them (more difficult than plants)
Eggs: Bird eggs are edible (but not always legal or ethical to take)
Nuts: Acorns, walnuts, hickory nuts (must be properly processed to remove toxins)
Plant knowledge is your most reliable food source in a survival situation.
Req 10 — Signaling for Rescue
Signaling for Rescue. Describe the following:
- Using a cell phone, including when and how to call for help
- Using a personal locator beacon (PLB)
- Signaling with a whistle
- Using a signal mirror
- Using a flashlight to signal
Explain the advantages and limitations of each method.
Signaling for rescue involves modern technology and ancient techniques. Each method has strengths and weaknesses. A wise Scout understands all of them and knows when each is most effective.
Using a Cell Phone
Cell phones are your fastest rescue option IF you have signal.
When It Works
Best case: You have cell signal (even if weak) and can make a call or text.
911 is always first: Even if you’re not on a plan, 911 works on any cell phone.
Location sharing: Modern phones share GPS location, making rescue faster.
The Call
What to say (concisely):
- “This is [your name]. I’m lost/injured near [location/landmark].”
- Provide details: “I’m near the blue trail marker, about 2 miles north of the parking area.”
- Describe your situation: “I’m injured but sheltered. I can stay put.”
- Give your callback number (in case connection is lost)
- Don’t hang up if possible—let them contact you
Text vs. Call:
- Calls are faster (immediate voice contact)
- Texts work with weak signal when calls don’t
- Send texts anyway (they may succeed even if calls don’t)
Advantages
- Immediate contact with trained dispatchers
- GPS location sharing (phones transmit location to 911)
- Fast rescue (dispatcher sends help immediately)
- Two-way communication (they can ask questions, you get updates)
Limitations
- Requires cell signal (no signal = useless)
- Battery drainage (signal searching kills battery fast)
- No signal in many wilderness areas
- Assuming rescuers can reach your location quickly (remote areas take time)
Preservation Tips
Extend battery life:
- Turn off WiFi and Bluetooth
- Reduce screen brightness
- Use airplane mode when not actively using phone
- Carry a portable charger (modern essential)
Using a Personal Locator Beacon (PLB)
A PLB (or satellite communicator like InReach) sends your exact GPS location to a rescue coordination center via satellite. No cell signal needed.
How It Works
- Press a button to activate the PLB
- Device transmits your GPS coordinates via satellite
- Rescue coordination center receives your location
- Rescue is dispatched to your coordinates
- You remain in place and wait
Advantages
- Works anywhere (satellite coverage is global)
- No cell signal needed
- Rescue teams get exact GPS coordinates
- Completely reliable (designed for this purpose)
- Two-way models allow texting with rescuers
Limitations
- Expensive ($100-500 device + subscription)
- Requires line-of-sight to sky (dense forest, canyons reduce effectiveness)
- Takes time to deploy and activate
- Rescue is still days away in remote locations (transmission happens immediately, but physical rescue takes time)
- Not everyone carries one
When PLBs Shine
PLBs are ideal for:
- Extended backcountry trips (mountaineering, remote hiking)
- Water-based activities (sailing, kayaking far from shore)
- Expeditions to areas with no cell coverage
For Most Scouts
Cell phones + trip plan = sufficient for day hikes and normal camping. PLBs are overkill for local activities but invaluable for serious backcountry trips.
Signaling with a Whistle
A whistle is your primary ground-level signaling tool. Three blasts is universal distress.
How to Signal
The pattern:
- Three short blasts: PEEP-PEEP-PEEP … (pause) … repeat every 10 minutes
Sound carries:
- 1-3 miles in open terrain
- Less in forest (maybe 0.5-1 mile)
- Sound travels differently in wind and rain
Duration:
- Use in intervals (don’t blow continuously)
- Rescuers listen between signals
- Blow every 10 minutes for as long as needed
Advantages
- No batteries (mechanical whistle never fails)
- Lightweight and cheap
- Carries farther than voice
- Recognized as distress signal worldwide
- Works in darkness
Limitations
- Ground rescue only (helpless against aircraft unless they’re actively listening)
- Doesn’t work well in heavy rain/wind
- Rescuers must be relatively close to hear it
- Can’t communicate complex information (just “I’m here”)
Integration
Use whistle + visual signals:
- Whistle to alert to your location
- Mirror/bright cloth for visual confirmation
- Together they’re more effective than either alone
Using a Signal Mirror
A signal mirror reflects sunlight to attract distant attention. It’s visible up to 10+ miles on clear days.
How to Signal
Setup:
- Position sun behind you
- Aim the mirror reflection at the target (aircraft, distant rescuer)
- Flash briefly (1-2 seconds)
- Pause 5 seconds
- Repeat until the target acknowledges
For aircraft:
- Flash repeatedly every 5-10 seconds
- Pilot might not notice immediately—persistence matters
- Mirror flashes are highly visible from high altitudes
For distant rescuers:
- Consistent flashing at their direction
- Mirror works for ground rescuers too if they’re far away
Advantages
- Visible 10+ miles on clear days
- No batteries or moving parts
- Weighs almost nothing
- Can be improvised from any reflective surface
- Works in daylight without fail
Limitations
- Only works in daylight with clear sun
- Requires clear sky (fog or rain prevent it)
- Useless at night
- Requires aiming (takes practice)
- Improvised mirrors are less effective
Integration
Mirror + whistle combo:
- Mirror for initial attention (visible far away)
- Whistle for continuous location signaling
- Together they’re a complete ground-and-air signal system
Using a Flashlight to Signal
A flashlight sends visible light signals, useful at night.
Signaling Techniques
SOS in Morse code:
- Short flash, short flash, short flash (dots: ·)
- PAUSE
- Long flash, long flash, long flash (dashes: —)
- PAUSE
- Short flash, short flash, short flash (dots: ·)
- Repeat
Continuous flashing:
- Steady flash every 2-3 seconds
- Signals “I’m here, please find me”
Aimed at target:
- Point flashlight at aircraft or distant rescuer
- Flash deliberately at them
- They understand “I’m trying to signal you”
Advantages
- Works at night (mirror is useless after dark)
- Can be aimed at specific targets
- Most people carry flashlights
- No special equipment needed
- Visible from significant distances
Limitations
- Battery dependent (batteries die, are forgotten, or leak)
- Less visible than mirror in daylight (too dim)
- Requires darkness or twilight to be effective
- Can’t signal if battery is dead
- Flashlight is bulky to carry
Integration
Flashlight + whistle:
- Mirror during day
- Flashlight at night
- Whistle continuously throughout
Comparison: Advantages and Limitations
| Method | Range | Day/Night | Effort | Reliability | Setup Time |
|---|---|---|---|---|---|
| Cell Phone | Unlimited (if signal) | Both | Minimal | Signal-dependent | Seconds |
| PLB | Unlimited (satellite) | Both | Minimal | Very high | Seconds |
| Whistle | 1-3 miles | Both | Low | Very high | None |
| Mirror | 10+ miles | Day only | Low (with practice) | Very high | Seconds |
| Flashlight | 1-5 miles | Night | Low | Battery-dependent | Seconds |
Integrated Signaling Strategy
Best practice uses all available methods:
Phase 1: Immediate (first hour)
- Try cell phone (may be weak signal)
- Deploy whistle (attract ground rescuers)
- Deploy mirror (attract distant rescuers/aircraft)
Phase 2: Sustained (ongoing)
- Repeat whistle pattern (every 10 minutes)
- Repeat mirror flashes (daytime)
- Use flashlight (nighttime)
- Maintain fire/smoke signal (if possible)
Phase 3: Coordinated (when rescue approaches)
- Use cell phone to communicate directly
- Use mirror to pinpoint your location to aircraft
- Use flashlight to mark your position at night
- Use ground-to-air signals (X, V, etc.) for final location
What Your Counselor Expects
You should be able to:
- Describe each method: What it is, how it works
- Explain advantages: Why it’s useful
- Explain limitations: What problems each has
- Compare them: When would you use each one?
- Demonstrate at least some: Actually showing whistle, mirror, or flashlight signals helps
Critical thinking: Your counselor might ask, “You’re lost at night. Your cell phone has no signal. What do you do?” You should explain:
- Use flashlight to signal
- Use whistle to attract ground rescuers
- Build a fire (if possible) for smoke signal at dawn
- Deploy ground-to-air signals
- Stay in place (don’t move at night)
Redundancy and Real-World Thinking
In real rescues:
- Cell phones fail (batteries, signal, damage)
- Flashlights have dead batteries
- Mirrors get lost or broken
- Whistles are forgotten
- PLBs are expensive (not everyone has one)
The solution: Carry multiple signaling tools and understand all methods. A Scout with whistle + mirror + flashlight is far more likely to be found than one depending on a single method.
Extended Learning
You’ve completed the Wilderness Survival Merit Badge requirements. Your foundation in shelter, signaling, water treatment, fire-building, and emergency response is solid. But survival is a lifetime skill. This section points you toward deeper knowledge and real-world opportunities to develop your wilderness competency.
A. Advanced Shelter Building and Winter Survival
Beyond the basic shelters you’ve built, advanced survival includes specialized techniques for extreme conditions.
Snow shelter engineering: Winter mountaineers build elaborate snow caves with thermal stratification chambers, ventilation systems, and entry tunnels designed to minimize heat loss. Understanding how snow insulates at different temperatures and densities is critical. A poorly designed snow shelter at -20°F is worse than a debris shelter because it’s colder inside than out. Professionals study snow metamorphosis (how snow changes over time) and can assess avalanche risk while building.
Extreme cold survival: Beyond “stay warm,” extreme cold means understanding wind chill calculations, early signs of hypothermia and frostbite, and priority management when resources are scarce. Hypothermia sneaks up—you can be hypothermic while still feeling warm (paradoxical undressing). Recognizing the “umbles” (mumbling, stumbling, fumbling) in yourself and others is life-saving knowledge. High-altitude mountaineers spend months acclimatizing to cold and low oxygen—a completely different challenge than ground-level survival.
Arctic and polar survival: Traveling in the Arctic requires knowledge of ice conditions, avalanche terrain, sea ice breakup, polar wildlife, and extended darkness. Survival in the Arctic means planning for months without rescue, not days. Modern polar expeditions use satellite communication and weather prediction, but the fundamentals remain: shelter, fire, food, and signaling.
Resources:
- Books: “The Art of Survival” by Angus Konstam, “Mountaineering: The Freedom of the Hills”
- Organizations: American Alpine Club, National Association for Search and Rescue
- Courses: Winter mountaineering courses (REI, NOLS, local rock gyms)
B. Wilderness Medicine and Advanced First Aid
Wilderness medicine is distinct from urban first aid. You’re far from hospitals, resources are limited, and evacuation takes hours or days.
Wilderness first responder (WFR) certification: The gold standard for backcountry rescue. WFR training (2-3 days) teaches how to assess injuries in the field, manage serious wounds with limited supplies, improvise splints, treat hypothermia and heat illness, and make evacuation decisions. Many Scout leaders and outdoor educators pursue WFR certification. It’s non-negotiable if you guide others in the wilderness.
Treating injuries without resources: What do you do if you’re 10 miles from the trailhead with a broken ankle and no cell signal? How do you stop bleeding with no bandages? How do you prevent infection with no antibiotics? Wilderness medicine answers these questions with practical improvisation.
Evacuation decisions: When is a victim able to walk out? When do you stay put and wait for rescue? When do you attempt to carry someone? These decisions are harder than they sound and have life-or-death consequences.
Resources:
- Certification: Wilderness First Responder (various providers: NOLS, REI, universities)
- Books: “Wilderness Medicine: Beyond First Aid” by William Forgey
- Organizations: Wilderness Medical Society
C. Advanced Water Finding and Treatment
Water is always priority, but sourcing it safely requires knowledge beyond boiling.
Hydrology and water location: Experienced survivors can predict where water will be based on terrain. Water flows downhill—finding the lowest point often leads to water. Vegetation indicates water presence (willows, cattails, green vegetation clusters). Animal signs point to water (animal trails often lead downhill to water sources). Developing this intuition requires studying maps and terrain.
Advanced filtration: Beyond basic filters, understanding micron ratings, pathogens that different methods handle, and building improvised filters from sand and charcoal gives you backup plans. A Scout who can build an effective filter from sand, cloth, and activated charcoal has gone far beyond the requirement.
Water from air: In humid climates, condensation can provide water. Dew collection (cloth wiping morning dew into a container) provides water in many environments. Solar stills (plastic-covered holes that collect groundwater evaporation) work but are slow. Understanding all methods means you always have an option.
Saltwater desalination: If you’re near ocean water, crude distillation (boiling and condensing the vapor) produces fresh water. Complex but possible with basic equipment.
Resources:
- Books: “Survival Water Procurement” (specialized texts)
- Course: Water sourcing components of NOLS and REI wilderness courses
D. Food Sourcing and Nutrition in Wilderness
Food is the lowest survival priority, but extended situations require nutrition knowledge.
Comprehensive plant identification: Master your region’s plants thoroughly. Not just five edible plants, but twenty, thirty, or more. Join a local foraging group and spend seasons learning. Different plants are edible at different growth stages (young vs. mature leaves, shoots vs. seeds).
Hunting and trapping small game: Setting snares and traps requires knowledge of animal behavior, materials, and ethics. Hunting requires licenses and training but provides high-protein food. Most Scout-age individuals shouldn’t pursue this alone, but understanding it is valuable.
Fishing and aquatic food: Fish are excellent nutrition and catchable with minimal equipment. Understanding fish behavior, water conditions, and improvised fishing methods (line and hook, spears, traps) provides reliable food in many environments.
Insect harvesting: Crickets, grasshoppers, termites, and ants are high-protein, abundant, and often overlooked. Many cultures eat insects regularly. Learning which are safe and how to prepare them is practical survival knowledge.
Nutrition balance: Not all survival foods have complete nutrients. Understanding which deficiencies develop (vitamin C from citrus, salt from animal organs) helps you assess long-term nutrition.
Resources:
- Books: “The Forager’s Harvest” by Samuel Thayer, “Peterson Field Guide to Edible Wild Plants”
- Organizations: Local naturalist groups, Audubon societies, Master Naturalist programs
- Courses: Plant identification and ethnobotany courses at local universities
E. Real-World Experiences and Opportunities
These direct experiences cement your knowledge and build genuine competency.
Multi-day backpacking: The Wilderness Survival requirement emphasizes one night in a shelter. Extended backpacking (3-7 days) forces you to apply all skills: water treatment daily, fire-building repeatedly, shelter maintenance, food management. Real conditions (unexpected rain, colder-than-expected temperatures, minor injuries) teach lessons that one night can’t.
Volunteer with search and rescue: Many areas have SAR organizations staffed by volunteers. Joining a SAR team (usually requires age 18+, but younger volunteers can assist) puts you on real rescue operations. You’ll help find lost people, understand terrain differently, and see how rescuers think.
Attend outdoor skills camps and conferences: Organizations like NOLS, REI, and Outward Bound offer courses ranging from day classes to month-long expeditions. Winter survival courses, mountaineering schools, and wilderness medicine trainings are available. Investing in these courses multiplies your skills.
Work as an outdoor educator or guide: Many camps, outfitters, and organizations hire seasonal staff to lead groups on camping trips. Working as a camp counselor or hiking guide forces you to develop skills and teach others—the best way to deepen your own knowledge.
Hiking challenging terrain in different seasons: A day hike in a familiar area in summer is different from backpacking the same area in winter or during a thunderstorm. Seek variety: different seasons, different terrain, different weather conditions. Each changes how you apply survival skills.
Service projects in wilderness areas: Building trails, maintaining shelters, removing invasive plants—these projects put you in the wilderness for extended periods while serving. You develop land knowledge and practical skills.
F. Advanced Signaling and Communication
Beyond whistles and mirrors, modern technology changes how rescue works.
Satellite communication: InReach and similar devices allow two-way messaging via satellite from anywhere on Earth. Garmin InReach allows messaging with loved ones and emergency SOS without the limitations of PLBs. These devices are becoming standard for serious backcountry travelers.
Drone signaling and location: Modern search operations use drones for aerial search. Understanding how drones work, their limitations (battery life, weather), and how to signal effectively to drone operators is increasingly relevant.
Electronic vs. traditional signals: GPS has transformed rescue, but it fails. Batteries die. Devices break. Clouds block signals (in some systems). Understanding why traditional signaling (mirror, whistle) remains critical even in the age of technology is philosophical and practical.
Two-way communication devices: Satellite communicators allow coordinating rescue and providing updates. Real rescues increasingly involve constant communication between lost person and rescue coordinator.
Resources:
- Technology: Research Garmin InReach, SPOT devices, modern PLBs
- Courses: Advanced wilderness communication courses
G. Environmental Ethics and Wilderness Stewardship
Survival knowledge comes with responsibility: how you use the wilderness matters.
Leave No Trace principles: Seven principles guide ethical wilderness use:
- Plan ahead and prepare
- Travel and camp on durable surfaces
- Dispose of waste properly
- Leave what you find
- Minimize fire impacts
- Respect wildlife
- Be courteous to others
When you build a shelter, you impact the land. Camp responsibly. Dismantle your shelter so it’s invisible afterward. Never cut live vegetation if alternatives exist.
Wildlife ethics: The wildlife protection you learned (bears, raccoons) assumes you’re defending your camp, not hunting. Respecting wild animals as inhabitants of their habitat (not pests to eliminate) shapes how you coexist.
Sacred sites and cultural heritage: Many wilderness areas are sacred to Indigenous peoples or have cultural significance. Understanding this history and treating these places with respect is non-negotiable.
Sustainable harvesting: If you harvest edible plants or fish, do so sustainably. Taking all the wild onions in an area means they won’t grow back. Removing all fish from a stream changes the ecosystem. Leave enough for the ecosystem to thrive.
Climate change and wilderness: Wilderness conditions are changing: glaciers melting, snow arriving later, extreme weather becoming common. Modern survival includes adapting to these shifts.
Resources:
- Books: “Leaving No Trace” (official guide), “Braiding Sweetgrass” by Robin Wall Kimmerer
- Organizations: Leave No Trace Center, American Alpine Club, Sierra Club
Suggested Progression for Deeper Learning
Year 1 (After earning badge): Earn Wilderness Survival BSA and Hiking merit badges if you haven’t. Take a Wilderness First Responder course. Do 2-3 multi-day backpacking trips.
Year 2: Learn your local plants (plant ID class or foraging group). Practice shelter-building in different seasons. Volunteer with SAR if eligible.
Year 3: Take a winter mountaineering or advanced wilderness course. Lead a multi-day trip for younger Scouts (teaching cements knowledge). Consider NOLS or similar expedition course.
Year 4+: Specialize in an area (winter survival, mountaineering, water-based rescue, wilderness medicine). Consider careers in outdoor education, search and rescue, or wilderness guiding.
Resources Summary
Organizations:
- National Association for Search and Rescue (NASAR)
- National Outdoor Leadership School (NOLS)
- REI Co-op Outdoor School
- American Alpine Club
- Wilderness Medical Society
- Leave No Trace Center for Outdoor Ethics
Books:
- “Mountaineering: The Freedom of the Hills” (comprehensive)
- “Wilderness Medicine: Beyond First Aid” by William Forgey
- “The Forager’s Harvest” by Samuel Thayer
- “Survival Wisdom & Know-How” (Editors of Esquire)
Certifications:
- Wilderness First Responder (WFR)
- Wilderness First Aid (WFA)
- Search and Rescue training
- Leave No Trace Trainer
Continued Development:
- Enroll in NOLS courses (various lengths and specialties)
- Take REI wilderness skills classes
- Join local mountaineering club
- Volunteer with SAR organization
- Lead trips for younger Scouts
Wilderness Survival is foundational. You now have tools to keep yourself alive in emergencies. The next chapter is doing this repeatedly, in different conditions, and helping others develop these skills. The wilderness will teach you humility, resilience, and respect for nature. Pay attention. The learning never stops.