Req 5d — Survival Shelters
A survival shelter is built from whatever materials the environment provides. You won’t have nails, saws, or a tent—only branches, leaves, snow, and your hands. Understanding how to improvise shelter in a forest or snow conditions means understanding what materials work and why they work.
The Forest Environment
A forest provides abundant materials: branches, leaves, bark, saplings, and logs. Your shelter’s goal is to trap body heat and block wind and rain.
Finding the Best Location
Before building, scout the area:
High ground: Avoid low areas where water collects during rain. Water flows downhill—position yourself above where it flows.
Natural windbreaks: Look for dense stands of trees, rocky outcroppings, or hillsides that block wind naturally. Building in the open requires much more work.
Dry materials nearby: Branches, leaves, and bark should be close. Carrying heavy materials long distances is exhausting.
Water source: Ideally within sight or short distance. You’ll need water before building, during, and after.
Avoid hazards: Don’t shelter under dead branches (widow makers), in gullies prone to flash flooding, or on exposed ridges that attract lightning.
Basic Forest Shelters
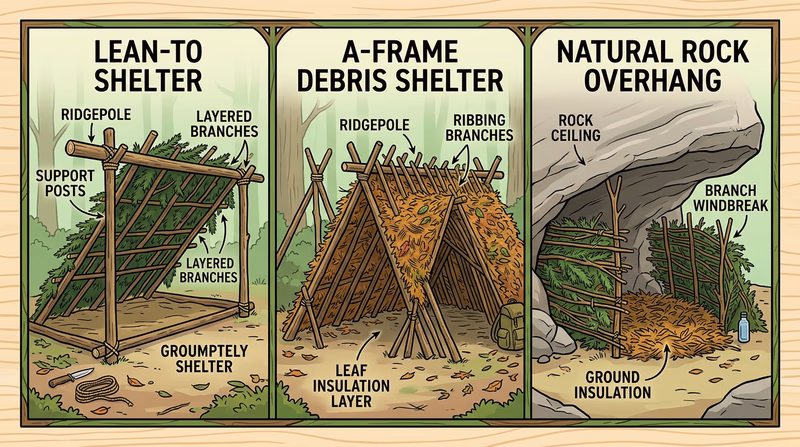
Lean-To Shelter
The simplest and fastest shelter to build.
Structure:
- Find two trees 6-8 feet apart or set up two branches as uprights (secured with stones or dug into the ground)
- Place a strong branch horizontally between them as a crossbeam at waist height
- Lean branches at an angle against the crossbeam to form a slanted roof
- Pile leaves and branches on the slanted roof for insulation
- Stuff leaves and branches inside for a bed and insulation from the ground
Time to build: 1-2 hours
Protection: Blocks wind from one direction. Not fully enclosed. Best for dry or light rain conditions. In heavy rain, the open front lets water blow in.
Insulation: The layers of leaves and branches trap dead air. Make it thick (6-12 inches minimum on the roof).
Debris Shelter (A-Frame)
More enclosed than a lean-to and excellent for cold conditions.
Structure:
- Find a long fallen log or place a strong branch between two trees at waist height
- Lean branches on both sides of this ridgeline to create an A-frame shape
- Layer leaves and branches thickly over the frame
- Stuff the interior with leaves and branches for bedding and insulation
- Leave one end open slightly for an entrance
Time to build: 2-3 hours
Protection: Fully enclosed on three sides and the roof. Open entrance is the only potential leak point. Excellent for rain and wind.
Insulation: The thick leaf/branch covering and interior stuffing create excellent insulation. This is a better choice than lean-to for cold weather.
Natural Shelter with Enhancement
Nature often provides partial shelters:
Rock overhangs or caves: Provide instant roof and wind protection. Collect branches and leaves to:
- Create a windbreak across the open side
- Insulate the floor with leaves
- Build a small fire for warmth (if ventilation allows)
Fallen trees: A large fallen tree creates a natural windbreak. Lean branches against it and cover with leaves to create shelter.
Dense evergreen trees: Branches form a natural shelter. Clear space beneath, add leaves for insulation, and you have a quick shelter.
Building Materials and Methods
Ridgepole (main branch): Must be strong enough to support weight. Test it before committing branches to it. Thicker is better than thin.
Leaning branches: Collect branches 6-10 feet long and 2-4 inches diameter. They don’t need to be perfectly straight.
Insulation (leaves, needles, bark): The thicker the better. Aim for 6-12 inches of material on the roof. Leaves compress over time, so add extra.
Bedding (leaves, pine needles): Create a layer at least 12 inches deep. Ground is cold—insulation under you is as important as insulation over you.
Securing materials: For lashing, use:
- Paracord (if available)
- Strips of bark
- Vines
- Clothing or rope improvised from plant fibers
The Snow Environment
Snow is an excellent insulator (it’s actually mostly air), but it requires different shelter techniques than a forest.
Understanding Snow
Snow insulates because it’s mostly air pockets. 10 inches of snow provides roughly the same insulation as fiberglass in a wall. Your shelter uses this natural insulation.
Key principle: Minimize air exposure and maximize snow’s insulation. A snow shelter is warmer than being exposed to wind, even at the same temperature.
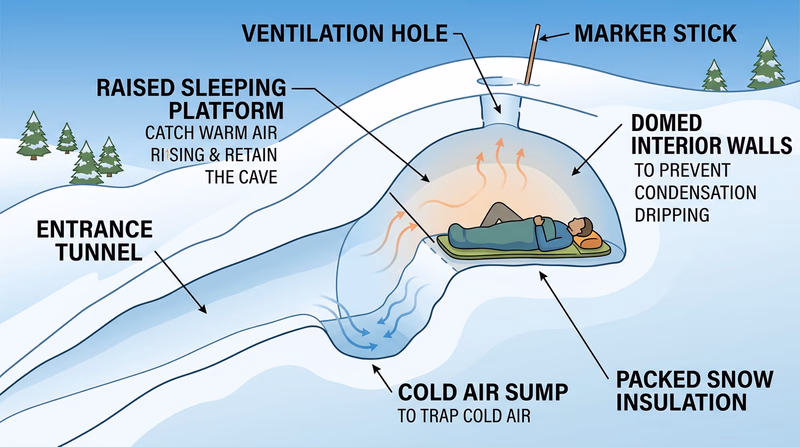
Snow Cave
The easiest and most effective snow shelter.
Requirements:
- Stable snow banks at least 8 feet high
- Wet snow that bonds together (not dry powder)
- A location away from avalanche terrain
Building steps:
- Find the location: Look for a hillside with stable snow. Avoid slopes steeper than 30 degrees (avalanche risk).
- Dig the entrance low: Create a horizontal tunnel about 4 feet long, staying low to reduce heat loss. This becomes an air lock.
- Expand the main chamber: Dig upward and back to create a sleeping cavity larger than the entrance. The floor should be 2-3 feet higher than the entrance.
- Maximize insulation: The raised floor uses gravity—warm air rises, cold air sinks into the entrance. This creates natural stratification.
- Smooth the roof: Smooth the interior ceiling so dripping water rolls down the walls instead of dripping on you.
- Create ventilation: A small hole in the roof allows air exchange without heat loss.
- Insulation from the ground: Use tree branches or pine boughs as a bed layer.
Time to build: 1-3 hours depending on snow conditions
Protection: Excellent insulation. The snow blocks wind completely. Interior temperature stays around 32°F even in extreme cold outside.
Snow Trench
Simpler than a cave, slower to build, but effective.
Building steps:
- Dig a trench: Dig down into the snow 2-3 feet deep, making the trench long enough to lie down in.
- Create insulation underneath: Line the bottom with pine branches or clothing to insulate from the ground.
- Build a roof: Lay branches over the top of the trench and pile snow on them to create a roof.
- Create openings: Make an entrance/exit at one end and a small vent at the other.
Time to build: 1-2 hours
Protection: Good insulation. More vulnerable to wind than a cave because the roof is less solid.
Snow Bivy
The fastest shelter when time is critical.
Building steps:
- Dig a shallow pit: Create a depression in the snow just deep enough for your body.
- Insulate the bottom: Use pine boughs or branches.
- Create a windbreak: Build a small wall on the windward side using snow blocks or branches.
- Use available materials: Drape your jacket or an emergency shelter material over the top for minimal protection.
Time to build: 15-30 minutes
Protection: Minimal. Provides some wind protection and insulation from the ground. Best as a last resort when time is critical.
Materials and Mistakes
Snow selection: Wet snow bonds and compacts well. Dry powder doesn’t bond—shelters in dry powder are weak and prone to collapse.
Roof thickness: The roof should be at least 18 inches thick for insulation and structural strength.
Ventilation: Without a vent hole, CO2 builds and oxygen depletes. Always include ventilation.
Entrance height: Keep the entrance low. This prevents wind from entering and keeps warm air from escaping.
Avoid avalanche terrain: Never dig a cave or trench on a slope that could avalanche. Stick to flat or gentle terrain.
Key Principles for Any Survival Shelter
Location matters most. A great shelter in a bad location is worse than a poor shelter in a good location. High ground, natural windbreaks, near water, and away from hazards matter more than construction quality.
Insulation is critical. Insulation under you (bed) and over you (roof) matter equally. Many survival shelters fail because Scouts insulate the roof but sleep on cold ground.
Airflow is necessary. Your shelter needs ventilation. Too tight and you suffocate or get wet from condensation. Proper ventilation with a small entrance/vent is the balance.
Speed matters in emergencies. A simple shelter you can build in an hour is better than the perfect shelter you can’t finish before dark.
Test it before depending on it. If possible, test a shelter design before relying on it in a real emergency. Know what works in your environment.
Shelter Building Checklist
Before You Start:
- Location is high ground
- Windbreak or natural protection
- Water source nearby
- Away from hazards (dead trees, flood zones, avalanche terrain)
Forest Shelter:
- Ridgepole is strong and secure
- Roof insulation is 6+ inches thick
- Bedding is 12+ inches deep
- Entrance faces away from prevailing wind
- Interior is cramped but cozy (small space = less to heat)
Snow Shelter:
- Terrain is safe (not avalanche slope)
- Entrance is low and narrow
- Sleeping area is elevated above entrance
- Ventilation hole is open
- Roof is smooth (drips roll down walls)
- Bedding insulates from snow floor