Req 5e — Building & Testing a Shelter
Describing how to build a shelter is one thing. Actually building one from scratch, sleeping in it, and discovering what works (and what doesn’t) is something entirely different. This requirement combines all your shelter knowledge with real-world testing.
Planning Your Shelter Project
Choose Your Location and Season
Scout familiar territory. Don’t attempt this in a remote wilderness. Choose a location you know where help is nearby if needed—a Scout camp property, a park with ranger stations, or family land.
Pick the right season. Summer or early fall is ideal for a first shelter test. Cold, wet, or snowy conditions add difficulty—build a warm-weather shelter first.
Check permissions. Get explicit permission from the property owner or land manager. Some places prohibit shelter building; others have restrictions on where and how to build.
Scout the site. Before committing to building, explore the area. Find high ground, identify water sources, locate natural windbreaks, and note any hazards.
Choose Your Shelter Type
For beginners: A debris shelter (A-frame) is more forgiving than a lean-to. It provides better insulation and weather protection.
If it’s summer: A simple lean-to works fine. Full enclosure matters less in warm weather.
If windy or cool: A debris shelter or enhanced natural shelter provides better protection.
Avoid: Don’t attempt a snow cave unless you’re in a location with appropriate snow and experience building them. Start with a forest shelter.
Building Your Shelter
Gathering Materials
Time needed: 2-4 hours of daylight remaining before you need to shelter
Ridgepole (main support branch):
- Target: 8-12 feet long, 3-4 inches diameter (arm-thick)
- Test it by pushing down hard—it should support significant pressure without cracking
- You can use a fallen log or two sturdy branches lashed together
- Avoid branches that are cracked, partially split, or wet-rotted
Leaning branches:
- Collect 15-20 branches, each 6-10 feet long and 1-2 inches diameter
- Look for fallen branches first—don’t break living branches
- Create a pile organized by size (consistency matters for building)
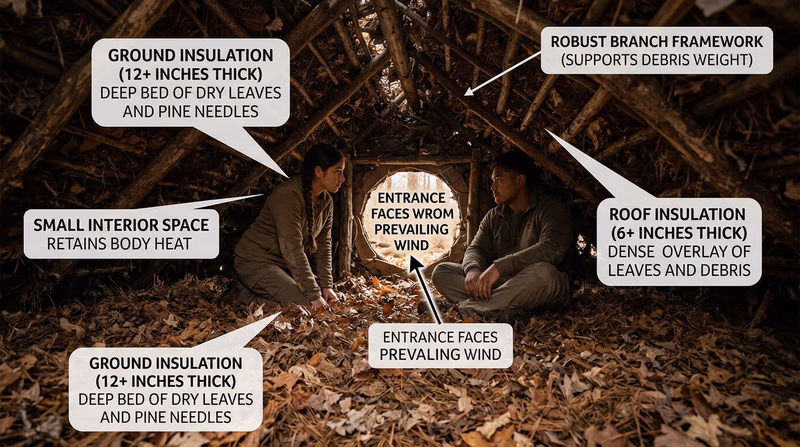
Insulation (leaves, pine needles, bark):
- This is bulky. Plan to gather more than you think you need—leaves compress.
- A contractor’s wheelbarrow or large bin of leaves compresses to fill a 4x8 foot shelter
- Target: 8-12 inches of material on the roof
- Strip bark from fallen logs (don’t peel living trees)
- Collect leaves by the armful
Bedding:
- Gather a separate pile for floor insulation
- Target: 12-18 inches deep
- More is better—cold rises from the ground
Lashing materials (if needed):
- Paracord (ideal but not always available)
- Bark strips
- Vines or plant material
Building Steps
1. Position the ridgepole
- Lay it on top of two rocks, logs, or lashed between two trees at waist height
- Test stability by pressing down hard
- Height matters—6-8 feet is ideal (too low is cramped, too high loses insulation value)
2. Lean the framework
- Place branches at a steep angle (60-70 degrees) against the ridgepole
- Space them 1-2 feet apart
- They should form a tight A-frame shape
- If branches are uneven, use rocks or lashing to hold them in place
3. Create the roof layer
- Layer sticks or thinner branches horizontally across the leaning framework
- This holds the insulation material in place
4. Add insulation
- Pile leaves and needles on the roof framework, 6-12 inches thick
- Pack it down slightly as you add it
- The weight of leaves helps insulate—don’t pack too hard or you lose air pockets
- Angle it so water runs off, not into the shelter
5. Create the entrance
- One end should be open (leave 1-2 feet open)
- Ideally, the entrance faces away from the prevailing wind
- You can create a windbreak across the entrance with branches and leaves if needed
6. Insulate the interior floor
- Pile leaves and pine needles 12-18 inches deep
- This is your bed—comfort matters
- Compress it down slightly so it’s supportive, not mushy
7. Test integrity
- Get inside and move around
- Check for gaps where rain/wind could leak
- Add more insulation to weak spots
- Make sure it’s cozy, not spacious
Environmental Responsibility
Leave no trace:
- Use fallen materials. Never cut living branches.
- Don’t peel bark from living trees.
- Don’t strip bark that damages the tree.
- Don’t cut small trees or saplings.
- After your night, disassemble or abandon the shelter gracefully—don’t leave a mess.
Minimize impact:
- Use an existing clearing or area already disturbed
- Don’t clear vegetation or dig out the site
- Keep the footprint small
Fire safety:
- Don’t build a fire inside the shelter—carbon monoxide is deadly
- If you want warmth, build a small fire outside the shelter entrance (if weather allows)
- Keep fire at least 6 feet away from shelter materials
Spending the Night
Before Dark
- Gather extra materials. Collect extra leaves and branches. You’ll likely need to adjust the shelter after dark.
- Prepare for bathroom breaks. Decide where your bathroom area is (at least 100 feet from shelter and water).
- Organize your items. Keep a flashlight, water, and extra clothing accessible.
- Test the entrance. Make sure you can get in and out easily.
During the Night
First hour (before sleep):
- Get inside and test comfort level.
- Adjust insulation if there are drafts or cold spots.
- Your body heat will warm the shelter—it may feel cool at first.
- Wear appropriate sleep clothing (layers so you can adjust).
Middle of night:
- You’ll likely wake up. This is normal.
- Assess comfort: too cold? Add insulation. Too warm? Remove layers.
- Check for leaks or water intrusion.
- Note what works and what doesn’t.
Toward dawn:
- Most shelters are coldest around dawn as body heat has dissipated.
- If you’ve planned well, you should be warm enough to sleep.
- If you’re cold, get up and move around to generate heat.
What to Expect
Success looks like:
- Staying warm enough to sleep
- No water intrusion during the night
- Waking up rested (or at least not miserable)
- No panic or emergency-exit situation
Failure looks like:
- Water pouring in during rain
- Being so cold you can’t sleep
- The shelter collapsing or shifting dangerously
- Realizing your design was fundamentally flawed
Both are learning experiences. You learn more from a failed shelter (what didn’t work) than a perfect one. That’s the whole point of this requirement.
Discussing Your Experience with the Counselor
When you meet with your merit badge counselor, be ready to explain:
What you built:
- Shelter type (lean-to, debris shelter, etc.)
- Location and why you chose it
- Materials used and how you gathered them
- How long it took to build
How you tested it:
- Weather conditions that night (temperature, wind, rain, etc.)
- What worked well
- What didn’t work
- Changes you’d make next time
What you learned:
- How insulation actually keeps you warm
- How location affects shelter comfort
- Why certain materials and designs work better than others
- How you’d approach building a shelter in different conditions (snow, extreme heat, etc.)
Environmental responsibility:
- How you minimized impact
- What you did with materials afterward
- How someone could rebuild a shelter in your location without seeing evidence
Variations for Different Conditions
Hot weather shelter: If you’re building in summer, your shelter needs shade more than insulation. A lean-to with thick roof coverage is perfect. You might be outside the shelter during the day but testing how well it blocks sun and provides cooling shade.
Cool or cold weather: A debris shelter (A-frame) provides better insulation. Make sure the bedding is especially thick—cold from the ground is more dangerous than cold from the air.
Wet conditions: If there’s any chance of rain, a well-sealed shelter is critical. Test your roof design before the night—stand outside the shelter during a test rain and see where water flows.
Multiple night option: Some Scouts prefer to build, sleep, adjust, and sleep a second night. This is allowed and gives you more feedback on improvements.