Req 6 — Fire Building
Fire is ancient technology, but it’s one of the most important survival skills. In the wilderness, fire provides warmth, purifies water, signals rescuers, and boosts morale. The challenge: you won’t always have matches. This requirement teaches you three reliable methods to build fire without them.
Understanding Fire’s Needs
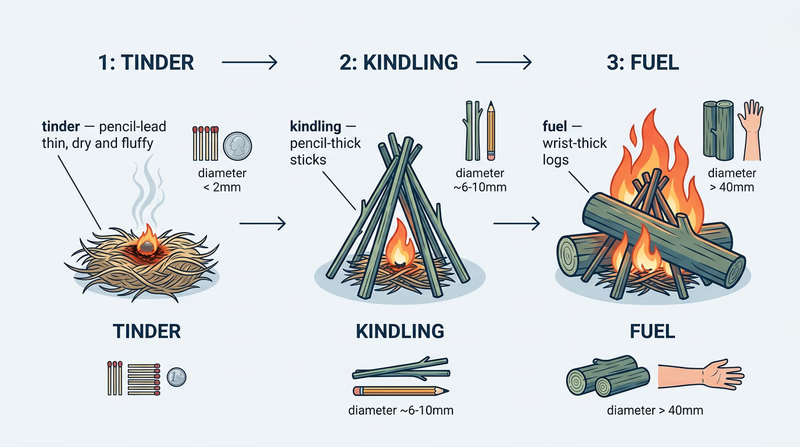
Before you build a fire, understand what it requires:
Tinder (catches sparks or flame easily):
- Dry grass, bark, leaves
- Wood shavings or sawdust
- Lint from pocket dryer
- Char cloth (cotton cloth burned in low oxygen)
- Pine pitch
- Magnifying glass-focused sunlight
- Electrical spark or friction heat
Kindling (small wood that catches tinder flame):
- Small twigs (pencil-sized or thinner)
- Thin bark strips
- Small branches split lengthwise
- Dead leaves or dry grass
Fuel (larger wood that burns hot and long):
- Branches (wrist-sized or thicker)
- Logs (shoulder-sized and larger)
- Well-seasoned hardwood burns longer than softwood
Oxygen: Fire needs air. The arrangement of tinder, kindling, and fuel must allow airflow through the fire.
The process: Tinder catches a spark or flame → ignites kindling → kindling heats fuel → fuel catches and sustains the fire.
Method 1: Ferro Rod (Flint and Steel)
A ferro rod is a small metal stick that produces sparks when scraped with steel. It works when wet and is incredibly reliable.
How a Ferro Rod Works
The rod contains ferrocerium, a rare-earth metal alloy that sparks at 3,000°F when struck. These sparks ignite tinder.
Advantages:
- Works when wet
- Thousands of strikes per rod
- Lightweight and compact
- Works at high altitudes
- No chemical degradation
- Cheap (often $5-10)
Disadvantages:
- Requires dry tinder
- Learning curve—takes practice to get consistent sparks
- Sparks are hot but brief—timing matters
Building a Fire with a Ferro Rod
1. Prepare tinder
- Gather dry material: bark, pine needles, lint, dry grass
- Fluff it up—loose tinder catches sparks better than packed tinder
- Create a bundle roughly the size of a bird’s nest
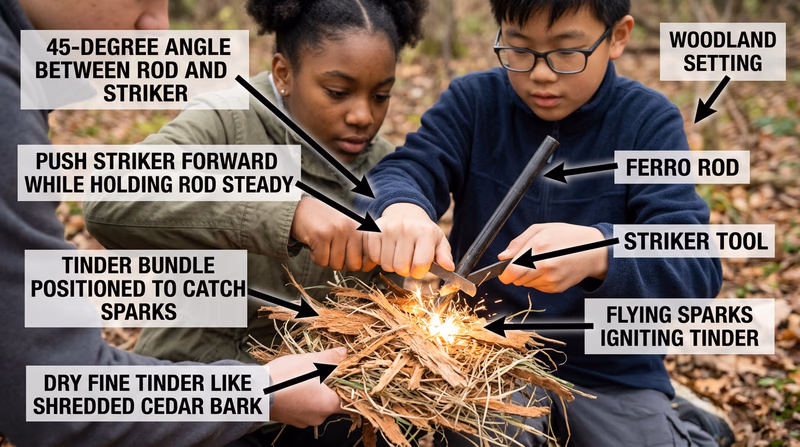
2. Create a spark catcher
- Hold the ferro rod at a 45-degree angle over the tinder bundle
- Scrape a knife, steel, or hard rock along the rod toward yourself
- Sparks shower down onto the tinder
3. Light the tinder
- It takes several sparks, sometimes many. Don’t get discouraged.
- Good sparks land in the tinder and create a small glow
- Blow gently on the glow to encourage flames (don’t blow so hard you scatter the tinder)
- When flames appear, you have ignition
4. Transition to kindling
- Carefully place pencil-thin kindling around the burning tinder
- Gently keep blowing to feed oxygen to the fire
- Once kindling is catching, add more kindling, gradually increasing size
5. Build to fuel wood
- As kindling burns hotter, add wrist-sized branches
- Eventually transition to larger fuel logs
- Once the fire is established, you can stop nursing it
Pro tip: Practice with a ferro rod at home before relying on it in the wilderness. The feeling of good sparks and the timing of ignition are learned skills.
Method 2: Bow Drill (Friction Fire)
A bow drill creates fire through friction. Two pieces of wood rubbed together generate heat—enough heat to ignite tinder. This is ancient technology (humans used it for thousands of years) and it works, but it requires significant effort and practice.
How Bow Drill Works
A wooden bow, string, spindle, and fireboard create friction between two wooden surfaces. The heat from friction creates dust that’s hot enough to ignite tinder.
Building a Bow Drill Kit
Spindle (vertical stick):
- 3/4" diameter, 12-18 inches long
- Straight grained softwood (cedar, poplar, cottonwood)
- Shaped to a slight point at the bottom end
Fireboard (base that the spindle spins on):
- 1-1.5" thick, 3-4 inches wide, 12+ inches long
- Same wood as spindle (matching wood matters)
- Flat surface
Bow (provides pressure and speed):
- Flexible branch 3-4 feet long, bent into an arc
- String or cord linking the ends (leather, plant fiber, or paracord)
- Spindle fits into the string so the string wraps around it
Hearth board (catches the ember):
- Flat board under the fireboard to catch hot dust
- A piece of bark or thin wood works
How it works:
- Wrap the spindle with the bow string
- Apply downward pressure on the spindle’s top with a hand grip
- Saw the bow back and forth
- Friction heats the spindle and fireboard
- Hot dust collects on the hearth board
- The dust reaches ignition temperature and glows
- Transfer the hot ember to tinder and blow to flame
Challenges:
- Requires the right wood pairing (matching wood is important)
- Requires sustained effort (sawing is tiring)
- Needs technique—too much or too little pressure ruins it
- Takes 5-20 minutes depending on conditions and skill
This is a backup method. Bow drill is impressive and valuable if you’re truly stranded without other fire sources, but it’s not practical for quick fire-starting. Learn it for the requirement and survival knowledge, but rely on easier methods in practice.
Method 3: Hand Drill (or Other Friction Method)
Hand drill is simpler than bow drill but harder to execute. It uses the same friction principle with just a spindle and board.
Hand Drill Method
Components:
- Spindle (same as bow drill)
- Fireboard (same as bow drill)
- No bow—your hands provide the friction
How it works:
- Place the spindle on the fireboard
- Wrap your hands around the spindle (like rolling a stick between your palms)
- Apply downward pressure
- Roll the spindle quickly between your palms
- As the spindle spins down, move your hands downward, then quickly reposition at the top and repeat
Challenges:
- Very difficult to maintain pressure and speed simultaneously
- Your palms get hot and hurt
- Takes even longer than bow drill
- High failure rate for beginners
Alternative friction methods:
- Fire plow: Rub a stick back and forth along a groove in a board
- Fire saw: Saw bamboo or a flexible wood with a stick
- Pump drill: A vertical spindle with a weighted disc that spins from pumping up and down
All friction methods share the same principle: create heat through sustained friction until dust ignites.
Preparation and Practice
Gathering Tinder
Before you attempt a fire start, gather tinder:
In forest:
- Dead bark (birch bark is excellent)
- Pine needles or dead grass
- Dead leaves (if completely dry)
- Rotten wood (dry rotten wood is excellent tinder)
- Cattail fluff or milkweed pods (if available)
From supplies (always bring):
- Char cloth (create it by burning cotton scraps in a low-oxygen environment, like a tin with holes)
- Cotton lint from laundry
- Jute twine
- Petroleum jelly on cotton balls (burns long and hot)
Preparation matters: Tinder should be loose and fluffy, not compressed. More surface area = easier ignition.
Practicing Before You Need It
Critical: Practice at home or in a controlled setting before relying on these methods in the wilderness.
For each method:
- Gather materials
- Attempt to build the fire
- Note what works and what fails
- Adjust technique and try again
Common failures:
- Ferro rod: Weak sparks, tinder too damp, not enough tinder
- Bow drill: Wrong wood pairing, spindle slipping, not enough pressure
- Hand drill: Spindle slipping, hands too hot to continue, insufficient pressure
Troubleshooting: Each method has technique elements. YouTube has countless tutorials. Watch several, practice, and develop muscle memory.
Building Your Three Fires
When demonstrating for your merit badge counselor:
Fire 1 (Method 1 - e.g., Ferro Rod):
- Gather tinder (show your materials)
- Create a tinder bundle
- Create kindling pile
- Prepare fuel wood
- Use your method to create ignition
- Build fire up to a healthy size
- Let it burn safely
Fire 2 (Method 2 - e.g., Bow Drill):
- Show you’ve constructed proper equipment
- Follow the same fire-building process
- Be patient—friction fires take longer
- Once ignition happens, transition to kindling and fuel
Fire 3 (Method 3 - e.g., Hand Drill):
- Repeat the process with a different method
Safety during demonstration:
- Clear area of dry material (to prevent spread)
- Have water or extinguishing method nearby
- Don’t let fires burn large—you’re demonstrating technique, not building campfires
- Fully extinguish each fire before leaving
What Your Counselor Expects
- Three successful fires using three different methods
- Ability to explain the process for each method
- Understanding of tinder, kindling, and fuel
- Safe fire handling and extinguishing
- Genuine attempt and practice (not just one-shot perfection)
If a fire fails, that’s okay—you can try again. The requirement is demonstrating three successful fires, so you’ll have opportunity to restart.