Req 7a — Ground Rescue Signals
Signaling is how rescuers find you. If you’re lost or stranded, the best survival skills are useless if no one knows where you are. Effective signaling means your rescue turns into a quick recovery instead of a tragedy.
The Three Audiences
Your signaling strategy depends on who might find you:
Ground rescuers: Other hikers, search and rescue teams, park rangers walking the trails.
Airborne rescuers: Helicopters, planes, or drones searching from above.
Water rescuers: Boats or rescue swimmers if you’re on or near water.
All three audiences respond to different signals. Your best strategy uses multiple signals simultaneously—whistle for ground rescuers, fire for airborne searchers, and mirror/bright cloth for visibility.
Universal Distress Signals
The Rule of Three
Three of anything is the distress signal:
- Three whistle blasts
- Three gunshots (if available)
- Three fires
- Three shelter reflections with a signal mirror
- Three yells or other sounds
Three signals spaced evenly (with pauses between) means distress. Search teams are trained to recognize this. If you hear three whistles in the wilderness, you respond.
SOS Signal
Morse code: · · · — — — · · · (three short, three long, three short)
- Whistle: short-short-short PAUSE long-long-long PAUSE short-short-short
- Mirror flashes: quick flashes PAUSE slower flashes PAUSE quick flashes
- Anything in this pattern communicates “I need help”
Ground-Level Signals
Whistle (Most Important for Ground Rescue)
A whistle is your primary ground-level signal. It travels farther than your voice and cuts through wind and forest noise.
Why a whistle:
- Carries 1-3 miles in open terrain
- Impossible to ignore (human voice sounds like wind or animals)
- Works in darkness
- Uses no fuel or resources
How to signal:
- Three blasts separated by pauses: beep-beep-beep … pause … beep-beep-beep
- Repeat pattern every few minutes
- Don’t blow continuously—rescuers listen for the pattern
- In calm conditions, reduce to every 10-15 minutes to conserve energy
Where to position yourself:
- Open areas where sound travels (ridgetops, clearings, water)
- Avoid dense forest where sound gets absorbed
- If you must stay in forest, move to the highest point possible
Voice and Yelling
Your voice is less effective than a whistle but better than nothing.
Yelling technique:
- Yell three times, pause, repeat
- Use low-frequency yelling (deeper sounds carry farther than high-pitched screams)
- Space yells 10-15 seconds apart
- Listen between yells—rescuers may respond
When yelling works:
- Close range (under 1 mile)
- Calm conditions without much background noise
- If rescuers are actively searching nearby
When it fails:
- Wind or rain masks your voice
- Dense forest absorbs sound
- Rescuers are distant or moving away from you
- You run out of voice (yelling is exhausting)
Noise Makers
- Air horn: Carries farther than your voice, attracts attention
- Bell or rattle: Continuous noise in camp warns rescuers of your position as they approach
- Honk from a vehicle: If you’re vehicle-stranded, honk to attract highway rescuers
Air-Level Signals (for Aircraft/Helicopters)
Ground-to-Air Signals
These are large, visible signals you create on the ground that pilots can see from above.
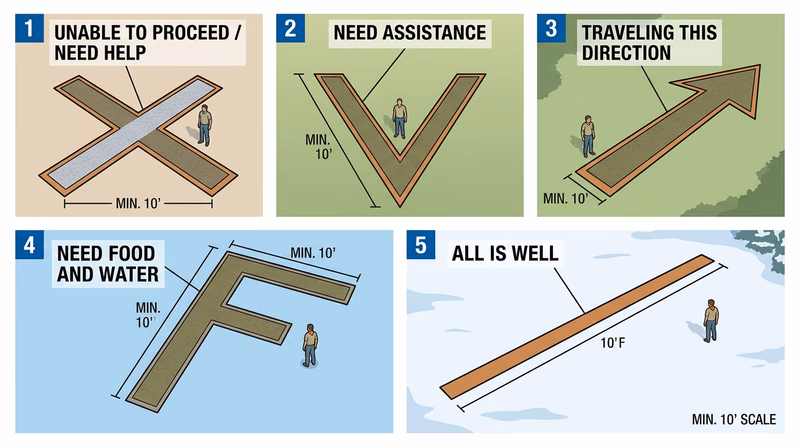
Shapes that signal distress:
X (Cross): Universal distress signal. Clear, unmistakable from the air. Measure 30-40 feet per arm for visibility.
SOS: Morse code in large letters. Takes time but very clear.
V (Victor): “Need assistance” in aviation signal language.
Arrow: Points toward your location or toward safe landing area.
How to create ground signals:
- Use rocks or logs (most permanent and visible)
- Pile stones in a line, then pile a second line crossing at right angles for an X
- Use contrasting colors: white cloth on dark ground, dark rocks on light sand
- Make it BIG—pilots are looking from hundreds of feet up
- Keep it visible from multiple angles (don’t hide it in a forest clearing)
Where to place signals:
- Open areas: meadows, clearings, beaches, bald ridgetops
- Visible from multiple directions
- If possible, position near your shelter but away from fire/smoke interference
Fire Smoke Signals
A fire with green branches creates smoke that’s visible from the air, especially on clear days.
How to use fire for air signals:
- Build a regular fire (your fuel wood)
- Add wet leaves, green branches, or damp wood to create thick smoke
- White smoke is visible against dark ground; dark smoke stands out against light sky
- Three fires in a triangle pattern is a distress signal
- Position fires in an open area away from tall trees
Limitations:
- Only works during daylight
- Smoke drifts with wind—rescuers know this
- May be obscured by natural haze or weather
- Takes time to build multiple fires
Best use: Use fire smoke as a secondary signal alongside ground-to-air marks. The X on the ground + smoke from a signal fire is more visible than either alone.
Surface to Air Visual and Body Signals PDF guide to ground-to-air signals used by Civil Air Patrol.Bright Cloth or Reflectors
Anything bright and reflective gets attention from the air.
- Spread a bright emergency blanket in an X shape
- Tie bright cloth to tall branches or high points
- Use mirrors or any shiny objects
- Wear bright colors (helps pilots spot you)
Water-Level Signals
For Water Rescuers
If you’re on or near water (capsized boat, stranded on shore, etc.):
Whistle: Same three-blast pattern. Water carries sound differently—a whistle on water carries exceptionally far.
Wave patterns: If you’re in water, create a triangle formation (three people) or maintain position. Stationary targets are easier to spot than moving ones.
Bright clothing: Wear or display bright colors. Orange and yellow are most visible on water.
Signal mirror: Reflects across water very effectively.
Flares (if you have them): Red flares are distress signals. Shoot them from water-level rescue platforms.
Stay visible:
- Climb onto any flotsam or high point
- Don’t hide in vegetation along shore
- Keep moving slightly so rescuers see you’re alive, not flotsam
Combining Signals for Maximum Effectiveness
Don’t rely on a single signal method. Combine them:
Ground rescuers:
- Whistle every 10 minutes
- Keep camp visible with bright cloth
- Make noise (talk, ring a bell) in camp
Airborne rescuers:
- Ground-to-air X marked in rocks or logs
- Signal fire with smoke (if weather permits)
- Bright emergency blanket or cloth
- Mirror flashes (if weather permits)
Water rescuers:
- Whistle blasts
- Bright clothing
- Stay in open water where visible
- Wave deliberately if you see rescue approaching
Positioning for Signaling
The optimal location:
- High ground (visible from above and distance)
- Open area (not hidden in forest)
- Safe position (not cliff edge or unstable ground)
- Near water source
- Away from hazards
This may not be where you crash or become lost. After taking shelter and caring for immediate needs, move to a better signaling location if you can do so safely.
Signal Preparation Checklist
Before You Go on a Trip:
- Whistle in your pocket or pack (always)
- Emergency bright cloth or emergency blanket
- Mirror (signal mirror or even a shiny watch face)
- Paracord or bright ribbon for marking location
- Pen to write SOS or X on materials if needed
When You Realize You’re Lost:
- Build shelter in a defensible location
- Identify highest visible point nearby (but not dangerous)
- Begin three-blast whistle pattern every 10 minutes
- Mark your location with bright cloth or signal mirror
- Prepare ground-to-air X from rocks or logs
- Consider visibility from air and ground
- Wait for rescue—don’t wander
If Building a Signal Fire:
- Green wood for smoke
- Three fires in triangle pattern (distress signal)
- Keep fire controlled and safe
- Never leave fire unattended