Req 7b — Signal Mirror
A signal mirror is one of the most effective rescue tools you can carry. A small mirror, lighter and smaller than your whistle, can be seen by aircraft 10+ miles away on a clear day. It’s silent (works in any weather), requires no fuel, and lasts forever.
How a Signal Mirror Works
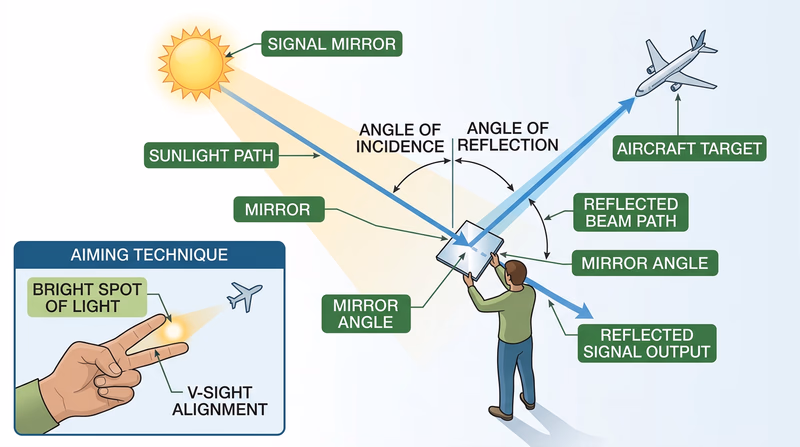
A signal mirror reflects sunlight toward a target—a rescuer, aircraft, or ship. The reflected beam is bright enough to catch attention across miles. Unlike a whistle, which they have to hear, rescuers are specifically trained to watch for mirror flashes.
Why mirrors work:
- Signal mirrors are visible up to 10+ miles on clear days
- Can reach aircraft at high altitudes
- Water rescue teams specifically scan for mirror flashes
- Works in daylight (any condition with sun)
- Requires no energy after initial setup
Limitations:
- Only works in daylight with clear sky
- Requires visibility to your target (can’t flash through dense fog)
- Requires the sun to be positioned properly (not at night)
- Takes practice to aim accurately
Types of Signal Mirrors
Commercial Signal Mirror
Purpose-built signal mirrors are the ideal:
Features:
- Reflective surface (mirror) 2-3 inches square
- Sighting hole or sight lines in the center
- Durable, waterproof, compact
- Cost: $5-20
The sighting hole system:
- Look through the sighting hole at your target
- Adjust the mirror angle until the reflection passes through the hole
- The reflection hits your target when you see the crosshair in the sighting hole
- This simple system makes aiming easy
Best choice: A lightweight commercial signal mirror in your survival kit is ideal. It’s cheap, reliable, and proven.
Improvised Signal Mirrors
If you don’t have a mirror, improvise:
Any reflective surface:
- Polished metal (belt buckle, compact mirror, watch face)
- CD or DVD (reflective side)
- Water in a container (tilt to reflect sunlight)
- Foil from a food wrapper
- Phone screen (less reflective but better than nothing)
Improvised aiming:
- Hold the reflective surface so the sun reflects toward your target
- Tilt and adjust until you see the reflection heading toward your target
- Landmarks help with aiming (aim at a nearby hill, then shift to your target)
Less effective: Improvised mirrors don’t have sighting holes, so aiming takes trial and error. They work but require more practice.
Basic Mirror Technique
Setup
Identify your target: Where is the rescue asset? Aircraft overhead, ship on horizon, rescuer on distant ridge?
Position the sun: You need sun behind you, reflecting toward the target. If the sun is behind the target, you can’t signal it.
Hold the mirror: Keep the mirror at arm’s length, positioned between you and the sun (but not blocking the sun from your eyes).
Aiming (with a Sighting Hole)
Look through the sighting hole (center of the mirror) toward your target.
Adjust the mirror angle until you see the reflected sunbeam (the “flash”) appear in the sighting hole. This takes a few small adjustments.
When the flash appears in the sighting hole, the reflection is pointing directly at your target. You’ve achieved aim.
Flash the signal: Hold steady for a few seconds, let them see the bright reflection.
Release and re-aim: Drop the mirror briefly, then re-aim and repeat. Intermittent flashing is more noticeable than a continuous beam.
Aiming (without a Sighting Hole)
Position the sun: Keep it behind you.
Observe the reflection: Watch where the reflected light appears on the ground or a nearby object.
Adjust toward target: Tilt the mirror so the reflection moves toward your target’s direction.
Estimate the aiming point: Use landmarks. “The flash needs to hit that ridge 2 degrees to the left.” Adjust incrementally.
Send the signal: Flash toward where the target should be. It takes longer than a sighted mirror but it works.
Signaling Patterns
Basic Flash
A steady 1-2 second flash is the simplest signal. Repeat every 3-5 seconds. This gets attention and signals “I’m here.”
Morse Code Flashing
Send actual messages using mirror flashes:
- SOS (distress): Quick-quick-quick (short flashes), PAUSE, slow-slow-slow (longer flashes), PAUSE, quick-quick-quick
- Help: One slow flash per second, continuous
- OK (not in distress): Two quick flashes per second, continuous
Most rescuers won’t decode Morse—they’ll recognize SOS or just see the flashing is intentional and directed at them.
Three Flashes Rule
Three flashes spaced evenly is a distress signal. Use this if you’re in trouble:
Flash-PAUSE-Flash-PAUSE-Flash … wait 5 seconds … repeat
Effective Mirror Signaling Strategy
For Aircraft
- Keep flashing at the aircraft until it acknowledges by waggling wings or circling back
- Aircraft can see mirror flashes from incredible distances
- The pilot isn’t expecting the signal, so repetition helps them notice
- Flash at intervals of 10-15 seconds so they see a pattern
For Ground Rescuers
- Mirror flashing works for rescuers on ridges or high points nearby
- Continuous flashing is better (they see you’re trying to signal)
- Combine with whistle or bright cloth so they notice your location
For Water Rescue
- Mirror flashing over water is highly visible
- Rescuers actively scan for this signal
- Flash toward the horizon where you expect rescue to come from
- The sun on calm water creates enough secondary reflection that your signal is visible even without a perfect reflection angle
Practice and Confidence
Before You Need It
Practice aiming a mirror at targets:
Start close: Aim at something 50 feet away. Keep adjusting until the reflection is obviously pointing at the target.
Increase distance: Practice at 200 feet, then a distant hilltop.
Use obstacles: Aim through trees at something beyond. It’s harder—this is realistic.
Try without sighting hole: If your mirror has a hole, cover it and practice aiming by eye.
Time yourself: Efficient signaling means you can aim and flash in 10 seconds. Practice this.
Checking Your Aiming
- When light hits your face, the reflection isn’t hitting your target—adjust
- Aim is correct when the reflected beam leaves your field of view toward the target
- Watch landmarks: “The reflection is hitting the summit of that peak” = you’re aiming correctly
- Ask someone to watch: Have a friend watch from the target position and tell you when they see the flash
Troubleshooting
“I’m aiming but the flash isn’t reaching my target”
- Sun position: Is the sun behind or beside you? (It must be behind)
- Angle: Tilt the mirror more or less steeply
- Target distance: Closer targets are easier to hit—start there
- Persistence: Try 10 different angles if needed
“The reflection hits my face”
- Your angle is off—move the mirror slightly upward or downward
- This is actually useful feedback (you’ve found the reflection path)
“The target doesn’t seem to notice”
- Visibility: Is the target looking in your direction? They might be searching elsewhere
- Brightness: On hazy days or at long distances, the flash is dimmer
- Repetition: Keep signaling every few seconds for several minutes
- Change angle: The target might be moving—adjust aim as they move
“The sun is too low to use a mirror”
- Early morning or late evening: Sun at the horizon makes aiming harder
- Wait for better sun angle (mid-morning to mid-afternoon is ideal)
- Use alternative signals (whistle, bright cloth, fire)
When To Use Mirror vs. Other Signals
Use a mirror when:
- Sun is available and bright
- Target is at distance or in the air
- You want a long-range silent signal
Use whistle when:
- Overcast or insufficient sun
- Target is relatively close
- You want audible signal (ground rescuers)
Use bright cloth when:
- You need continuous visibility
- Target is scanning generally but not specifically
- You want a passive signal (doesn’t require aiming)
Use all three when:
- You’re genuinely lost/stranded
- You want maximum chance of being found