Wood Carving Merit Badge — Complete Digital Resource Guide
https://merit-badge.university/merit-badges/wood-carving/guide/
Introduction & Overview
Wood carving turns a plain block or branch into something useful, funny, beautiful, or all three. It teaches patience, hand control, and planning because every cut changes the shape of the wood for good.
For Scouts, that makes wood carving more than an arts-and-crafts project. It is a practical skill that blends tool safety, design, and steady workmanship—the same habits that matter in camping, shop work, and many trades.
Then and Now
Then
People have carved wood for thousands of years. Long before factories could stamp out identical objects, families and craftspeople made spoons, bowls, toys, religious figures, signs, tools, and decorations by hand. In many places, carving was not a hobby at all—it was simply how everyday objects got made.
Traditional carving styles grew out of local needs and local woods. Scandinavian chip carving decorated boxes and plates with crisp geometric patterns. Folk artists carved animals and human figures. Walking sticks, tool handles, canoe paddles, and cooking tools were shaped to be both useful and attractive.
Now
Today, wood carving is still alive in workshops, art studios, reenactment camps, and Scout camps. Some carvers focus on wildlife figures or spoon carving. Others make signs, relief panels, neckerchief slides, chess pieces, or detailed decorative patterns.
Modern carvers also have better steels, safer clamps, cut-resistant gear, and a wider variety of sharpening tools than earlier generations did. But the heart of the craft is still the same: read the grain, use sharp tools, make controlled cuts, and let skill—not force—do the work.
Get Ready!
This badge rewards patience more than speed. You will practice safe habits, learn what different tools are for, and make cuts that look simple until you try to repeat them cleanly. Slow down, keep your tools sharp, and enjoy watching rough wood turn into a real project.
Kinds of Wood Carving
Carving in the Round
Carving in the round means shaping a three-dimensional object that can be viewed from multiple sides. Neckerchief slides, small figures, walking-stick tops, and simple animals all fit this style. You are removing wood to create full form, not just surface decoration.
Relief Carving
Relief carving starts with a flat board. Instead of shaping a full object, you cut the background away so the design appears raised above the surface. Leaves, animals, emblems, and signs often work well in relief because strong outlines show clearly.
Chip Carving
Chip carving decorates a flat surface with repeated geometric cuts. Small triangular chips pop out to make patterns of stars, diamonds, borders, and rosettes. It looks detailed, but it is built from a few repeatable knife motions.
Whittling and Utility Carving
Some carving projects are meant to be used, not displayed. Tent pegs, cooking utensils, marshmallow sticks, and simple tools all teach the same lessons about grain direction, sharp edges, and controlled pressure. Utility carving is a good reminder that craftsmanship can be practical.
Next Steps
Your first job is not making something fancy. It is learning how to carve without hurting yourself, your tools, or the people around you.
Req 1 — Carving Safely
This requirement covers the two habits that make every later project possible: preventing injuries and knowing what to do if something still goes wrong. Start by thinking about where the blade, the wood, and your hands are at every moment.
Requirement 1a
A carving knife is small enough to feel harmless right up until it slips. Most wood-carving injuries are not caused by wild mistakes. They happen during ordinary moments: rushing one cut, carving while distracted, using a dull edge, or holding the wood where the blade will travel if it keeps going.
The main hazards in wood carving
Sharp-edge injuries are the biggest risk. Knives, gouges, and chisels can slice skin quickly, especially when you cut toward your supporting hand or lap.
Flying chips and dust can irritate your eyes and lungs. This matters even more if you use sanding tools or power equipment to prepare a piece.
Tool-control problems happen when the wood shifts, the tool is dull, or your grip is awkward. A tool that suddenly jumps is much harder to stop than one moving in a short, controlled cut.
Fatigue and distraction are real hazards too. When your hands get tired or your attention drifts to conversation, your cut quality drops and your risk goes up.
Poor workspaces create hidden danger. Cluttered tables, bad lighting, unstable chairs, and people walking too close all make safe carving harder.
How to prevent those hazards
Safety habits before you carve
Build these into your routine every time- Choose a stable workspace: Sit at a table or bench with good light and enough room for your elbows and tools.
- Control the wood: Hold the piece firmly or clamp it when possible so it cannot twist unexpectedly.
- Keep the blade path clear: Never let the knife’s likely travel line point at your hand, leg, or another person.
- Use short cuts: Small, shallow cuts are easier to control than deep, forceful ones.
- Stay sharp: A sharp edge cuts where you guide it. A dull edge makes you push harder.
- Wear the right protection: A thumb guard, carving glove, and eye protection can reduce common injuries.
- Stop when tired: If your hands are cramping or your focus is gone, put the tools down.
How to lessen a hazard once you notice it
Good carvers constantly adjust. If the grain starts tearing, change the direction of the cut. If the piece feels too small to hold safely, clamp it or switch to scrap wood for practice. If the design requires a cut you cannot see clearly, stop and reset your position before you continue.
One useful phrase for counselor discussion is: anticipate, prevent, mitigate.
- Anticipate means noticing what could go wrong before you cut.
- Prevent means setting up your workspace and technique so the problem is less likely.
- Mitigate means reducing harm if something still happens, such as wearing eye protection, keeping first-aid supplies nearby, and telling an adult right away if you are injured.
Requirement 1b
A tiny slip can become a bigger problem if you panic or try to hide it. Your counselor is looking for calm, simple first aid: stop the bleeding, clean the injury, protect the area, and get an adult if the wound is more serious than a minor scrape.
Minor cuts and scratches
Most carving injuries are minor cuts. The goal is to stop bleeding first, then clean and cover the wound.
For a deep cut, a wound that will not stop bleeding, or a cut that gapes open, get adult help immediately. That is no longer a “finish it yourself” injury.
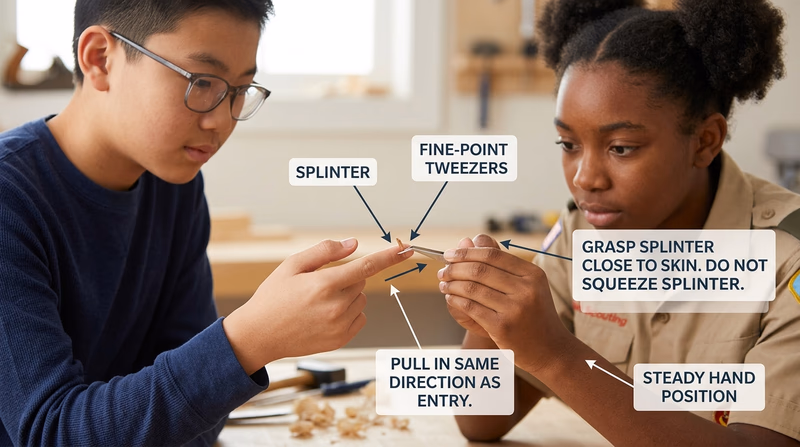
Splinters
Splinters are common because carving and sanding both expose rough fibers. A small splinter near the surface can often be removed carefully with clean tweezers. Pull it out in the same direction it entered if possible. Then wash the area and cover it if needed.
Do not dig around aggressively for a deep splinter. That can damage more tissue and increase the chance of infection. Get adult help instead.
When first aid becomes “get help now”
Call an adult or seek medical help when
Minor shop injuries should stay minor- Bleeding will not stop after steady pressure.
- The cut is deep or wide and may need stitches.
- A splinter is large, deep, or under a nail.
- You cannot clean the wound well.
- The area becomes red, swollen, warm, or filled with pus later.
In Req 2, you will look at the official carving safety checklist. That checklist helps prevent exactly the kinds of cuts and splinters covered here.
Req 2 — Totin' Chip and Safety Checklist
This requirement connects general knife safety to carving-specific safety. One part proves you already understand woods-tool responsibility. The other part narrows that responsibility to the habits that keep carving projects safe at home, at camp, or in a shop.
Requirement 2a
The Totin’ Chip is your baseline woods-tool credential. It shows that you understand that knives, saws, and axes are tools, not toys, and that safe use depends on attention, care, and self-control.
For wood carving, the Totin’ Chip matters because carving uses the same judgment skills on a smaller scale. A pocketknife in a carving session can still injure you if you fool around, cut in an unsafe direction, or ignore tool condition.
What the Totin’ Chip proves
What your counselor wants to see
The Totin' Chip is about behavior as much as knowledge- You know the rules: You can explain the basic safety expectations for pocketknives and other woods tools.
- You handle tools responsibly: You carry, pass, open, close, and store them safely.
- You use tools with purpose: No showing off, no horseplay, no careless cutting.
- You understand consequences: Unsafe behavior can cost you the privilege to use the tool.
Requirement 2b
The Safety Checklist for Carving turns broad knife safety into specific carving habits. The pamphlet highlights five big areas: personal maturity and judgment, caring for tools, controlling the work environment, handling knives, and making the right choices. If you can talk through those five areas using your own words and examples, you are ready for this discussion.
The five parts of the checklist
1. Personal maturity and judgment means you carve only when you are alert, approved to do so, and able to focus. Knives are not props for jokes or showing off.
2. Caring for your tools means keeping blades sharp, clean, and rust-free. Good care is not just about pride in your gear. It directly affects control and safety.
3. Controlling the work environment means good light, enough elbow room, a stable chair or bench, and no one crowding into your carving space.
4. Handling knives means safe grip, safe cutting direction, and safe storage when the tool is not in your hand.
5. Making the right choices means picking a project and a tool that match your skill level. A cool-looking design is not worth attempting if you cannot carve it safely yet.
Safety Checklist for Carving (PDF) Official Scout checklist covering maturity, tool care, workspace control, knife handling, and smart carving choices. Link: Safety Checklist for Carving (PDF) — https://filestore.scouting.org/filestore/Merit_Badge_ReqandRes/Requirement%20Resources/Wood%20Carving/WoodcarvingChecklist.pdfHow to discuss the checklist well
Instead of reciting the list mechanically, connect each item to a real action:
- “I keep my elbows supported so my cuts stay short.”
- “I stop carving if people start crowding around my chair.”
- “I would practice on scrap wood before trying a face or detailed figure.”
- “I keep a thumb guard on because my supporting hand is often close to the blade.”
In Req 1, you looked at hazards and first aid. In Req 3, you will build the tool-care skills that make this checklist easier to follow every time.
Req 3 — Tools and Sharpening
This requirement is about control. Before you can carve cleanly, you need to know what each tool is meant to do and how to keep its edge ready for work. A carver who understands tools can work more safely and with much less frustration.
Requirement 3a
You do not need a giant toolkit to carve well, but you do need to know what each tool is for. Here are five common tool types you can discuss confidently with your counselor.
1. Carving knife
The carving knife is the main tool for shaping wood. It is used for paring cuts, basic cuts, stop cuts, and detail work. Keep the blade sharp, clean, and dry. Store it closed or sheathed, and never leave it hidden under shavings on the table.
2. Roughout knife or larger utility knife
A larger knife removes wood faster during the early shaping stage. This tool helps you bring a block down to a simpler form before switching to a smaller blade for detail. Because it removes more wood per stroke, it demands extra attention to cut direction.
3. Gouge
A gouge has a curved cutting edge that scoops or channels wood. It is useful for hollows, rounded details, and some relief carving work. Gouges must be kept sharp and protected so the edge does not bang into other tools.
4. V-tool or veiner
A V-tool makes crisp grooves and lines, especially in relief work and decorative detail. It is excellent for borders, feathers, fur lines, and deep corners that are hard to reach with a straight blade.
5. Mallet or light carving hammer
Some carving tools are designed to be tapped rather than pushed only by hand. A carving mallet gives controlled force to chisels or gouges, especially when removing background in relief carving. Use only the tool and striking method your counselor approves.
How to talk about a carving tool
Use this pattern for any tool you choose- What it does: What kind of cut or shaping job is it made for?
- When to use it: Rough shaping, detail work, grooves, smoothing, or background removal?
- How to care for it: Sharpening, cleaning, rust prevention, safe storage.
- What can go wrong: Slipping, chipping the edge, using the wrong amount of force, or cutting in the wrong direction.
Tool care basics
Good tool care is simple: wipe tools clean after use, keep moisture off metal, touch up edges before they get badly dull, and store tools where the cutting edges are protected. A blade tossed loose into a toolbox gets dull faster and is more dangerous the next time someone reaches in.
Requirement 3b
Sharpening is one of the most important carving skills you can learn. A carver with ordinary talent and sharp tools often does better work than a talented carver using dull ones.
Common sharpening devices
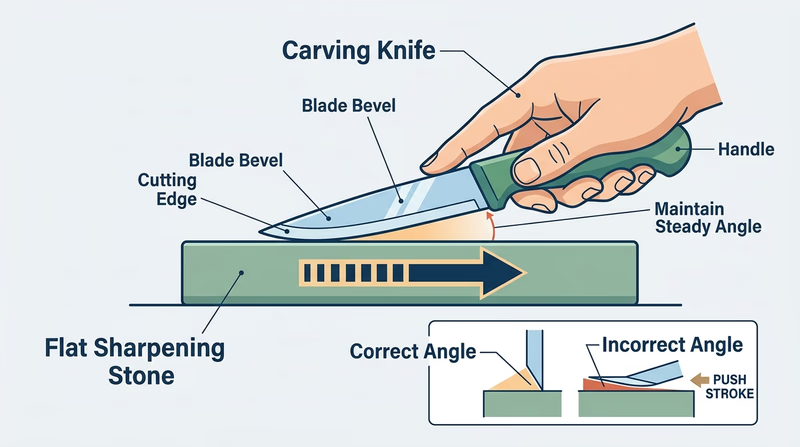
Whetstones or sharpening stones remove metal to rebuild the edge. They may be oil stones, water stones, or diamond stones. Each works a little differently, but all depend on holding a steady angle.
Diamond plates cut quickly and stay flat. They are useful for sharpening and for flattening some other stones.
Slipstones or shaped stones help sharpen curved tools like gouges and V-tools because they fit inside the curve better than a flat stone.
Strops polish the edge after sharpening. A leather strop with honing compound removes the tiny burr and refines the edge so it slices more cleanly.
The idea behind sharpening
Sharpening is not random rubbing. You are shaping two bevels so they meet in a clean edge. The key is consistency: same angle, smooth passes, light pressure, and patience.
In Req 4, you will put these sharp tools to work on the core cuts that appear again and again in carving projects.
Req 4 — Practice the Basic Cuts
This is an inherited-action requirement: the real task is to show each cut clearly and under control. Think of these cuts as the carving alphabet. Most projects in Req 6 and Req 7 are built from them.
Requirement 4a
What the paring cut does
A paring cut removes a small amount of wood toward your body in a very controlled way. It is useful for tight spaces, gentle shaping, and light cleanup work where a bigger stroke would be clumsy.
How to show a paring cut
Keep the piece supported and make a short, shallow cut. Many carvers brace the knife with the thumb of the guiding hand so the motion stays small and controlled. The point is finesse, not power.
Common mistakes
Do not take a long pull stroke. Do not carve with the wood floating in the air. Do not let the blade’s path end at your fingers or chest.
Requirement 4b
What the basic cut does
The basic cut removes a larger shaving and helps shape the general form of the project. It is often one of the first cuts you use when taking a block from rough shape to recognizable form.
What the push cut does
A push cut moves the knife away from your body under control. It is especially useful when the grain direction or the shape of the wood makes a pull cut awkward.
How to show them well
For both cuts, keep your elbows in, use short motion, and cut with the grain when possible. Your counselor is looking for steady control and proper body position—not speed.
Requirement 4c
What the V-cut does
A V-cut makes a narrow groove with sloping sides. It is used for sharp detail lines, borders, feather lines, fur texture, and features like the corners of eyes or decorative separation lines.
How to show a clean V-cut
The cut is usually made by forming two angled cuts that meet. The depth and spacing need to stay even. If the angles wander, the groove looks ragged instead of crisp.
Where it matters later
This cut becomes especially valuable in relief carving and in decorative detail on carving-in-the-round projects. Even simple neckerchief slides look more finished when line work is neat.

Requirement 4d
What the stop cut does
A stop cut sets a boundary. It tells the wood where a later cut should stop so fibers break cleanly instead of tearing past the line.
How to show a stop cut or score line
Make a deliberate line first, then bring another cut toward it. The stop cut protects sharp edges and helps you define ears, borders, shoulders, feathers, or relief backgrounds.
Why it is so useful
Many beginner projects get fuzzy edges because the carver skips this step and tries to remove wood in one move. A stop cut slows the process down in a good way and gives the carving cleaner shapes.
What your counselor will notice
Good demonstration habits for every cut- Your setup: Stable seat, supported wood, clear workspace.
- Your blade control: Short, deliberate cuts instead of forceful slashes.
- Your body position: Hands and body out of the knife’s travel path.
- Your results: Clean surfaces, clear grooves, and controlled depth.
By now you can see that technique and material work together. The next step is choosing wood that matches the kind of carving you want to do.
Req 5 — Choosing the Right Wood
A project can fail before the first good cut if the wood is a bad match for the design. Some woods are soft and friendly for beginners. Others are hard, brittle, stringy, or strongly grained. The best choice depends on what you want the finished piece to do and how much carving experience you have.
What changes from one wood to another
Hardness affects how easily the blade enters the wood. Basswood is a favorite for beginners because it is soft and even-textured. Harder woods like oak demand more force and sharper tools.
Grain affects how cleanly the wood cuts. Straight, fine grain is easier to predict. Wild grain can tear out unexpectedly.
Strength matters for thin parts. A walking-stick topper or neckerchief slide with small projecting areas may need wood that can hold detail without breaking.
Color and appearance matter when the carving will be stained, painted, or left natural. A plain wood may show detail clearly, while a strongly patterned wood may compete with the design.
Use of the project matters too. A decorative relief panel, a handled tool, and a camp gadget do not all need the same qualities.
Common woods a Scout might consider
| Wood | Why carvers use it | Things to watch for |
|---|---|---|
| Basswood | Soft, smooth, fine grain, easy for beginners | Dents easily if handled roughly |
| Butternut | Good for relief carving, warm color, cuts fairly easily | Grain can be more open and fuzzy |
| Pine | Easy to find and inexpensive | Resin, knots, and uneven grain can frustrate carving |
| Poplar | Affordable and available in boards | Harder than basswood and sometimes stringy |
| Cedar | Pleasant smell and good for rustic work | Can be soft and crumbly, with strong grain |
How to explain your wood choice well
Your counselor is not looking for a magic species name. They want to hear your reasoning. A strong answer sounds like this: “I chose basswood for my in-the-round project because I am still learning knife control, and basswood is soft and predictable. For my relief or chip carving, I wanted a flat board with straight grain so the pattern would cut cleanly.”
Questions to ask before choosing wood
Use these to justify your decision- What kind of project is this? Three-dimensional figure, relief panel, or geometric chip carving?
- How detailed is it? Fine detail needs wood that cuts cleanly.
- How experienced am I? Beginner projects should not fight the carver.
- Will the project be handled hard? Walking sticks and outdoor pieces need more durability.
- Am I painting, staining, or leaving it natural? That changes how important color and grain pattern are.
Matching wood to Requirements 6 and 7
For carving in the round in Req 6, many Scouts choose a soft, straight-grained wood because shaping a 3-D form already requires plenty of control.
For relief or chip carving in Req 7, flat, stable stock matters even more. Chip carving especially benefits from a smooth board and predictable grain so the small geometric chips pop out cleanly.
Req 6 — Carving in the Round
Carving in the round means shaping a piece that has real form and volume, not just a decorated surface. That could be a simple neckerchief slide, a small animal, a walking-stick top, or another modest 3-D project. The word simple matters. This requirement is about finishing a clean beginner project, not attempting the hardest design you can imagine.
Start with the plan
Before you carve, answer three questions:
- What am I making?
- Why is this a beginner-level project for me?
- What wood and tools fit it best?
The pamphlet’s advice is sensible: keep the project small, think it through before cutting, and practice on scrap wood first. Some Scouts even sketch the shape from more than one side so they can picture what is closer, farther back, thicker, or thinner.
A smart project choice
A good in-the-round project has:
- one clear main shape
- limited tiny details
- wood thick enough to hold safely
- no thin parts that will snap easily
- a size you can realistically finish
Signs you picked the right project
Use this before you begin carving- I can describe the sequence: rough shape first, then refine, then detail.
- The project matches my skill level: no tiny faces or ultra-thin fragile pieces.
- My wood choice makes sense: soft enough to carve, strong enough for the shape.
- I have practice material: scrap wood for testing cuts before touching the project.
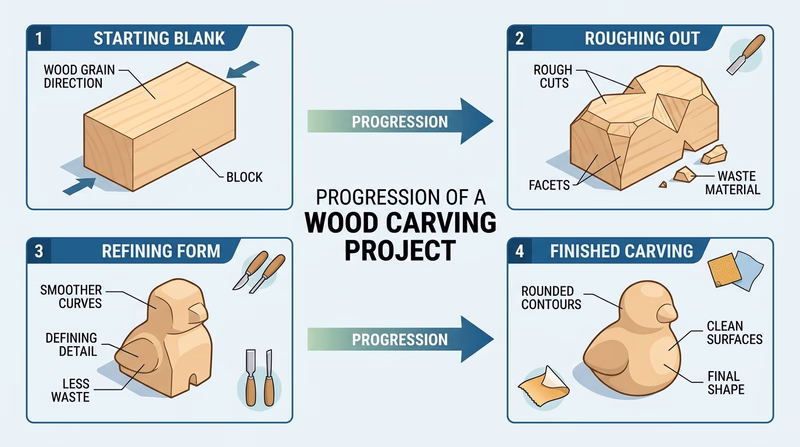
A practical carving sequence
Lay out the design. Mark important lines and shapes on the wood before cutting.
Rough out the form. Remove the biggest extra wood first. This is where your basic cuts and push cuts do much of the work.
Refine the shape. Start rounding, slimming, or separating major forms.
Add controlled detail. Use stop cuts, V-cuts, and small paring cuts where the shape needs definition.
Smooth and finish. Clean fuzzy areas, remove rough spots, and prepare the project for the finish your counselor approves.
What your counselor will want to hear
You should be ready to explain:
- why you chose this project
- why your wood choice fit the project
- which tools you used most
- where you had to slow down and work carefully
- what you learned from mistakes or practice cuts
That explanation connects this requirement back to Req 3 and Req 5. A finished carving matters, but so does the thinking behind it.
Once you can make a simple three-dimensional project, you are ready to compare two flat-surface styles: low-relief and chip carving.
Req 7 — Relief or Chip Carving
This requirement gives you two different ways to finish the badge. Both start with a flat piece of wood, but they create very different results.
- Low-relief carving raises a picture or design above the background.
- Chip carving removes small triangular chips to make geometric patterns.
Neither path is “better.” The right choice depends on whether you enjoy picture-like shaping or pattern-based precision.
Option 1: Low-relief carving
Low-relief carving is a good choice if you like outlines, scenes, symbols, or designs that rise from a flat board. You might carve a leaf, a fleur-de-lis, an animal silhouette, or a simple emblem.
The basic process is:
- draw the design on the board
- establish boundaries with stop cuts or V-cuts
- lower the background around the design
- refine the raised shape and clean the edges
This option rewards planning because the design must read clearly from the front. Strong outlines usually work better than complicated scenes.
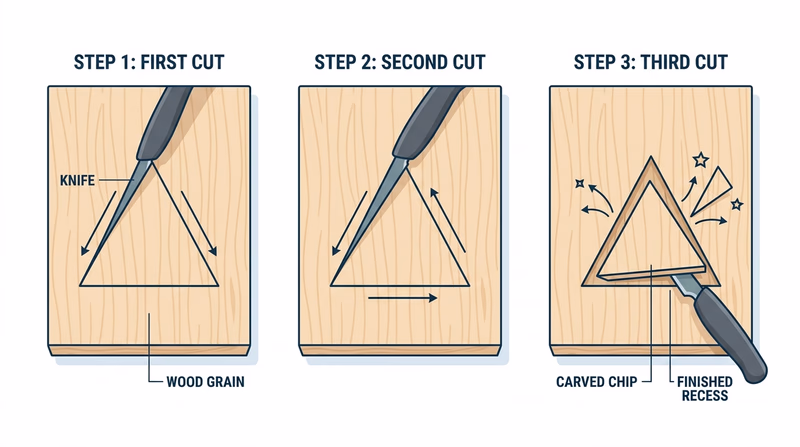
Option 2: Chip carving
Chip carving creates decoration from repeated small cuts. The pamphlet describes it as building designs from simple shapes like triangles, diamonds, and squares. That is why chip carving is great for borders, patch mounts, photo mounts, and geometric panels.
A simple triangle chip is the starting unit. Three angled cuts meet and release a small chip. Repeating that motion in a planned pattern creates the design.
How to choose between the two
Pick the style that fits your interest and patience- Choose low-relief if: you like pictures, raised shapes, and sculpting the background away.
- Choose chip carving if: you like symmetry, patterns, and repeating precise knife cuts.
- Choose the simpler design: both styles look better when the pattern or picture is clean and readable.
- Match your wood to the technique: flat, smooth stock is especially important for chip carving.
What to keep in mind for chip carving
The pamphlet’s chip carving section emphasizes a few useful beginner ideas:
- start with practice triangles on the back or on scrap wood
- use straight lines and simple shapes
- keep the board smooth before laying out the design
- turn the board as needed so each cut is made from a controlled position
What makes either project successful
Your counselor will likely care less about artistic perfection than about whether you showed the right process:
- the project was simple enough to finish
- the cuts were deliberate and controlled
- the wood choice matched the design
- the edges look clean for your skill level
- you can explain what was challenging and what you learned
Extended Learning
Congratulations!
You turned sharp tools, plain wood, and patient practice into finished projects. That is a real craft skill. Better yet, wood carving is one of those hobbies that can keep growing with you for years, because there is always another style, tool, or project shape to learn.
Spoon Carving and Green Wood
Many carvers love working with fresh-cut “green” wood because it can be easier to shape before it dries. Spoon carving is a great example. It combines safe knife work with practical design: bowls, handles, curves, and smooth transitions all matter.
If you explore this next, you will quickly learn how moisture changes the feel of the cut. Green wood often slices differently than seasoned stock, and that makes grain direction even more important.
Lettering, Signs, and Decorative Work
Not every carving has to be a figure or a pattern board. Sign carving, decorative borders, and carved lettering turn woodcraft into communication. Camps, cabins, and trail projects often use carved signs because they are durable, readable, and satisfying to make.
This kind of work rewards layout and spacing. A clean letter carved with control says more about craftsmanship than a complicated project with uneven lines.
Finishing and Preserving Carvings
A carving is not fully done when the last chip falls off. Finishing choices change how the project looks and lasts. Some carvings are painted. Others are stained, oiled, waxed, or left natural.
Each finish has tradeoffs. Oil can deepen the wood’s color. Paint can highlight relief details. Outdoor items may need stronger protection than an indoor display piece. Learning finishes is a whole new part of the craft.
Teaching Through Carving
Wood carving is a skill that passes well from one person to another. Once you can explain safe setup, grain direction, and basic cuts, you can help younger Scouts learn the same habits. Teaching carving also improves your own understanding because you have to slow down and explain what your hands are doing.
Real-World Experiences
Visit a Woodcarving Club or Guild Meeting
Explore a Folk Art or Craft Museum
Volunteer for a Camp Craft Area
Take a Beginner Carving Workshop
Organizations
Long-running carving organization that shares events, publications, and connections to local clubs and carving communities.
Organization: National Wood Carvers Association — https://chipchats.org/
Focused on woodturning rather than hand carving, but valuable for Scouts interested in how shaped wood objects are designed, finished, and taught.
Organization: American Association of Woodturners — https://www.woodturner.org/
Retailer and education network that often hosts classes, demos, and beginner-friendly woodworking instruction, including some carving topics.
Organization: Woodcraft — https://www.woodcraft.com/
Respected woodworking publication with articles and videos that can help you learn more about wood behavior, tools, sharpening, and finishing.
Organization: Fine Woodworking — https://www.finewoodworking.com/