Req 1 — Carving Safely
This requirement covers the two habits that make every later project possible: preventing injuries and knowing what to do if something still goes wrong. Start by thinking about where the blade, the wood, and your hands are at every moment.
Requirement 1a
A carving knife is small enough to feel harmless right up until it slips. Most wood-carving injuries are not caused by wild mistakes. They happen during ordinary moments: rushing one cut, carving while distracted, using a dull edge, or holding the wood where the blade will travel if it keeps going.
The main hazards in wood carving
Sharp-edge injuries are the biggest risk. Knives, gouges, and chisels can slice skin quickly, especially when you cut toward your supporting hand or lap.
Flying chips and dust can irritate your eyes and lungs. This matters even more if you use sanding tools or power equipment to prepare a piece.
Tool-control problems happen when the wood shifts, the tool is dull, or your grip is awkward. A tool that suddenly jumps is much harder to stop than one moving in a short, controlled cut.
Fatigue and distraction are real hazards too. When your hands get tired or your attention drifts to conversation, your cut quality drops and your risk goes up.
Poor workspaces create hidden danger. Cluttered tables, bad lighting, unstable chairs, and people walking too close all make safe carving harder.
How to prevent those hazards
Safety habits before you carve
Build these into your routine every time
- Choose a stable workspace: Sit at a table or bench with good light and enough room for your elbows and tools.
- Control the wood: Hold the piece firmly or clamp it when possible so it cannot twist unexpectedly.
- Keep the blade path clear: Never let the knife’s likely travel line point at your hand, leg, or another person.
- Use short cuts: Small, shallow cuts are easier to control than deep, forceful ones.
- Stay sharp: A sharp edge cuts where you guide it. A dull edge makes you push harder.
- Wear the right protection: A thumb guard, carving glove, and eye protection can reduce common injuries.
- Stop when tired: If your hands are cramping or your focus is gone, put the tools down.
How to lessen a hazard once you notice it
Good carvers constantly adjust. If the grain starts tearing, change the direction of the cut. If the piece feels too small to hold safely, clamp it or switch to scrap wood for practice. If the design requires a cut you cannot see clearly, stop and reset your position before you continue.
One useful phrase for counselor discussion is: anticipate, prevent, mitigate.
- Anticipate means noticing what could go wrong before you cut.
- Prevent means setting up your workspace and technique so the problem is less likely.
- Mitigate means reducing harm if something still happens, such as wearing eye protection, keeping first-aid supplies nearby, and telling an adult right away if you are injured.
Requirement 1b
A tiny slip can become a bigger problem if you panic or try to hide it. Your counselor is looking for calm, simple first aid: stop the bleeding, clean the injury, protect the area, and get an adult if the wound is more serious than a minor scrape.
Minor cuts and scratches
Most carving injuries are minor cuts. The goal is to stop bleeding first, then clean and cover the wound.
For a deep cut, a wound that will not stop bleeding, or a cut that gapes open, get adult help immediately. That is no longer a “finish it yourself” injury.
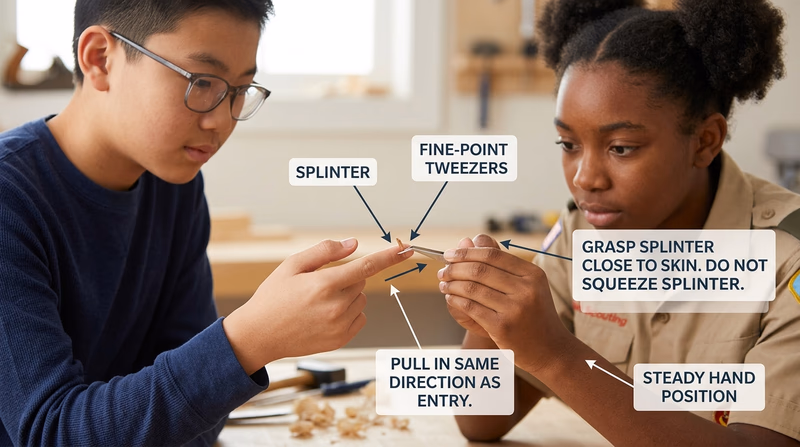
Splinters
Splinters are common because carving and sanding both expose rough fibers. A small splinter near the surface can often be removed carefully with clean tweezers. Pull it out in the same direction it entered if possible. Then wash the area and cover it if needed.
Do not dig around aggressively for a deep splinter. That can damage more tissue and increase the chance of infection. Get adult help instead.
When first aid becomes “get help now”
Call an adult or seek medical help when
Minor shop injuries should stay minor
- Bleeding will not stop after steady pressure.
- The cut is deep or wide and may need stitches.
- A splinter is large, deep, or under a nail.
- You cannot clean the wound well.
- The area becomes red, swollen, warm, or filled with pus later.
In Req 2, you will look at the official carving safety checklist. That checklist helps prevent exactly the kinds of cuts and splinters covered here.