Req 6 — Carving in the Round
Carving in the round means shaping a piece that has real form and volume, not just a decorated surface. That could be a simple neckerchief slide, a small animal, a walking-stick top, or another modest 3-D project. The word simple matters. This requirement is about finishing a clean beginner project, not attempting the hardest design you can imagine.
Start with the plan
Before you carve, answer three questions:
- What am I making?
- Why is this a beginner-level project for me?
- What wood and tools fit it best?
The pamphlet’s advice is sensible: keep the project small, think it through before cutting, and practice on scrap wood first. Some Scouts even sketch the shape from more than one side so they can picture what is closer, farther back, thicker, or thinner.
A smart project choice
A good in-the-round project has:
- one clear main shape
- limited tiny details
- wood thick enough to hold safely
- no thin parts that will snap easily
- a size you can realistically finish
Signs you picked the right project
Use this before you begin carving
- I can describe the sequence: rough shape first, then refine, then detail.
- The project matches my skill level: no tiny faces or ultra-thin fragile pieces.
- My wood choice makes sense: soft enough to carve, strong enough for the shape.
- I have practice material: scrap wood for testing cuts before touching the project.
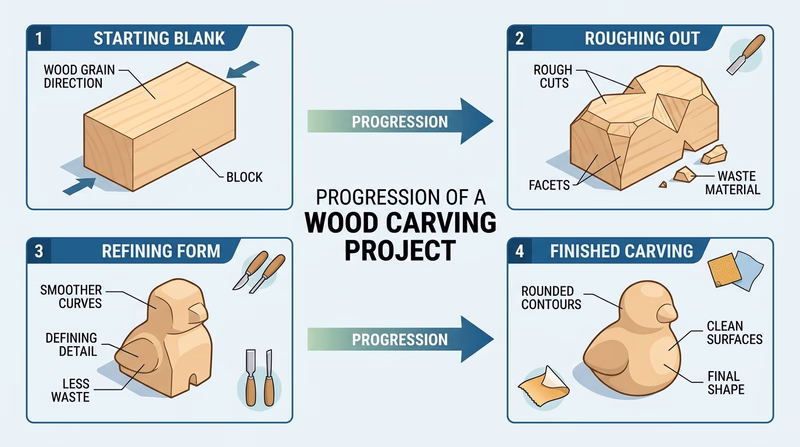
A practical carving sequence
Lay out the design. Mark important lines and shapes on the wood before cutting.
Rough out the form. Remove the biggest extra wood first. This is where your basic cuts and push cuts do much of the work.
Refine the shape. Start rounding, slimming, or separating major forms.
Add controlled detail. Use stop cuts, V-cuts, and small paring cuts where the shape needs definition.
Smooth and finish. Clean fuzzy areas, remove rough spots, and prepare the project for the finish your counselor approves.
What your counselor will want to hear
You should be ready to explain:
- why you chose this project
- why your wood choice fit the project
- which tools you used most
- where you had to slow down and work carefully
- what you learned from mistakes or practice cuts
That explanation connects this requirement back to Req 3 and Req 5. A finished carving matters, but so does the thinking behind it.
Once you can make a simple three-dimensional project, you are ready to compare two flat-surface styles: low-relief and chip carving.