Req 7 — Relief or Chip Carving
This requirement gives you two different ways to finish the badge. Both start with a flat piece of wood, but they create very different results.
- Low-relief carving raises a picture or design above the background.
- Chip carving removes small triangular chips to make geometric patterns.
Neither path is “better.” The right choice depends on whether you enjoy picture-like shaping or pattern-based precision.
Option 1: Low-relief carving
Low-relief carving is a good choice if you like outlines, scenes, symbols, or designs that rise from a flat board. You might carve a leaf, a fleur-de-lis, an animal silhouette, or a simple emblem.
The basic process is:
- draw the design on the board
- establish boundaries with stop cuts or V-cuts
- lower the background around the design
- refine the raised shape and clean the edges
This option rewards planning because the design must read clearly from the front. Strong outlines usually work better than complicated scenes.
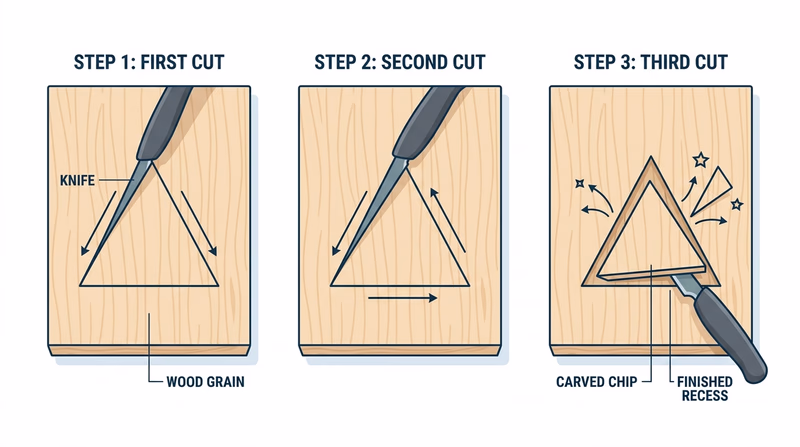
Option 2: Chip carving
Chip carving creates decoration from repeated small cuts. The pamphlet describes it as building designs from simple shapes like triangles, diamonds, and squares. That is why chip carving is great for borders, patch mounts, photo mounts, and geometric panels.
A simple triangle chip is the starting unit. Three angled cuts meet and release a small chip. Repeating that motion in a planned pattern creates the design.
How to choose between the two
Pick the style that fits your interest and patience
- Choose low-relief if: you like pictures, raised shapes, and sculpting the background away.
- Choose chip carving if: you like symmetry, patterns, and repeating precise knife cuts.
- Choose the simpler design: both styles look better when the pattern or picture is clean and readable.
- Match your wood to the technique: flat, smooth stock is especially important for chip carving.
What to keep in mind for chip carving
The pamphlet’s chip carving section emphasizes a few useful beginner ideas:
- start with practice triangles on the back or on scrap wood
- use straight lines and simple shapes
- keep the board smooth before laying out the design
- turn the board as needed so each cut is made from a controlled position
What makes either project successful
Your counselor will likely care less about artistic perfection than about whether you showed the right process:
- the project was simple enough to finish
- the cuts were deliberate and controlled
- the wood choice matched the design
- the edges look clean for your skill level
- you can explain what was challenging and what you learned