Extended Learning
A. Congratulations
You have earned the Woodwork merit badge — and more importantly, you have gained a skill that will serve you for the rest of your life. You can now identify wood species, sharpen and maintain tools, read and create working drawings, and build projects from raw lumber. That is a foundation many adults wish they had. What follows are ways to keep growing as a woodworker long after the badge is complete.
B. Wood Finishing — The Final Touch
A well-built project deserves a great finish. The finish you choose affects how your project looks, feels, and holds up over time.
Types of Finishes
Penetrating finishes soak into the wood fibers rather than sitting on the surface. They are the easiest to apply and repair.
- Danish oil — A blend of oil and varnish. Apply with a rag, wipe off the excess, let it cure. Gives wood a warm, natural look with moderate protection. Great for furniture and cutting boards.
- Boiled linseed oil — A traditional finish that darkens wood slightly and brings out the grain. Takes longer to cure (24 to 48 hours between coats) but produces a beautiful hand-rubbed look.
- Tung oil — Extracted from the seeds of the tung tree. Dries harder than linseed oil and provides better water resistance. Excellent for tabletops.
Film finishes build up a protective layer on the surface of the wood. They provide more protection but are harder to repair if damaged.
- Polyurethane — Very durable, available in water-based (dries fast, stays clear) and oil-based (more durable, slight amber tone). Apply with a brush or wipe-on.
- Shellac — Made from lac insect secretions dissolved in alcohol. Dries extremely fast, polishes to a beautiful sheen, easy to repair. Not resistant to water or alcohol.
- Lacquer — Professional-grade finish sprayed on in thin coats. Very durable and beautiful but requires proper ventilation and spray equipment.
Application Tips
- Sand to at least 220-grit before applying any finish.
- Remove all dust with a tack cloth or damp rag before finishing.
- Apply thin coats — multiple thin coats look and perform better than one thick coat.
- Sand lightly between coats with 320-grit sandpaper for the smoothest result.
- Always work in a well-ventilated area and follow the finish manufacturer’s safety instructions.

C. Hand-Cut Joinery — The Heart of the Craft
Machine-cut joints are precise and efficient, but hand-cut joints connect you to centuries of woodworking tradition. Learning to cut joints by hand develops your tool skills, your patience, and your understanding of how wood works.
Dovetail Joints
The dovetail is the hallmark of a skilled woodworker. Its interlocking fan-shaped “tails” and “pins” create a joint that is both mechanically strong and visually stunning. Dovetails are the traditional joint for drawer construction.
To cut a dovetail by hand, you need:
- A dovetail saw (a small back saw with fine teeth)
- A sharp chisel (¼" and ½")
- A marking gauge
- A dovetail marker or sliding bevel set to the correct angle (1:6 for softwoods, 1:8 for hardwoods)
The process takes patience and practice. Your first dovetails may have gaps — that is normal. Keep at it. By your fifth or sixth attempt, you will see dramatic improvement.
Box Joints (Finger Joints)
Box joints look like interlocking fingers. They are simpler to cut than dovetails and provide excellent glue surface area. A well-fitted box joint is very strong and has a distinctive, modern appearance.
Half-Lap Joints
Two pieces overlap each other, each with half its thickness removed where they cross. Half-laps are easy to cut, surprisingly strong when glued, and useful for face frames and furniture construction.
D. Woodworking in the Digital Age
Modern technology has expanded what woodworkers can do without replacing the fundamentals you have learned.
Computer-Aided Design (CAD)
Free software like SketchUp, Fusion 360, and FreeCAD lets you design projects in 3D on your computer. You can rotate your design, check dimensions, and even simulate how joints fit together before cutting a single piece of wood. Many professional shops now design exclusively in CAD.
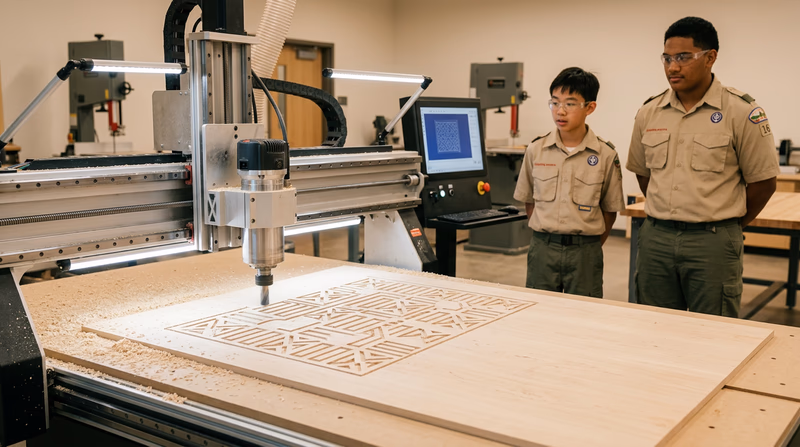
CNC Routers
Computer Numerical Control (CNC) routers follow digital toolpaths to cut, carve, and shape wood with extreme precision. Community maker spaces often have CNC machines available for members to use. A CNC router can cut complex curves, carve signs, and produce identical parts in large quantities.
Laser Cutters and Engravers
Laser cutters can cut thin wood (up to about ¼ inch) along intricate paths, and laser engravers burn detailed designs into wood surfaces. These tools are increasingly available at libraries, maker spaces, and school fab labs.
E. Real-World Experiences
Here are ways to keep building your woodworking skills beyond the merit badge:
Local Maker Spaces Find a maker space near you with shared woodworking tools, CNC machines, and laser cutters. Many offer classes and open shop hours for members. Habitat for Humanity Volunteer to build homes with Habitat for Humanity. You will gain real-world carpentry experience while helping families in need. Woodworking Shows and Competitions Attend regional and national woodworking shows to see demonstrations by master craftspeople, try new tools, and get inspired by competition entries. State and County Fairs Many state and county fairs have woodworking competitions. Enter a project you have built and get feedback from experienced judges. Scout Woodworking Service Projects Plan a woodworking-focused Eagle Scout service project — build Little Free Libraries, park benches, or storage systems for a community organization.