Req 3b — Sharpening
A sharp tool cuts cleanly, requires less effort, and is actually safer to use than a dull one. Sharpening is a skill that every woodworker must learn, and once you get the feel for it, you will find it surprisingly satisfying.
Why Sharp Matters
A dull chisel or plane blade tears wood fibers instead of slicing them cleanly. The result is rough surfaces, splintered edges, and a lot of frustration. Worse, a dull tool requires more force to push through wood, which makes slips more likely.
A sharp edge, by contrast, glides through wood with minimal effort. The shavings curl away in thin ribbons, the surface left behind is smooth, and you have far more control.
Sharpening Methods
There are several ways to sharpen woodworking tools. You do not need expensive equipment to get a razor-sharp edge.
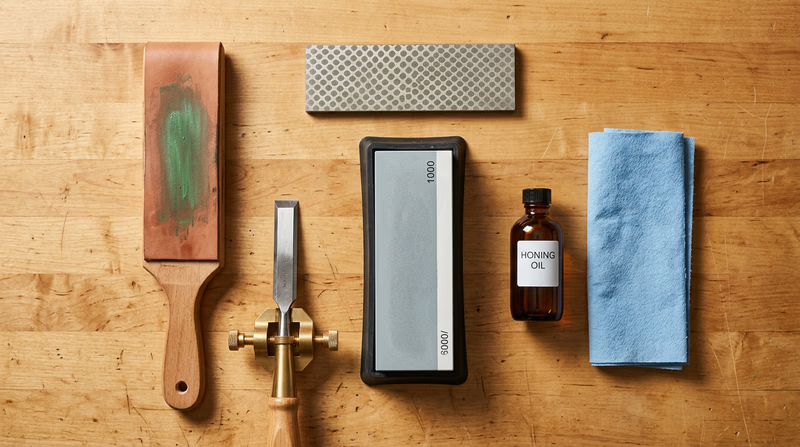
Sharpening Stones (Whetstones)
Sharpening stones are the most traditional method. They come in several types:
- Oil stones (Arkansas stones, India stones) — Use with honing oil. Slow-cutting but long-lasting.
- Water stones (Japanese water stones) — Use with water. Cut faster than oil stones but wear down more quickly and need periodic flattening.
- Diamond stones — Metal plates embedded with industrial diamonds. Never need flattening. Cut very fast.
Each type comes in multiple grits. You start with a coarser grit to establish the edge and progress to finer grits to polish it.
| Grit | Purpose |
|---|---|
| 220–400 | Repairing damaged or very dull edges |
| 800–1000 | Shaping and refining the edge (medium) |
| 3000–6000 | Honing to a fine, sharp edge |
| 8000+ | Polishing to a mirror finish (optional) |
Sandpaper Method
Tape sheets of wet/dry sandpaper to a flat surface (like a piece of glass or granite tile). This is an inexpensive way to get started:
- Start with 220-grit to flatten the back of the blade.
- Progress through 400, 800, 1000, and 1500 grit.
- Finish with 2000-grit for a polished edge.
The key advantage of this method is cost — a few sheets of sandpaper and a flat surface are all you need.
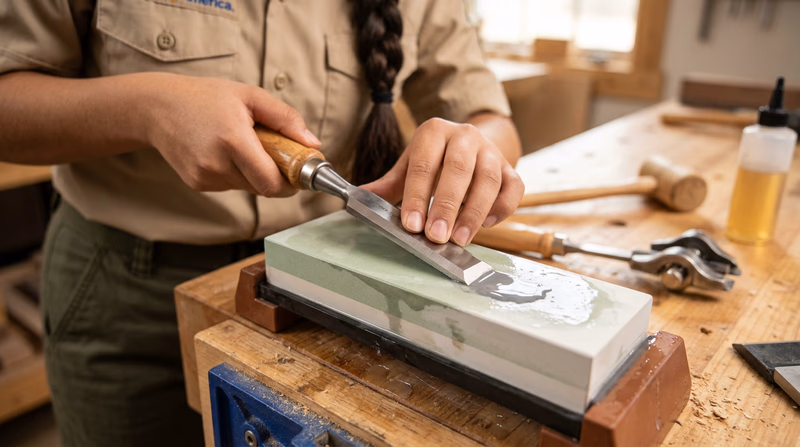
How to Sharpen a Chisel
This step-by-step process works for bench chisels and plane blades:
Step 1: Flatten the Back
The back (flat side) of the blade must be perfectly flat. Place the blade flat on your stone or sandpaper and rub it back and forth with even pressure. You only need to do this once — after the back is flat, it stays flat.
Step 2: Set the Bevel Angle
Most bench chisels have a bevel angle of 25 degrees. Hold the chisel bevel-down on the stone at this angle. You can use a honing guide (a small jig that clamps the blade at a consistent angle) or learn to hold the angle freehand.
Step 3: Sharpen the Bevel
With the bevel flat on the stone, push the blade forward along the stone in smooth, even strokes. Apply moderate pressure on the forward stroke and light pressure on the return. Work through progressively finer grits.
Step 4: Remove the Burr
Sharpening creates a tiny curl of metal (a “burr” or “wire edge”) on the flat side. Flip the blade over, lay it flat on the stone, and take a few light strokes to remove it.
Step 5: Test the Edge
A sharp edge will:
- Slice cleanly through a piece of paper or the edge of a sheet of newsprint
- Shave hair off your arm (be careful)
- Catch on your thumbnail when you lightly drag it across the edge
How to Sharpen a Hand Plane Blade
The process is nearly identical to sharpening a chisel:
- Remove the blade from the plane (note how it is assembled so you can put it back).
- Flatten the back on your finest stone (if not already done).
- Sharpen the bevel at 25 degrees (the primary bevel).
- Optionally, add a “micro-bevel” at 30 degrees — just a few strokes on the finest stone at a slightly steeper angle. This creates a tiny secondary edge that is extremely sharp and quick to touch up.
- Remove the burr.
- Reassemble the blade in the plane and test on a piece of scrap wood.
Maintaining the Edge
Once your tools are sharp, keep them that way:
- Strop frequently — A leather strop (or even a piece of cardboard loaded with honing compound) realigns the microscopic edge between sharpenings. A few passes on a strop can keep a blade sharp for much longer between full sharpening sessions.
- Sharpen at the first sign of dullness — Do not wait until a tool is completely dull. A few passes on a fine stone is all it takes to restore a slightly dulled edge. Waiting means starting over from coarser grits.
- Protect edges during storage — Use blade guards and never let cutting edges contact other metal tools.